

Connecting Google Login
To let users of your service sign up with a Google account, you register your service with Google and receive a Client ID and a Client secret.
This page covers the order in which you receive the Client ID and the Client secret. Putting the two values into WEEGLOO is in Putting the Client ID and the Client secret into WEEGLOO, and showing your service name and logo on the consent screen is in Showing your service name and logo on the consent screen.
Getting the Client ID and the Client secret from Google
You do the four steps below in the Google Cloud Console. You have to be signed in with your Google account. What you do here costs nothing.
If you use more than one Google account, a link may open under an account you did not intend. Click the profile picture at the top right of the screen to check which account it is, and switch accounts if it is not the one you intended.
Creating a project
If you already have a project you have been using, you can use that project as it is instead of creating a new one. In that case, skip this step and go on to Configuring the consent screen.
-
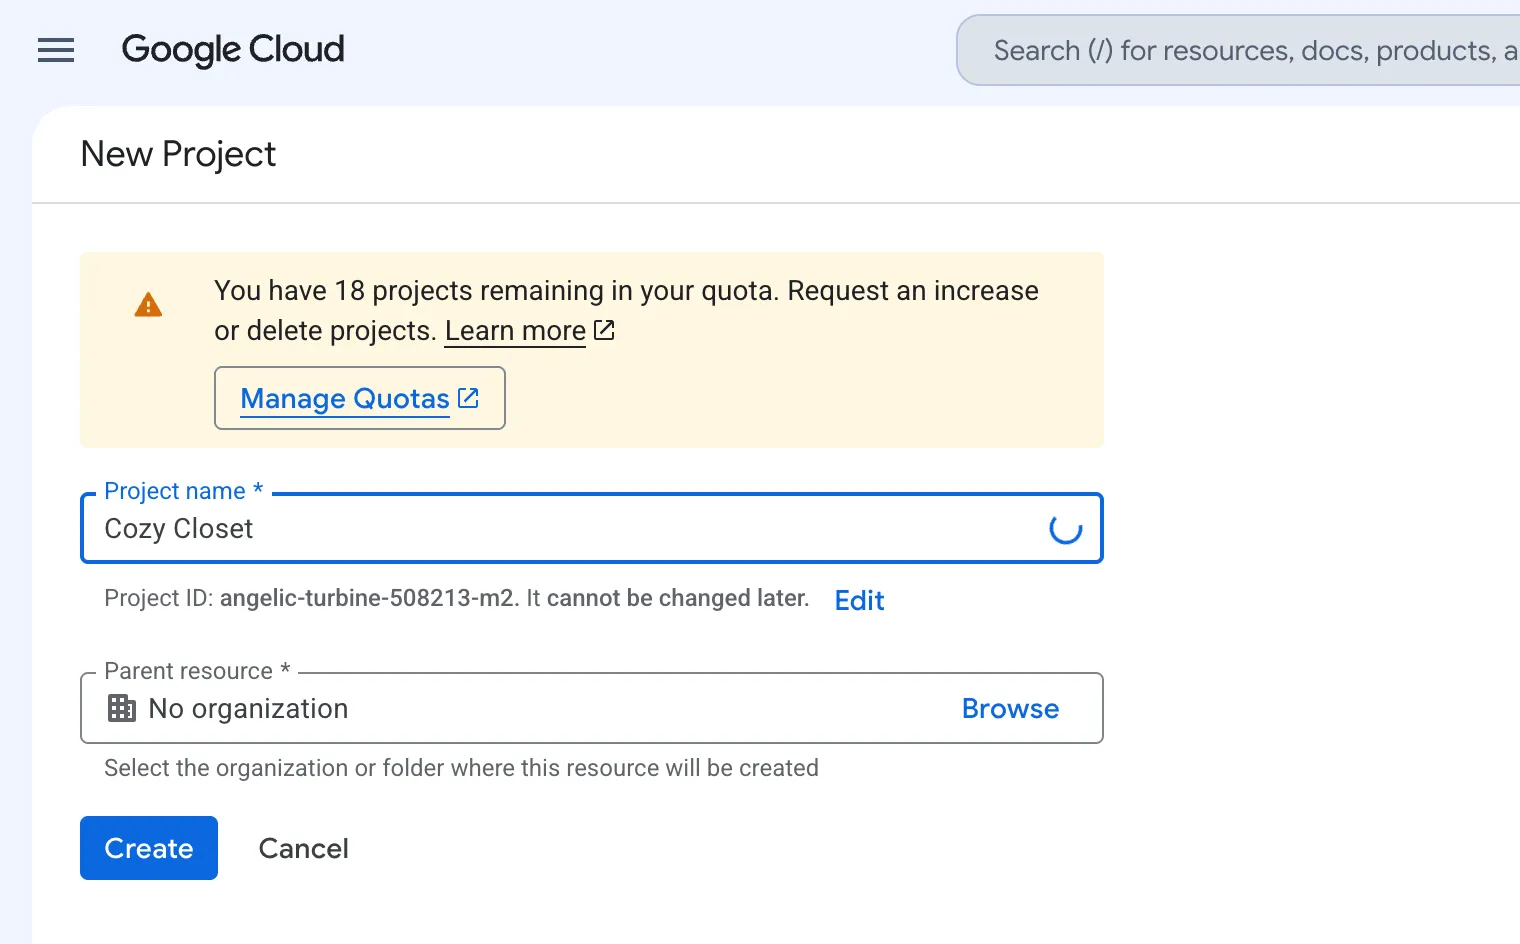
Open the new project screen (https://console.cloud.google.com/projectcreate (opens in a new tab)).
-
In Project name, enter a name you will recognize later (for example,
Cozy Closet). -
Click Create.
-
Check that the project name at the top of the console is the one you just created.
Configuring the consent screen
When a user logs in with a Google account, a Google screen asking whether it is all right to log in to this service appears first. Here you decide what name appears on that screen and where inquiries are received. You do this only once for each project.
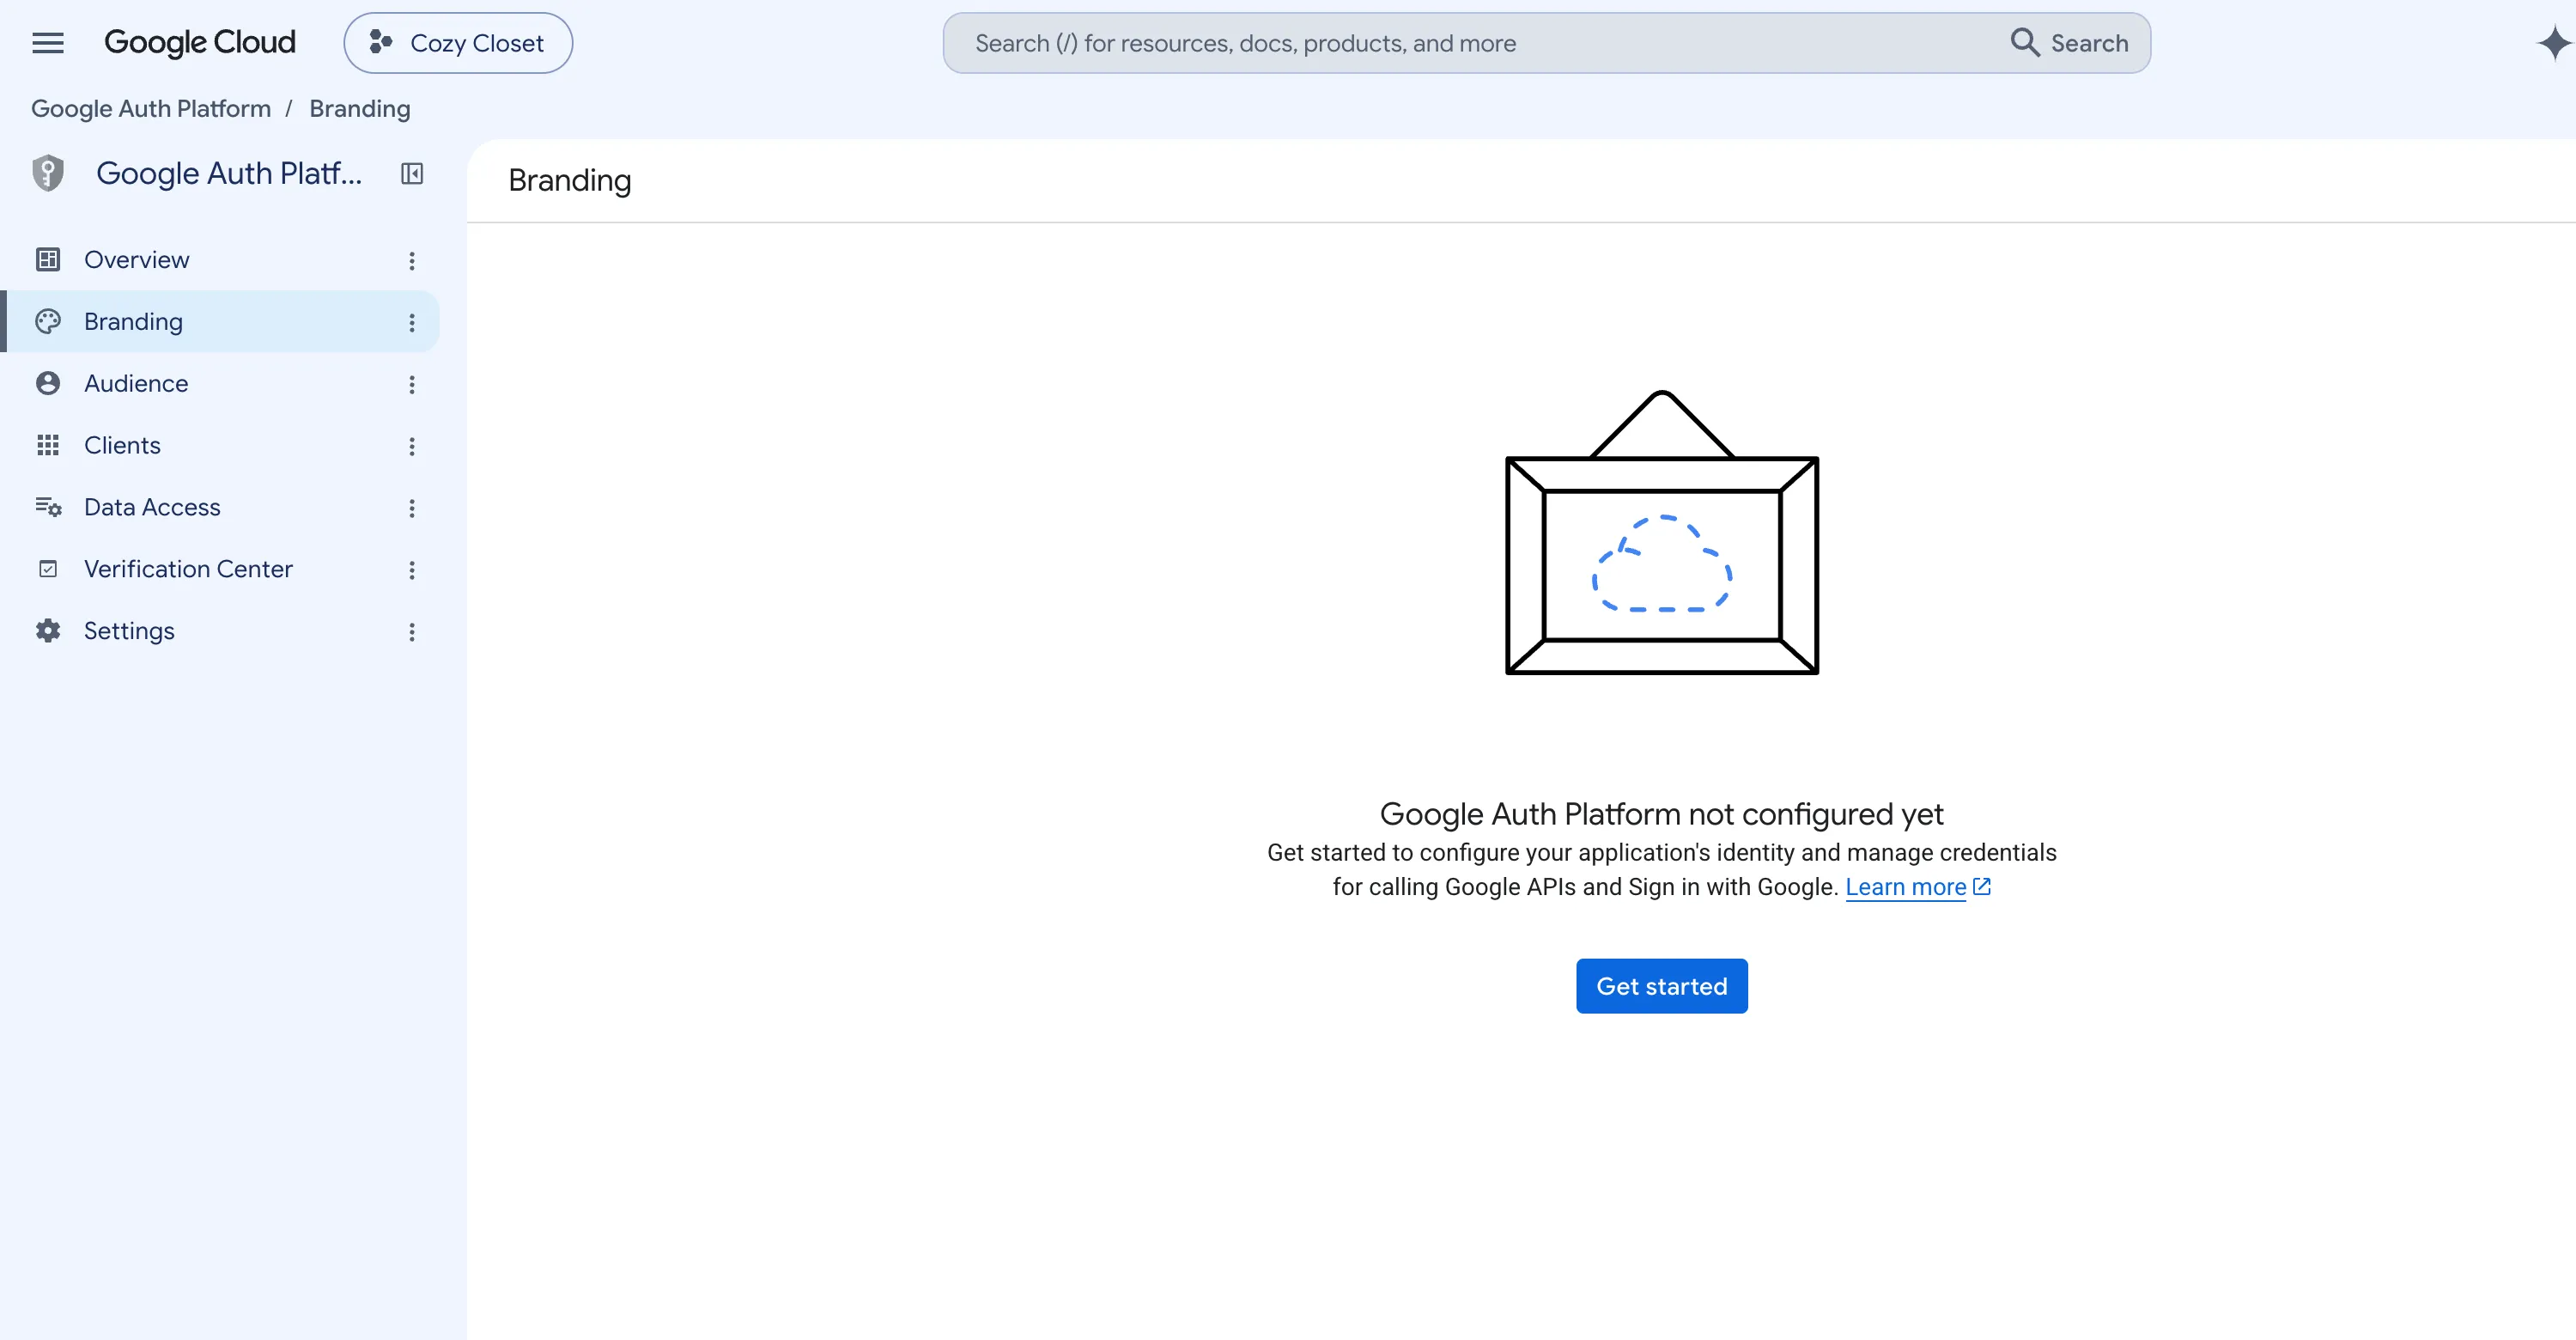
If you have already configured this in this project, what you configured appears instead of the Get started button. In that case, skip this step and go on to Creating an OAuth client.
-
Open the Branding screen of Google Auth Platform (https://console.cloud.google.com/auth/branding (opens in a new tab)).
-
Click Get started.
-
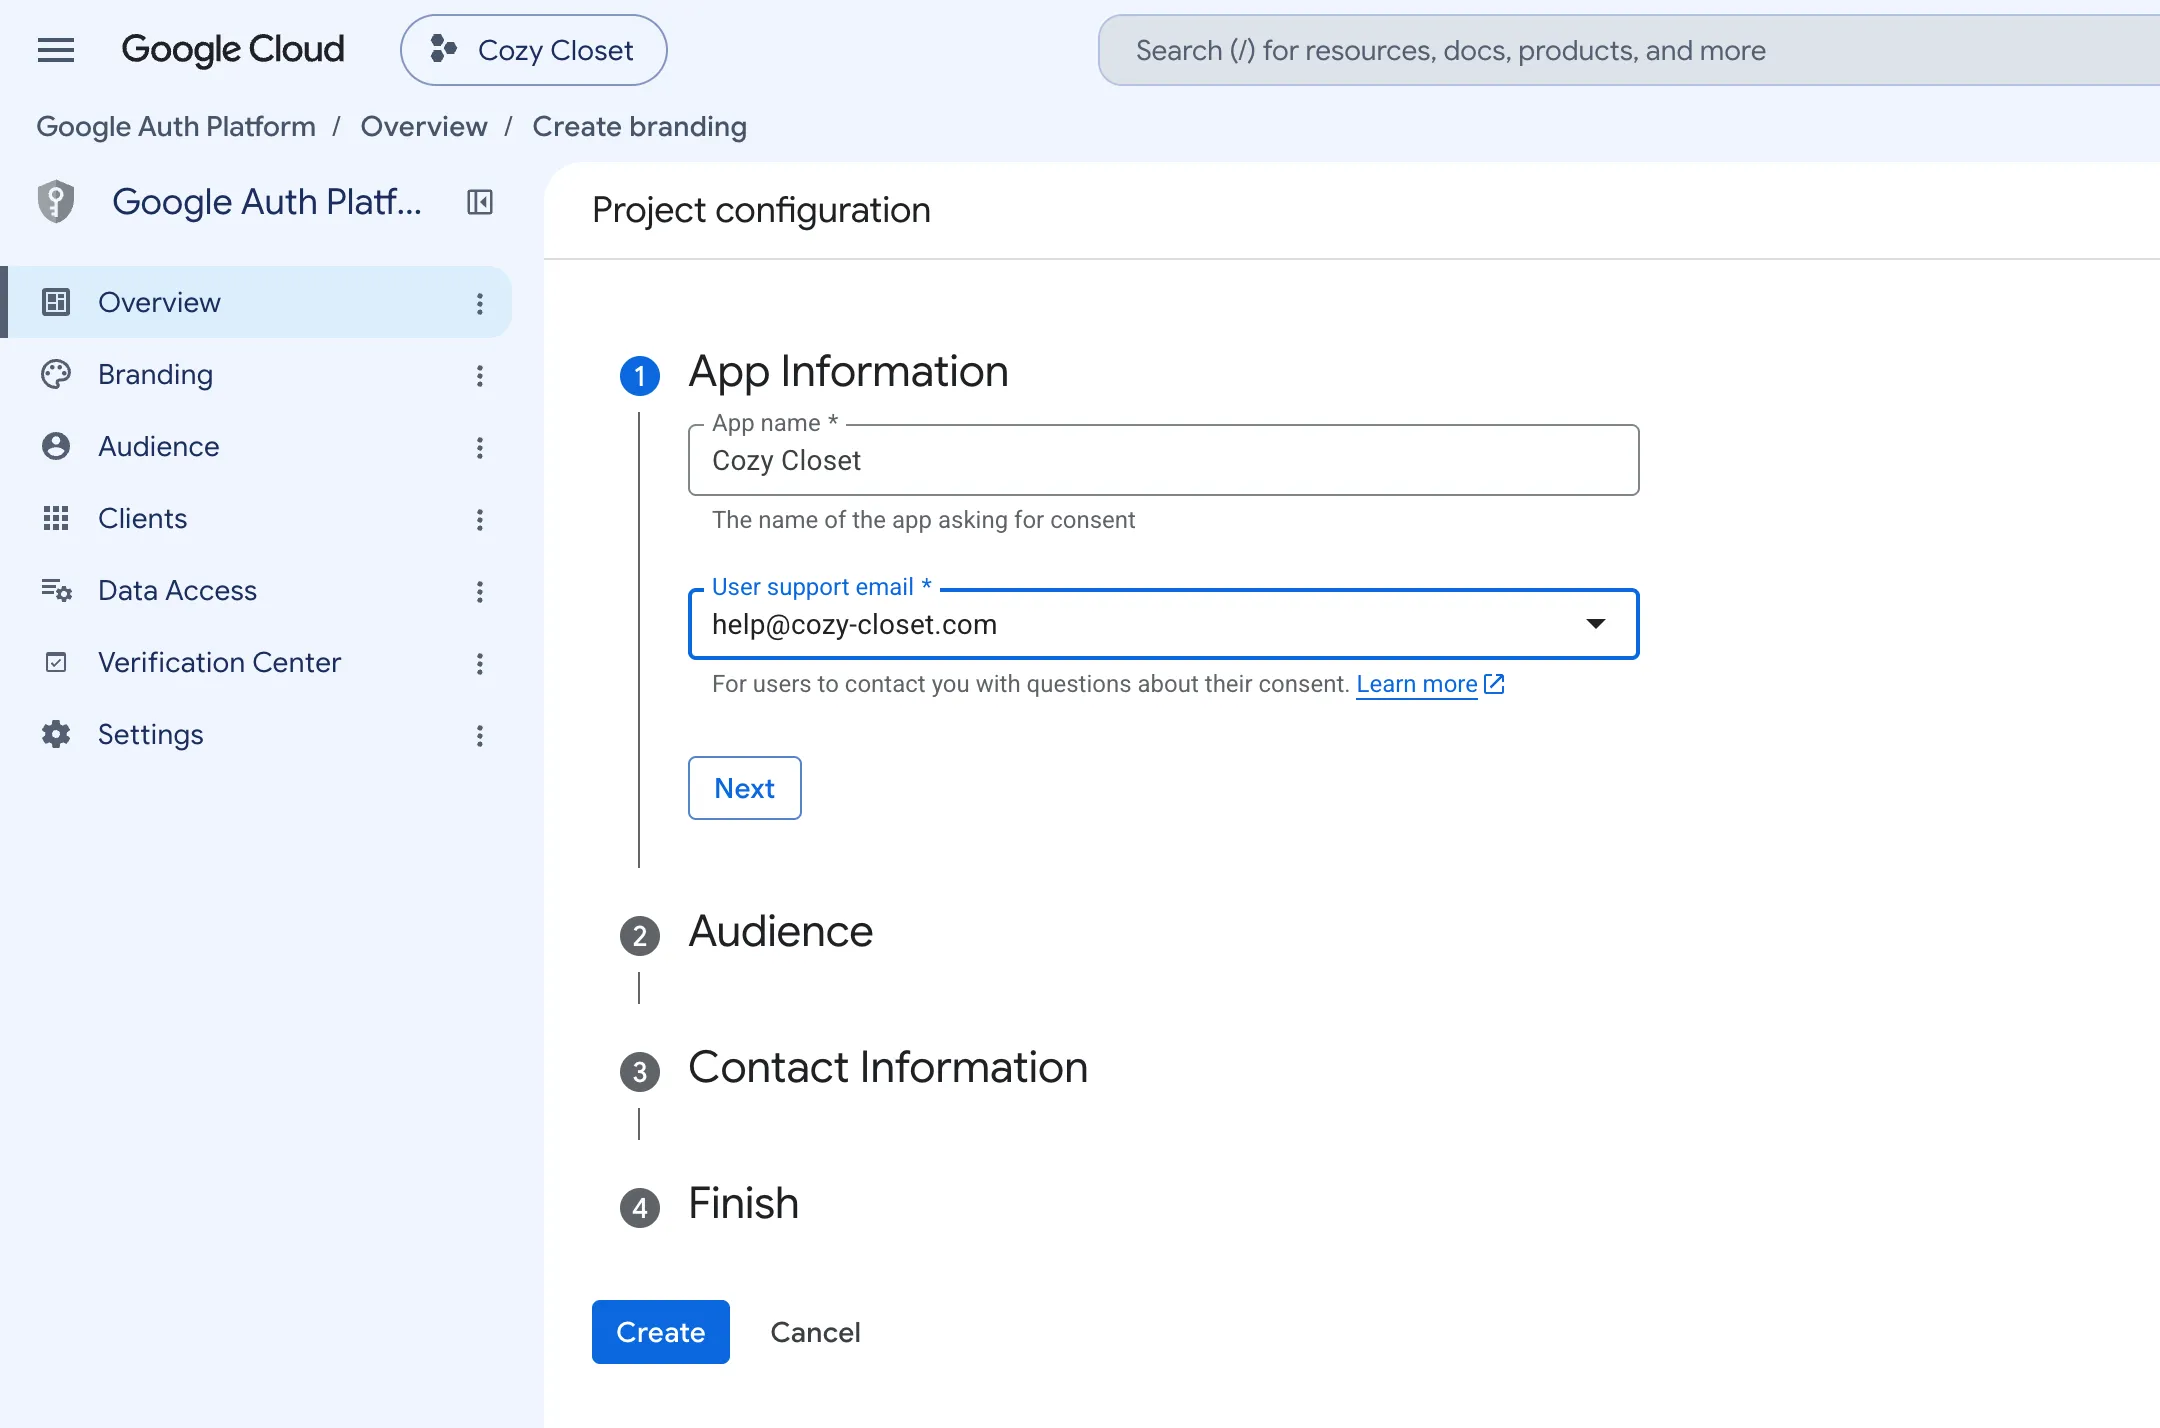
In App name, enter the name users will see (for example,
Cozy Closet). -
In User support email, choose the address that will receive inquiries.
-
Click Next.
-
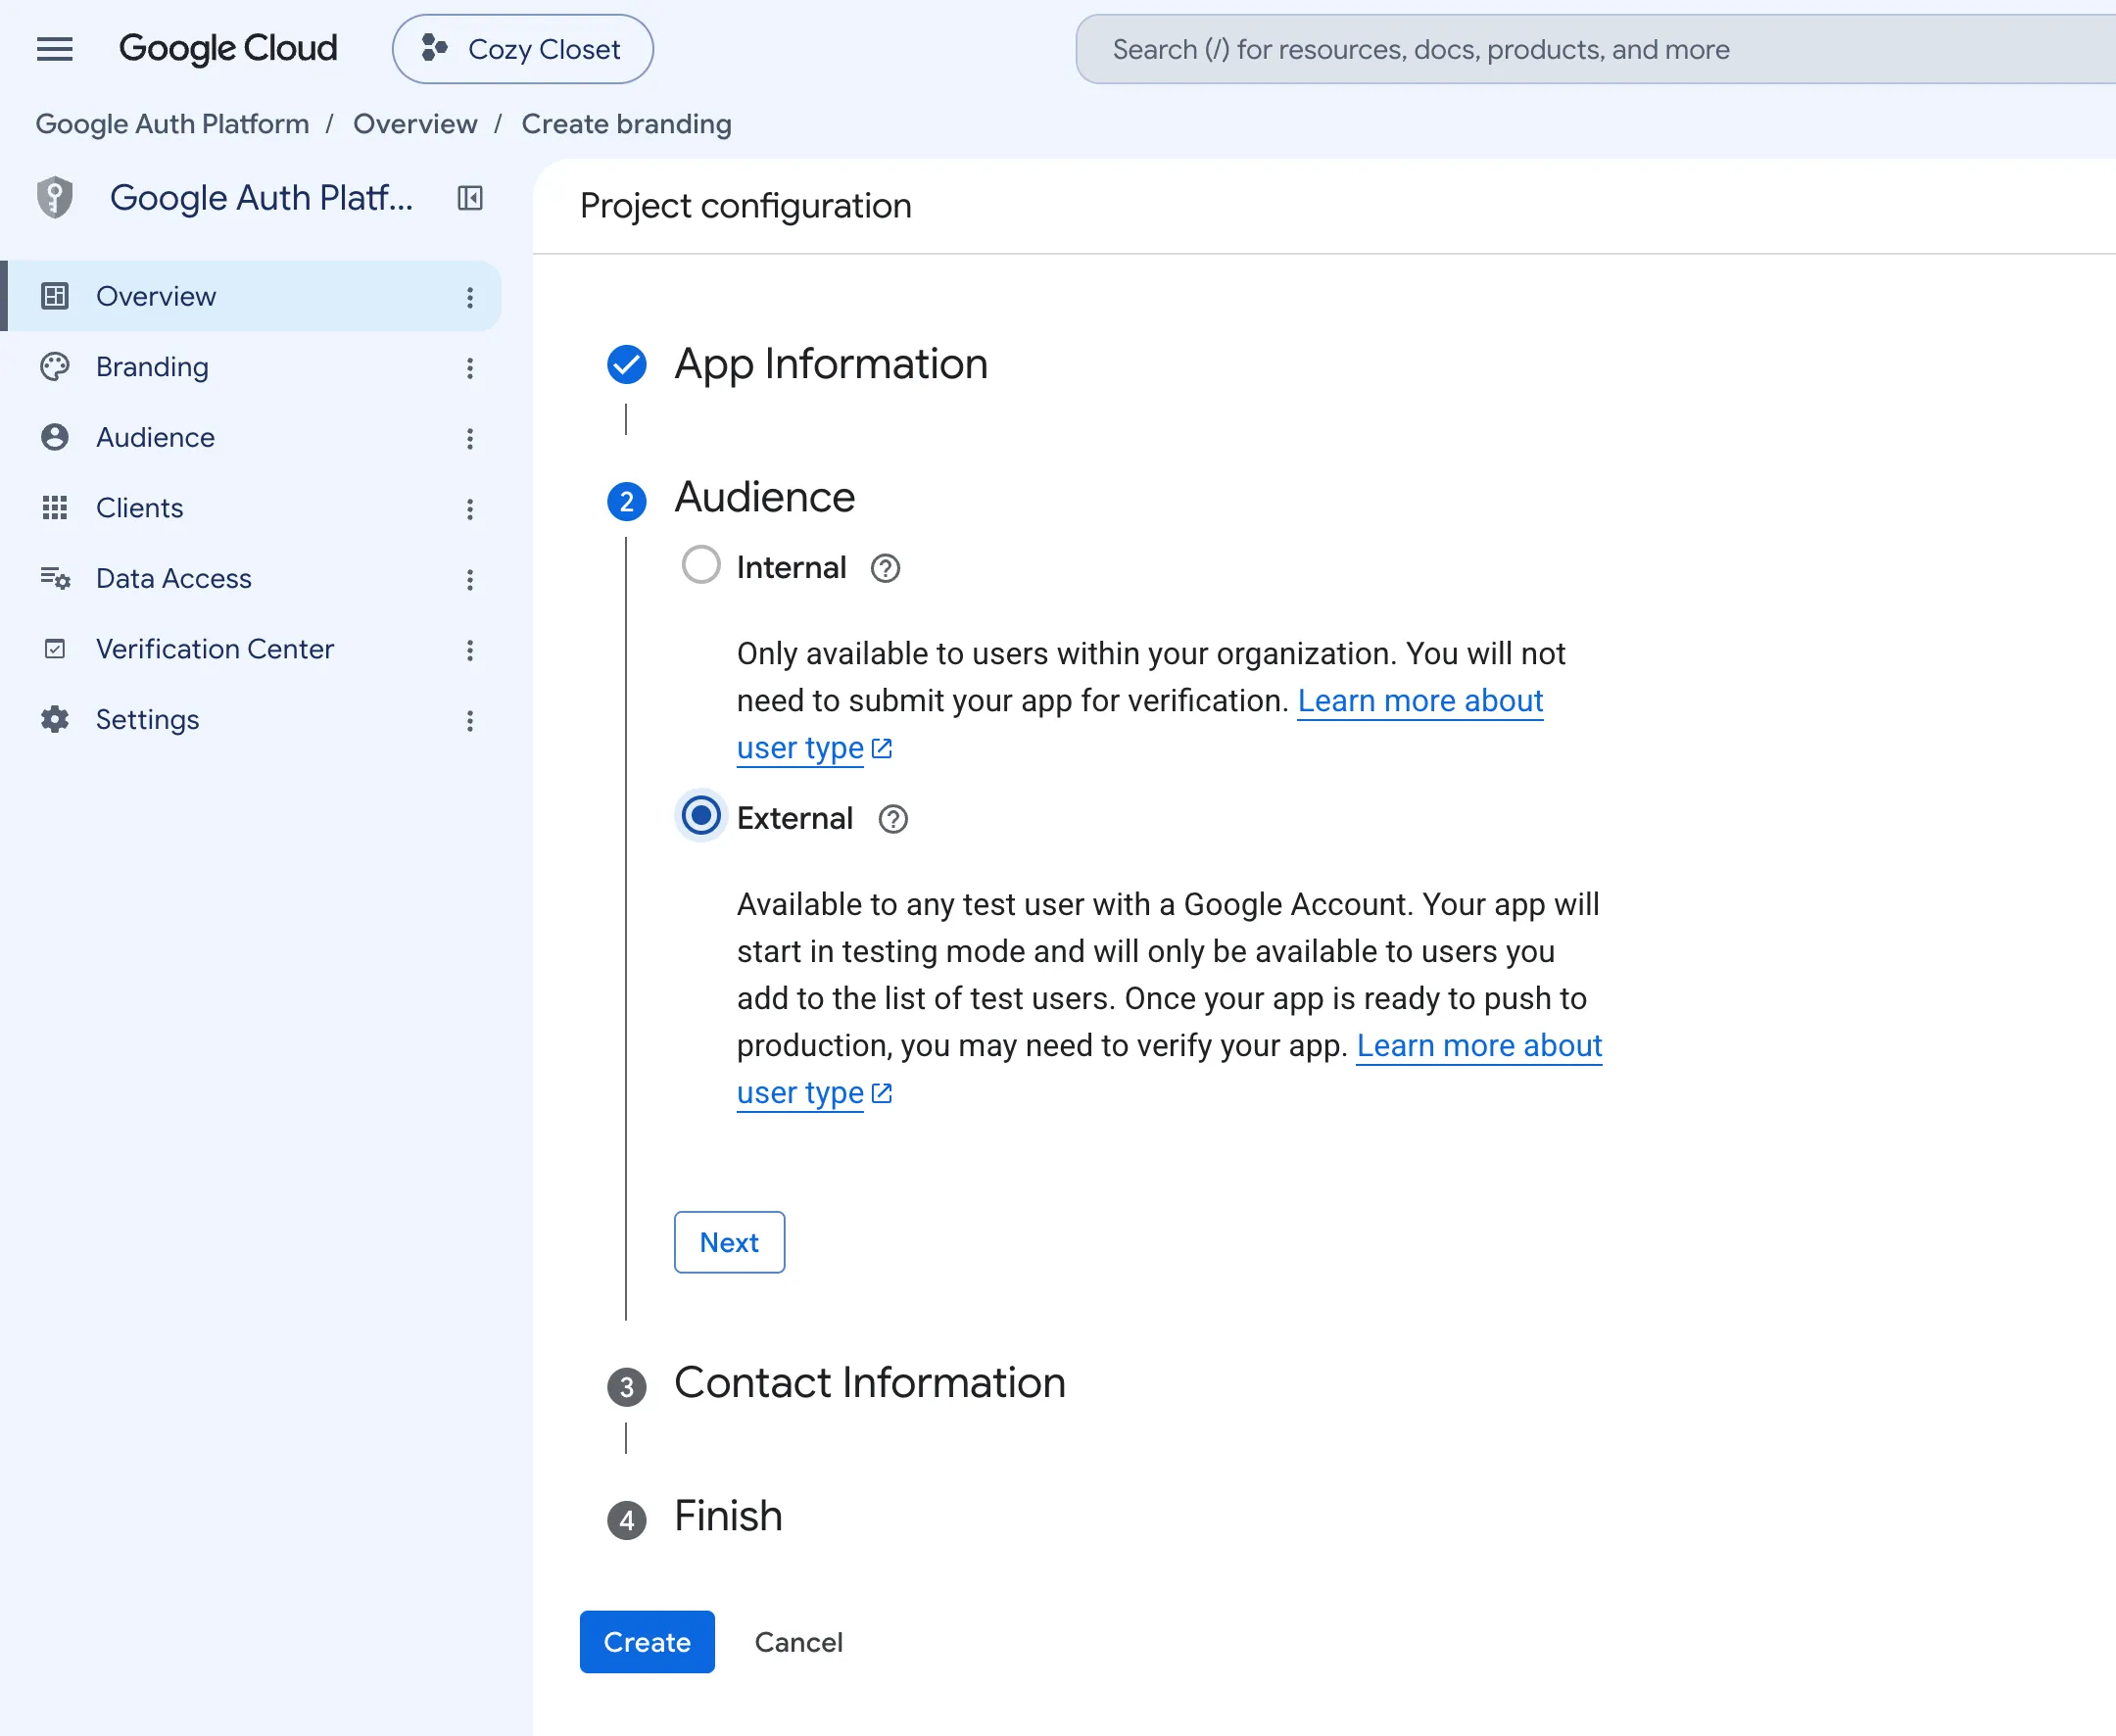
In Audience, choose External.
-
Click Next.
-
In Contact Information, enter an email address.
-
In the Finish step, check the box agreeing to Google's user data policy.
-
Click Create.
Internal can be used only by accounts in the same organization. To let users outside your organization log in, choose External.
Creating an OAuth client
On the client you create here, you register the address the login result returns to.
-
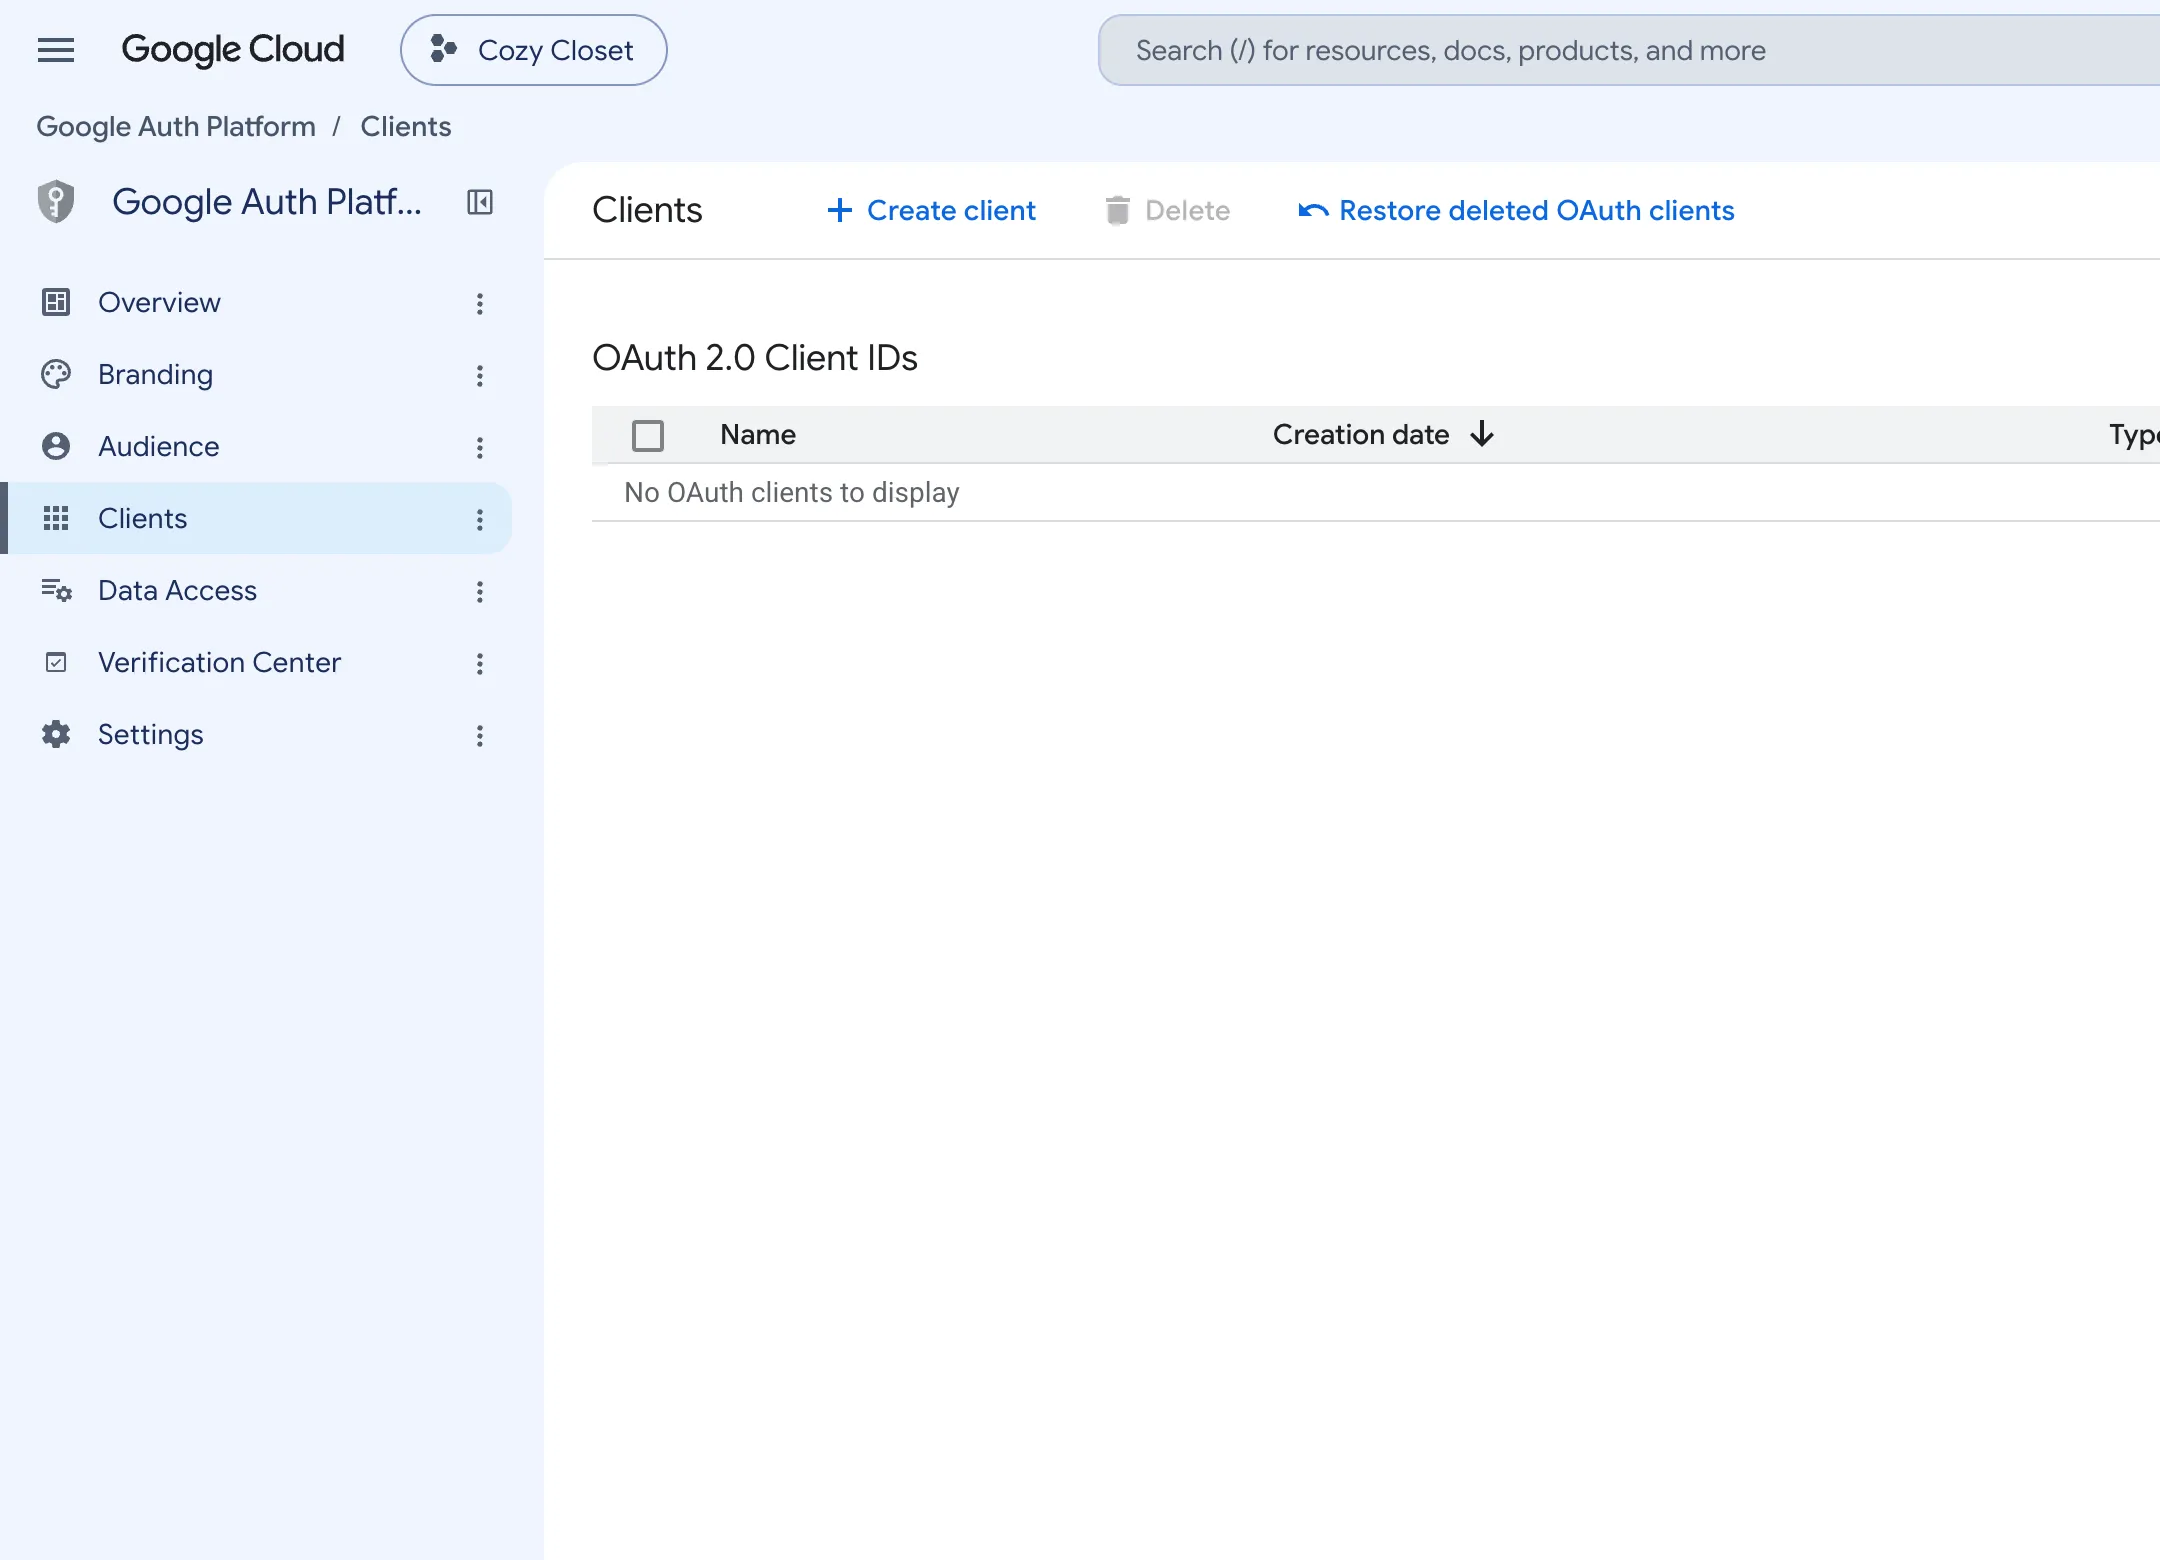
Open the Clients screen of Google Auth Platform (https://console.cloud.google.com/auth/clients (opens in a new tab)).
-
Click Create client.
-
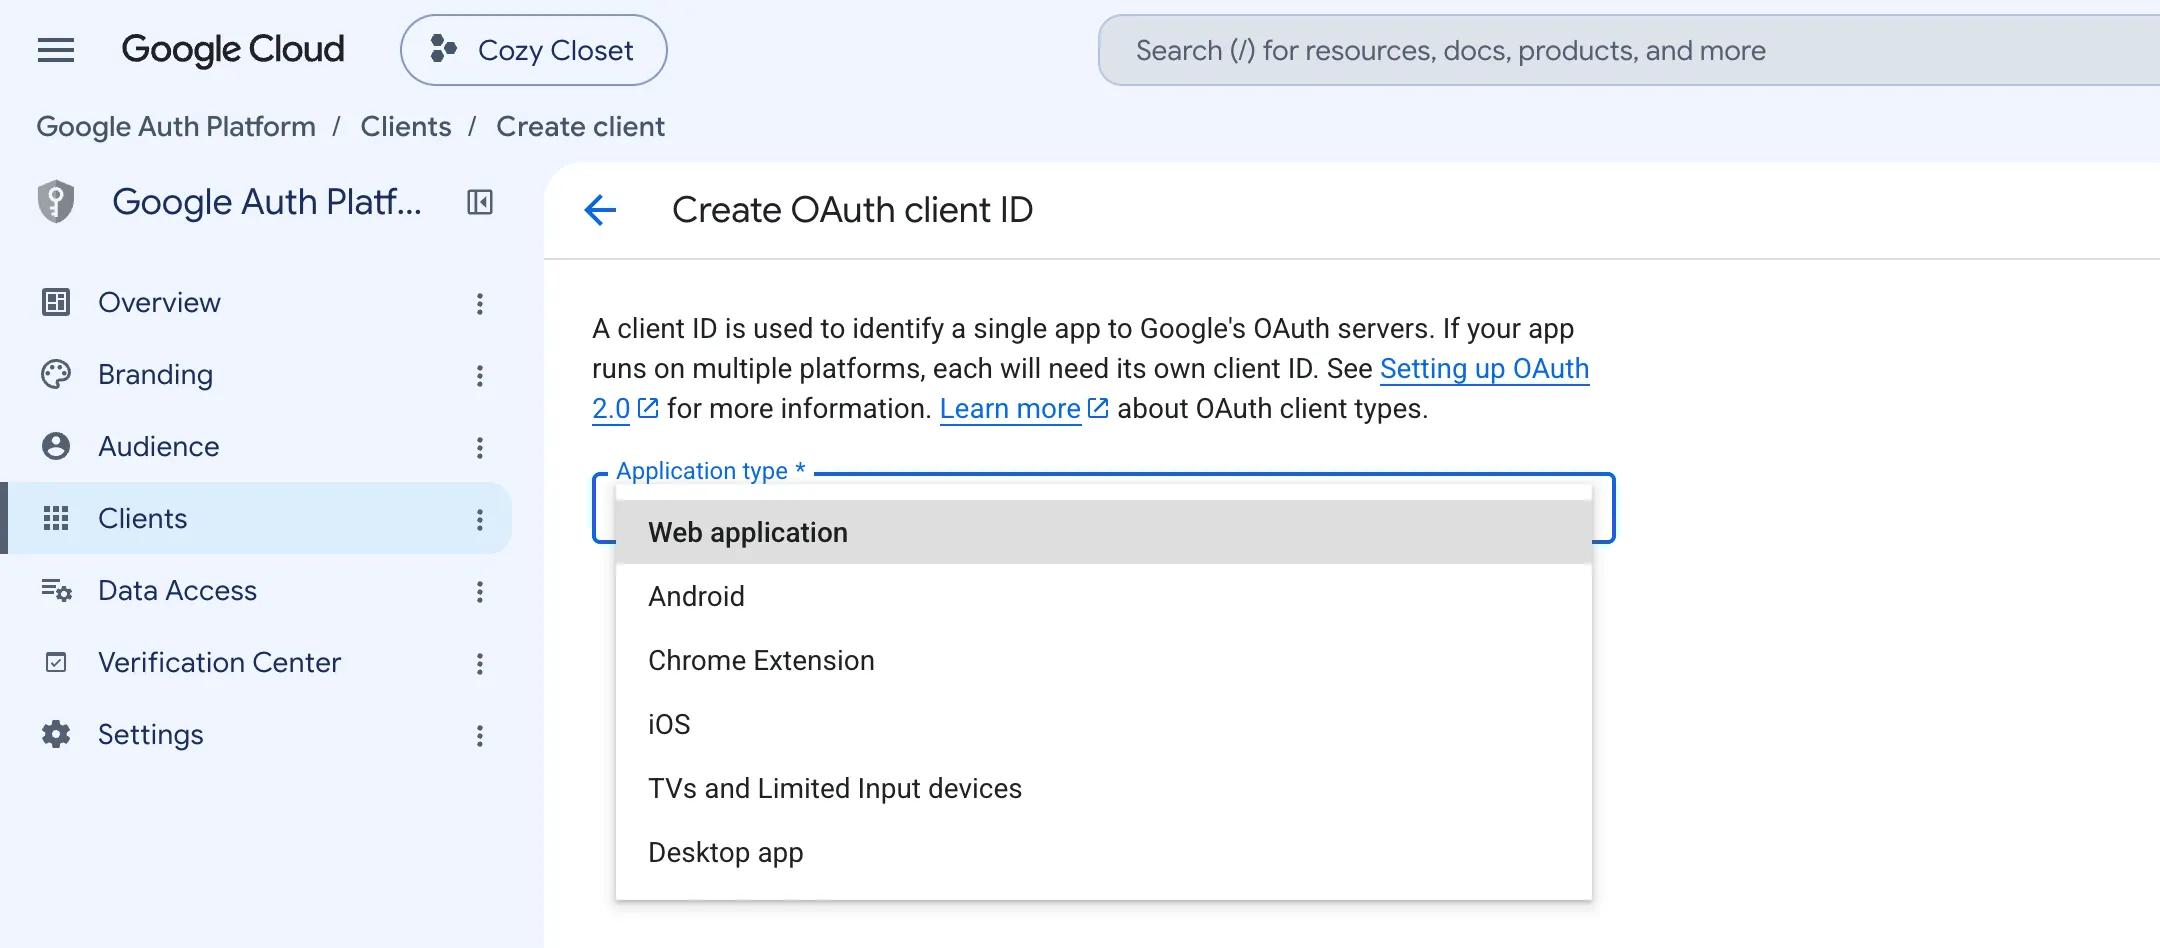
In Application type, choose Web application.
-
In Name, enter a name you will recognize this client by (for example,
Cozy Closet). -
Leave Authorized JavaScript origins empty.
-
Click Add URI under Authorized redirect URIs.
-
In the box that appears, paste the address below. Pick your Space and the identifier is filled in.
Spacehttps://auth.weegloo.com/v1/spaces/{spaceId}/login/oauth2/code/googleIf you are not sure which Space is yours and you have handed the integration to an AI agent, you can also ask the agent. Ask in the chat, "Tell me the redirect address to register with Google Login", and you receive the finished address.
-
Click Create.
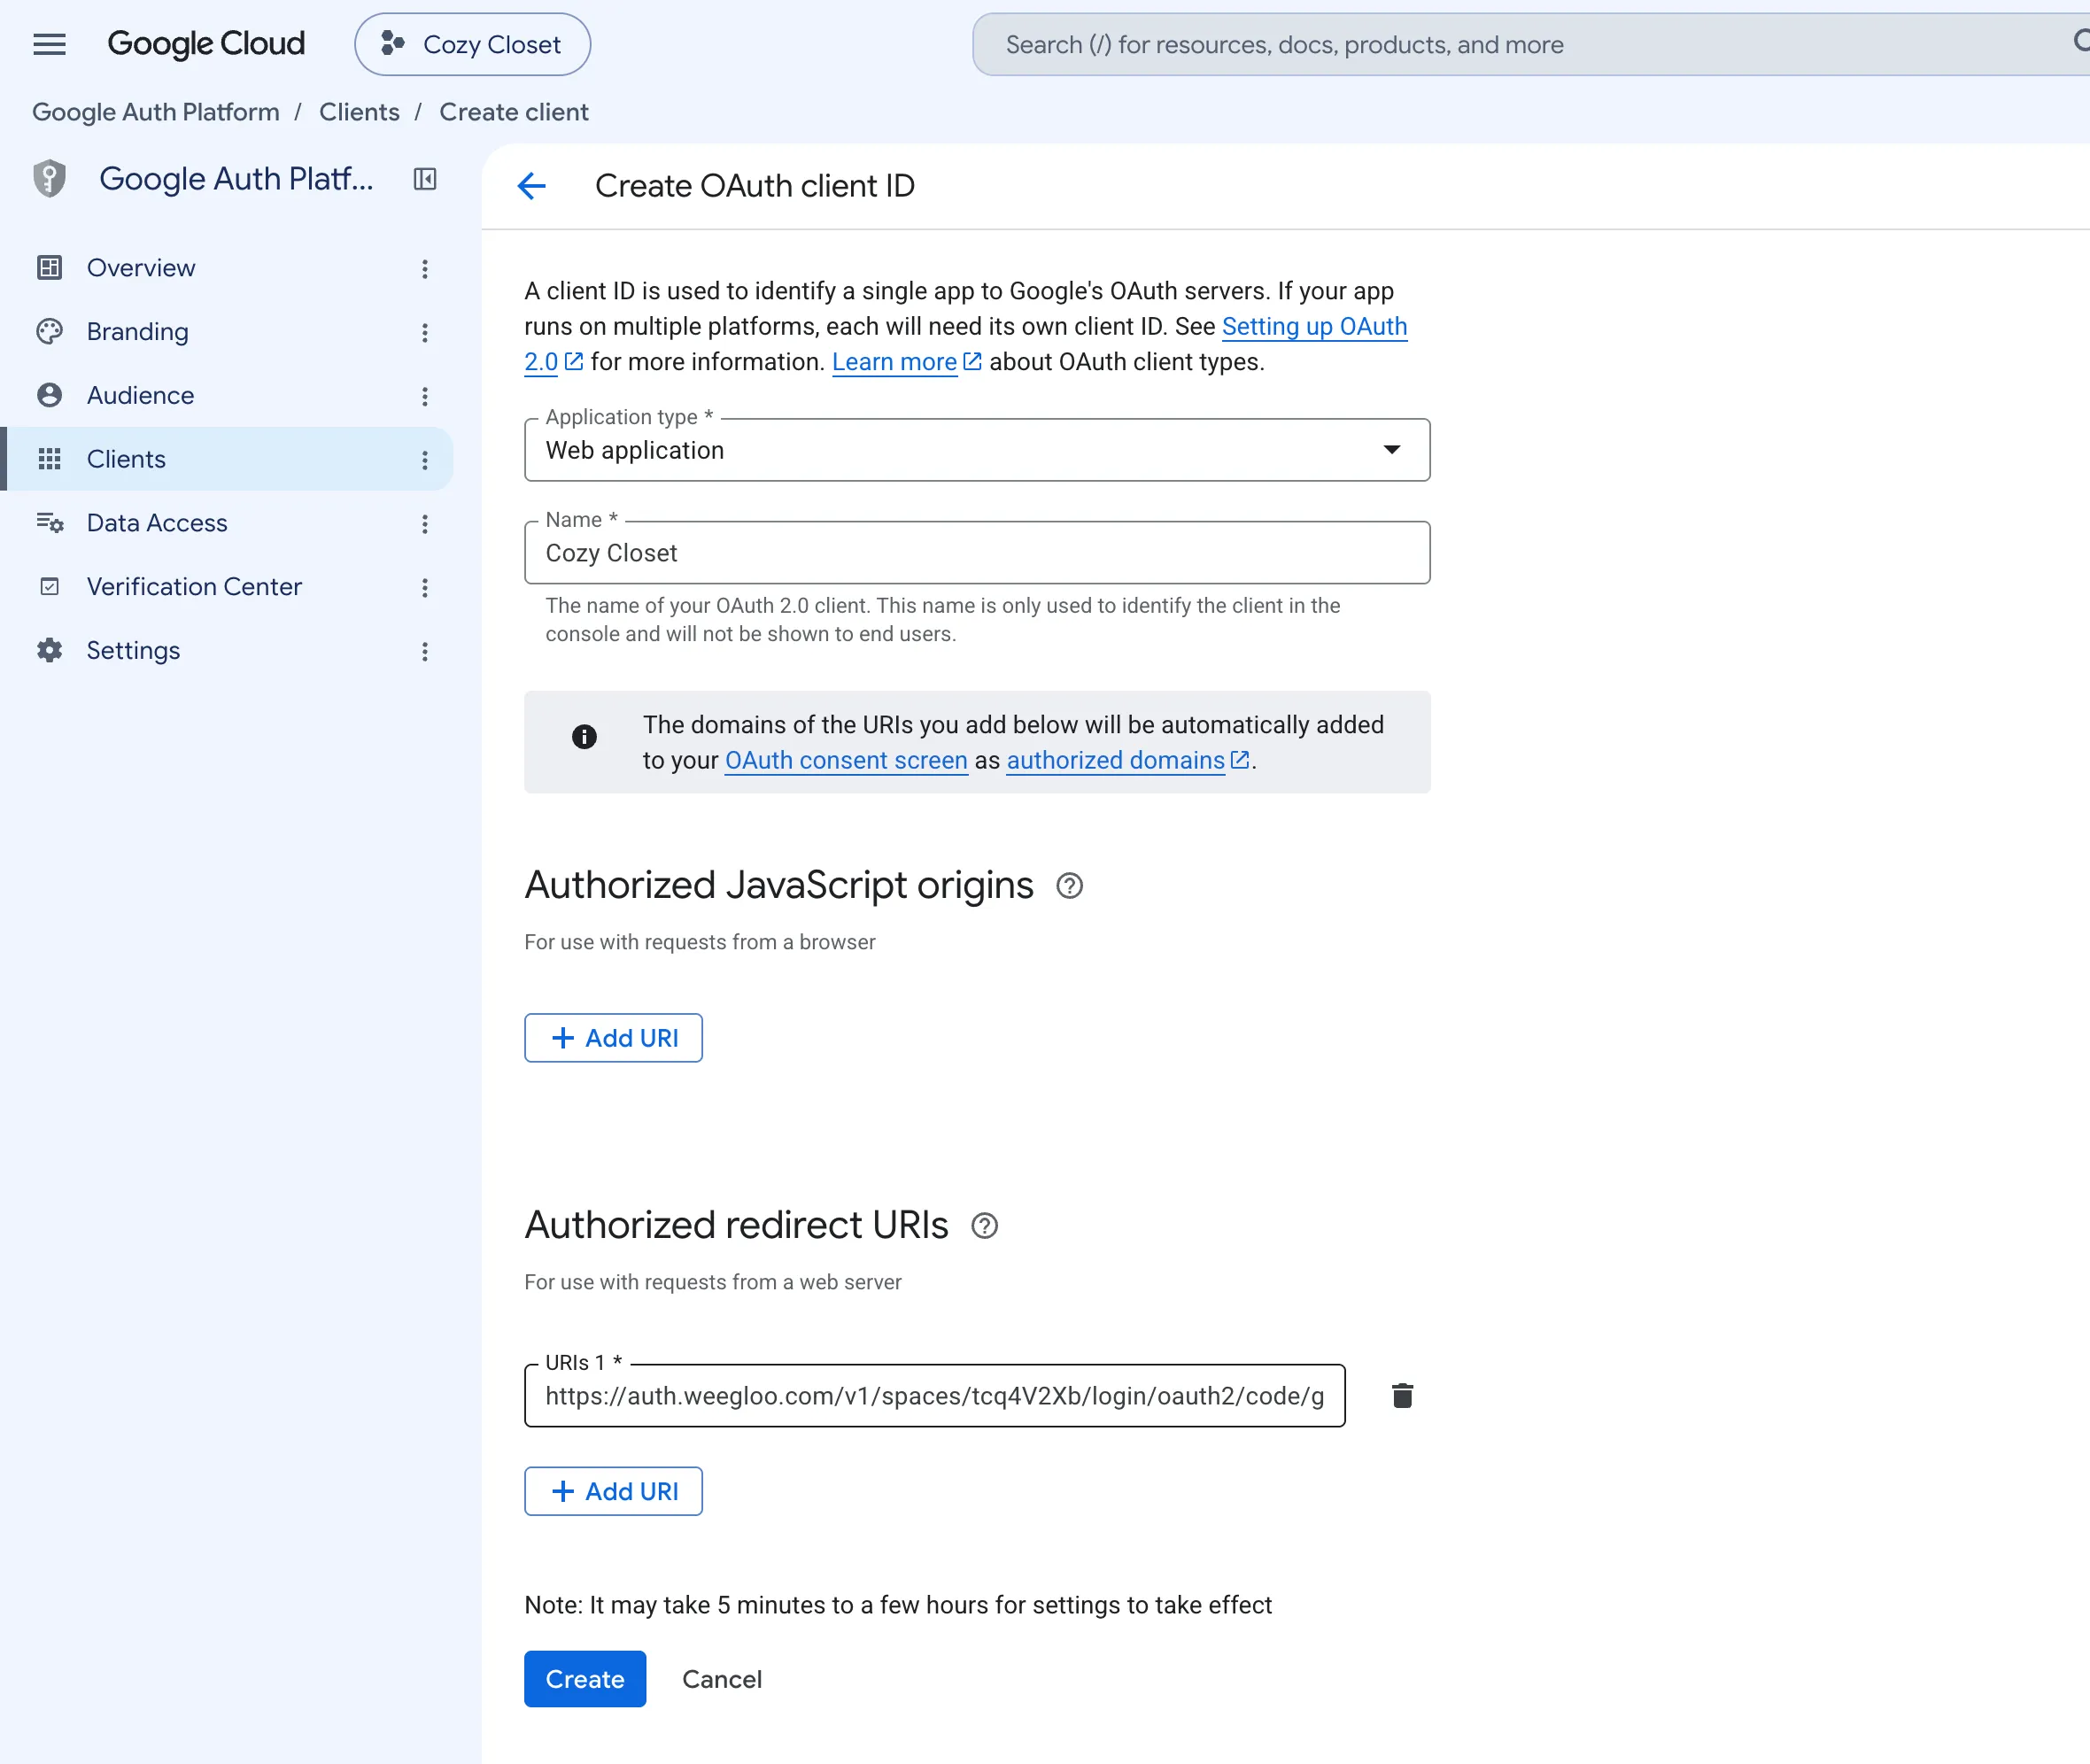
The list also holds types such as Android and iOS, but you choose Web application even when you are adding login to a mobile app. That is because the login result returns to WEEGLOO's web address, not to your app. Name is used to tell clients apart on the Google screens, and users do not see it.
The address you register may not take effect right away
Below the form is Google's notice reading "Note: It may take 5 minutes to a few hours for settings to take effect". Right after you register the address, it may not have taken effect yet and login can be blocked. In that case, leave it some time and try again.
Copying the Client ID and the Client secret
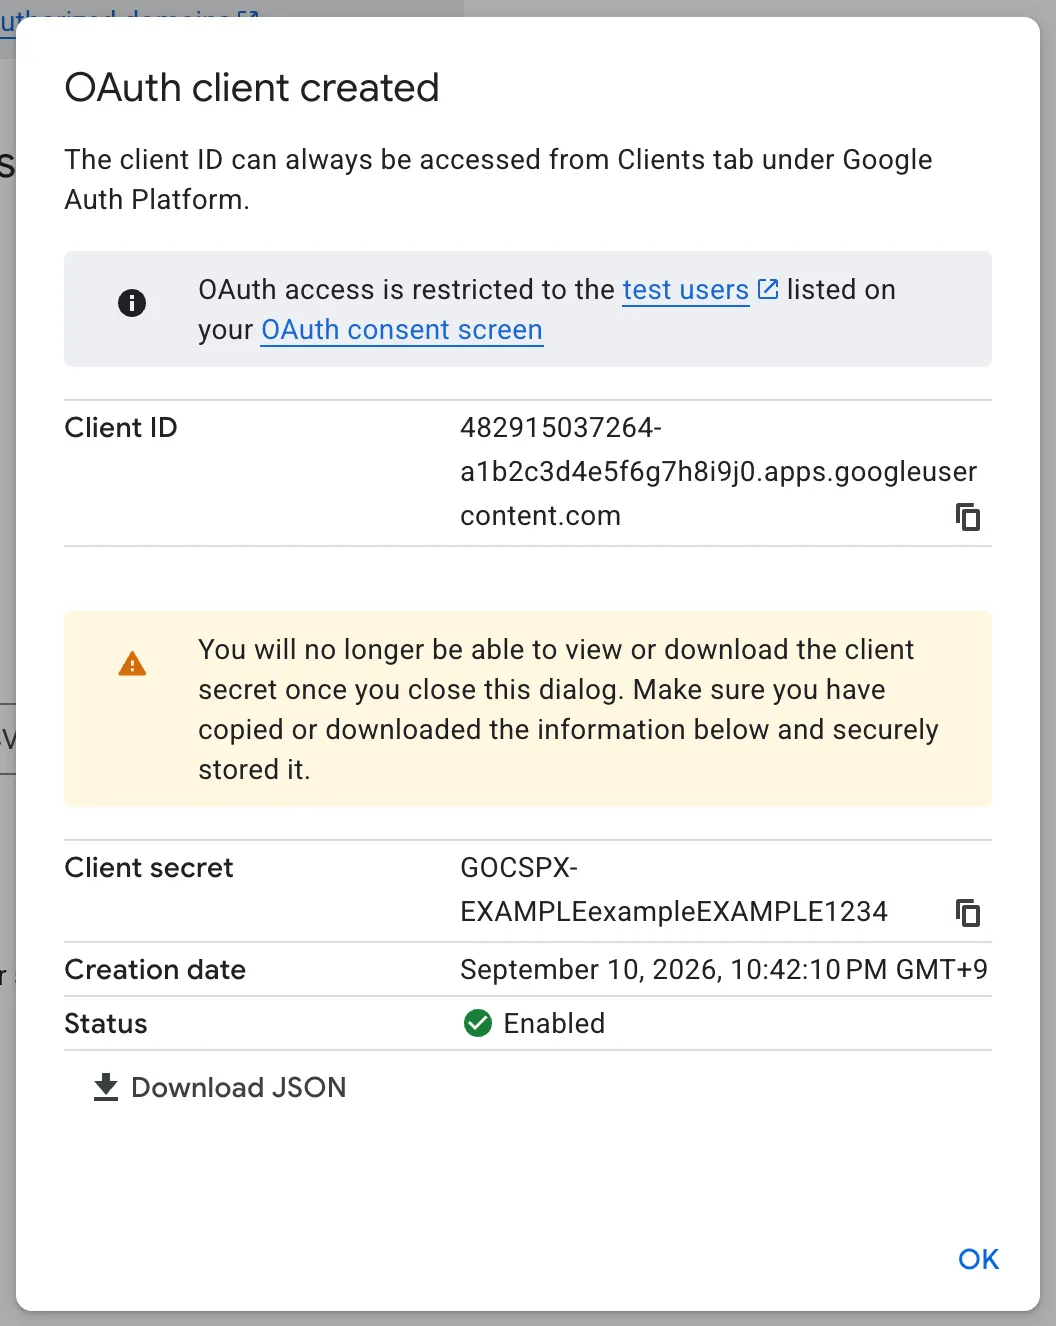
When you click Create, the OAuth client created window appears. The Client ID and the Client secret written here are what you put into WEEGLOO.
Once you close the window you cannot view the Client secret again
This window carries a warning reading "You will no longer be able to view or download the client secret once you close this dialog". Copy the Client ID and the Client secret before you close the window. If you want the values as a file, you can click Download JSON.
-
Click the copy icon to the right of Client ID to copy the value.
-
Click the copy icon to the right of Client secret to copy the value.
-
Once you have saved both the Client ID and the Client secret somewhere, click OK.
Here is which box in the content studio the Client ID and the Client secret go into.
| Google screen | Content studio |
|---|---|
| Client ID | Client ID |
| Client secret | Client Secret |
The Client secret is a password, exactly as the name says. Do not tell it to anyone, and do not write it down anywhere public.
Putting the Client ID and the Client secret into WEEGLOO
Now the Client ID and the Client secret are ready. From here the path splits depending on how you have been working so far.
If you were configuring this directly in the content studio, follow these steps.
- Go back to turning on social login in Service Member Login.
- Turn on Google.
- Enter the Client ID in the Client ID box in Step 2.
- Enter the Client secret in the Client Secret box.
- Click Save.
If you handed the integration to an AI agent and were told to go and get the Client ID and the Client secret, paste the two values you received into the chat as they are and carry on with what you were doing. The agent handles the rest of the configuration from there.
Showing your service name and logo on the consent screen
On the consent screen that appears when a user logs in with a Google account, WEEGLOO's domain is shown at first instead of your service name. Users have a hard time telling which service they are signing up for, and a hard time telling it apart from a fake site dressed up to look similar. When your service name and logo are shown, users can sign up with confidence.
Login works in this state too, so this is not required. It is worth doing before you actually open your service. The name and the logo are shown once you pass Google's brand verification (opens in a new tab).
Preparing a homepage and a privacy policy
Google uses your homepage to check that the name to be shown on the consent screen is the name of a real service. Prepare a homepage and a privacy policy on your site.
If you handed the integration to an AI agent, ask, "Create the homepage and the privacy policy that Google brand verification needs".
- Homepage: a page that opens without login, explains the service, and links to the privacy policy. You put the login button on a different page.
- Privacy policy: a page under the same address as the homepage that states how you use and store the information you receive from the Google account.
Terms of service are optional.
Getting your site verified in Search Console
You prove that the homepage is yours with Google Search Console.
If you handed the integration to an AI agent, upload the file you download in step 5 below to the chat and ask, "Put this file into the site and deploy it again". The agent handles step 6.
-
Open Search Console (https://search.google.com/search-console (opens in a new tab)). The account has to be an owner or an editor of the Google Cloud project.
-
Click Add website. If you already have a site registered, click Add property in the property selector at the top left, then click Add website.
-
In the URL prefix box of the Select property type window, enter your homepage address (for example,
https://cozy-closet.weegloo.app/). -
Click Continue on the URL prefix side.
-
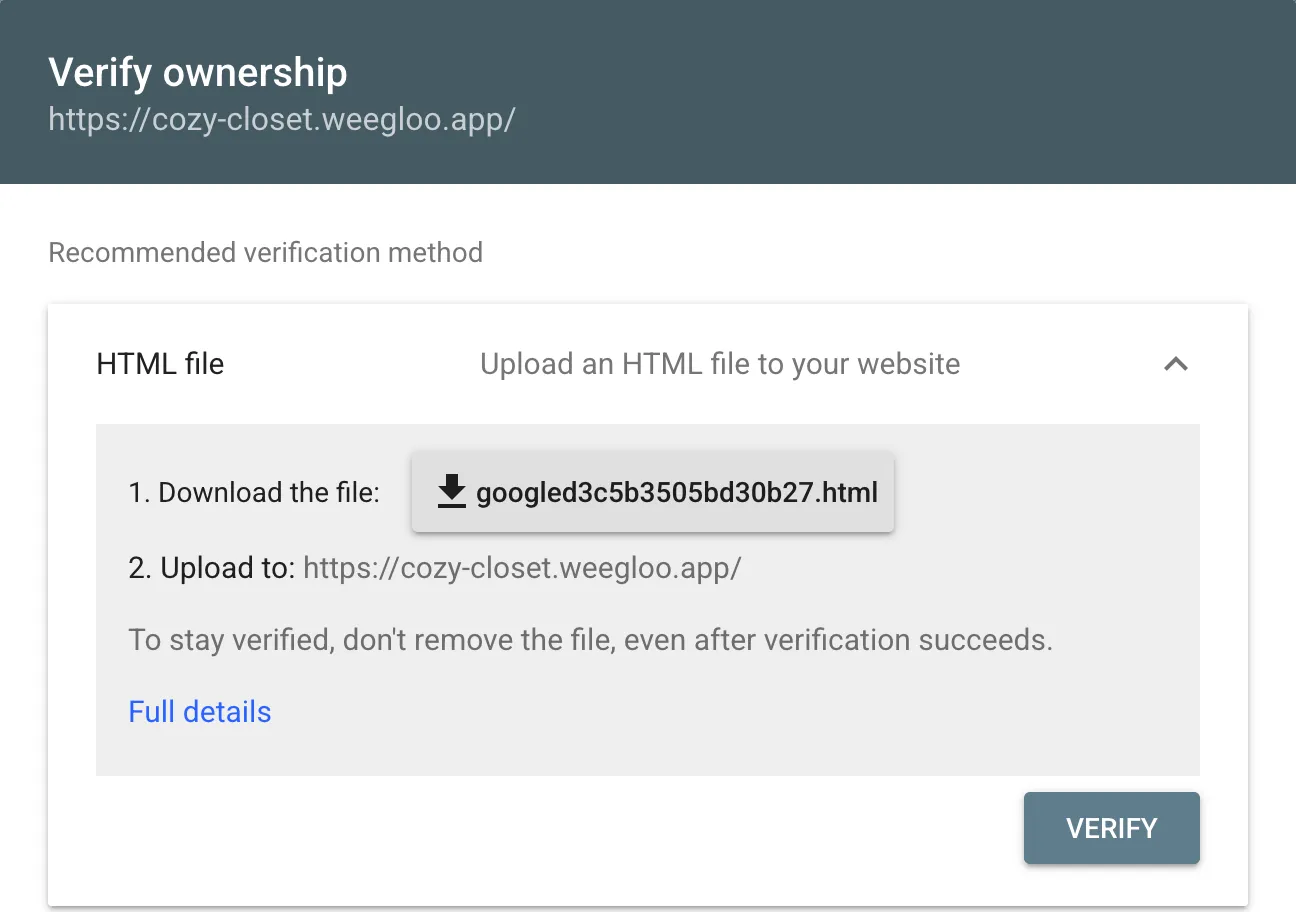
In HTML file of the Verify ownership window, click the button with the file name on it to download the file. Leave this window open.
-
Put the file you downloaded into the top folder of your site under the same name and deploy again (Uploading again after changing the site).
-
Go back to the Verify ownership window and click Verify.
This step is done when Ownership verified appears.
Do not delete the verification file
Search Console periodically checks again that this file is still there. Include it whenever you upload the site again.
Filling in the branding information
You tell Google about the pages you prepared, the name to display, and the logo.
-
Open the Branding screen of Google Auth Platform (https://console.cloud.google.com/auth/branding (opens in a new tab)).
-
In App name, enter exactly the same service name you wrote on the homepage. You cannot put the name of a Google product in it.
-
In App logo, upload a logo that belongs to your own service. If you use another brand's logo, it does not pass verification. The file is a JPG, PNG, or BMP of 1MB or less, and a 120×120px square looks best.
-
In Application home page and Application privacy policy link, put the addresses of the homepage and the privacy policy. If you have terms, put that address in Application terms of service link too.
-
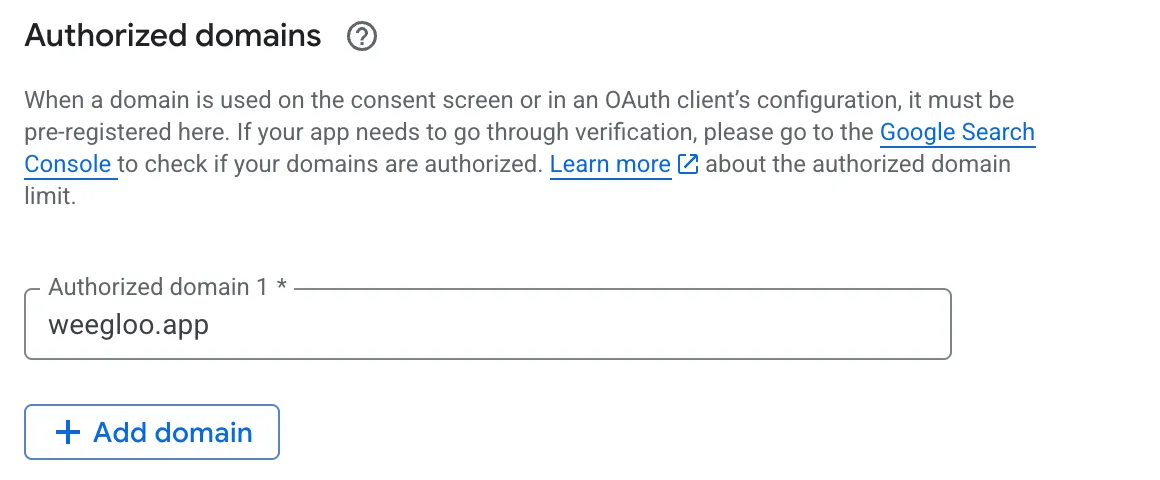
In Authorized domains, put
weegloo.app.- If there is no entry, click Add domain and enter it.
- If there is an existing entry, change the value in that box to
weegloo.app. An existing entry may not be deletable. In that case, changing the value is enough.
-
Click Save.
Requesting verification and publishing
You can request brand verification only after you publish the app. In the testing state the verification button is not shown.
- On the Audience screen, click Publish app.
- In the Push to production? window, click Confirm.
- In Verification status on the Branding screen, click Verify branding. Verification takes up to about 5 minutes.
- If there is something to fix, check what it is with View issues. After fixing it, choose I have fixed the issues and request again.
- Once it passes, click Publish branding within 7 days.
Once you publish, your service name and logo are shown on the consent screen.
What to do next
- Service Member Login: put the values you received into the content studio and finish the rest of the member login configuration.
- Member Roles and Permissions: create the ServiceUserRole that decides what a signed-up member can see and use.
- Auth API: covers technical specifications such as the request format you need when wiring login into your own site's code.