

Get started
WEEGLOO is a platform that turns the screens you create into a real service. Without having to learn how to use a content studio or any communication format, you just tell the AI agent you already use in plain language, and it takes care of everything needed behind the screen, from members and data to publishing and deployment. Underneath it all is a content management system (CMS) that can handle even large-scale services, so you can put any kind of service on top of it. Connect it, and one line is all it takes.
1. Prerequisites
You need Node.js to run the installation commands below. First, use these commands to check whether it is installed and whether the version is 18 or later.
If Node.js is installed but npx is not, update npm to the latest version with the command below. Updating npm installs npx as well.
If Node.js is not installed, or if the version is too old, install Node.js using the method for your operating system.
If you do not have Homebrew, install it first from brew.sh, or download Node.js directly from nodejs.org.
If winget is not installed or not recognized, download the LTS installer from nodejs.org. After installation, open a new terminal.
Distribution packages may be outdated, so we recommend installing with nvm, which works across many distributions.
To download the installer directly, check nodejs.org.
2. Connect your AI agent
Select the coding tool you use. For a basic install, copy the install command on this page and run it once in your terminal. To choose each install step yourself, open Custom install.
Coding tool
Install MCP and Skills
Copy the install command and run it in your terminal.
Authenticate the MCP connection
Authenticate in the following order.
This step requires the Claude Code CLI (claude). If you do not have it yet, install Claude Code.
-
Run Claude Code in your terminal.
Terminalclaude -
Enter
/mcpto open the MCP server management screen.Terminal/mcp -
Select
weegloofrom the list. It shows aneeds authenticationstatus.TerminalManage MCP servers > weegloo · ∆ needs authentication weegloo-upload · √ connected -
Check that the connection URL is
https://ai.weegloo.com/mcpand select Authenticate.TerminalWeegloo MCP Server Status: ∆ needs authentication URL: https://ai.weegloo.com/mcp > 1. Authenticate 2. Disable -
When you select Authenticate, the WEEGLOO authentication page opens in your browser. Copy your token with the Copy token button below, paste it, and click Connect Server. Once
weegloochanges toconnected, you are done.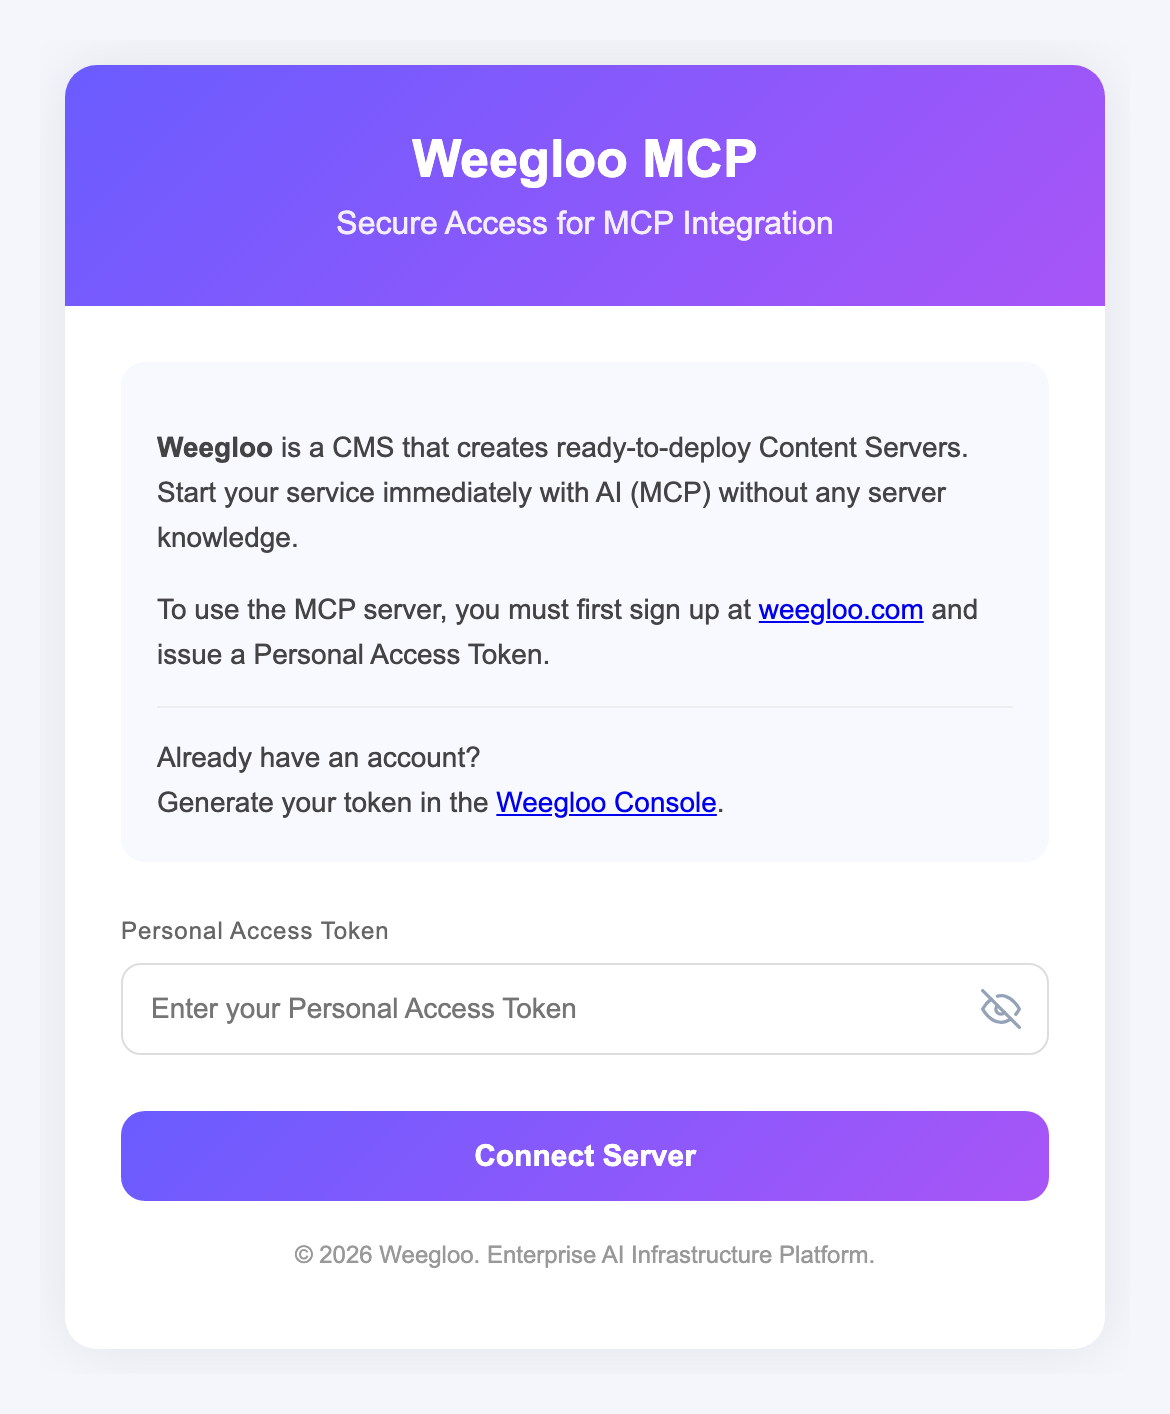
Run npx weegloo interactively and install by choosing each prompted item yourself.
Run the install tool
Run the command below in your terminal and choose each prompted item in turn. Where it asks for the token, copy your token with the Copy token button below and paste it.
Authenticate the MCP connection
Authenticate in the following order.
This step requires the Claude Code CLI (claude). If you do not have it yet, install Claude Code.
-
Run Claude Code in your terminal.
Terminalclaude -
Enter
/mcpto open the MCP server management screen.Terminal/mcp -
Select
weegloofrom the list. It shows aneeds authenticationstatus.TerminalManage MCP servers > weegloo · ∆ needs authentication weegloo-upload · √ connected -
Check that the connection URL is
https://ai.weegloo.com/mcpand select Authenticate.TerminalWeegloo MCP Server Status: ∆ needs authentication URL: https://ai.weegloo.com/mcp > 1. Authenticate 2. Disable -
When you select Authenticate, the WEEGLOO authentication page opens in your browser. Copy your token with the Copy token button below, paste it, and click Connect Server. Once
weegloochanges toconnected, you are done.
Run the install tool
Move to the project folder you want to connect, then run the command below in that folder and choose each prompted item in turn. Where it asks for the token, copy your token with the Copy token button below and paste it. Be sure to run it inside that project folder.
Authenticate the MCP connection
Authenticate in the following order.
This step requires the Claude Code CLI (claude). If you do not have it yet, install Claude Code.
-
Run Claude Code in your terminal. You must run it inside the project folder you want to connect.
Terminalclaude -
On first run, it may ask whether to enable the new MCP servers. In that case, confirm that
weeglooandweegloo-uploadare checked and pressEnterto submit.TerminalNew MCP servers found in .mcp.json Select any you wish to enable. > [√] weegloo [√] weegloo-upload -
Enter
/mcpto open the MCP server management screen.Terminal/mcp -
Select
weegloofrom the list. It shows aneeds authenticationstatus.TerminalManage MCP servers > weegloo · ∆ needs authentication weegloo-upload · √ connectedIf the servers do not appear in the list: If
weeglooandweegloo-uploaddo not appear in the list, you may not have submitted them on the enable screen in step 2, or they may be disabled. Quit Claude Code, enter the command below in your terminal, and runclaudeagain. When the same screen as step 2 appears again, make sureweeglooandweegloo-uploadare checked and pressEnterto submit.Terminalclaude mcp reset-project-choices -
Check that the connection URL is
https://ai.weegloo.com/mcpand select Authenticate.TerminalWeegloo MCP Server Status: ∆ needs authentication URL: https://ai.weegloo.com/mcp > 1. Authenticate 2. Disable -
When you select Authenticate, the WEEGLOO authentication page opens in your browser. Copy your token with the Copy token button below, paste it, and click Connect Server. Once
weegloochanges toconnected, you are done.
Install MCP and Skills
Copy the install command and run it in your terminal.
Authenticate the MCP connection
Authenticate in the following order.
-
Run Claude Code in your terminal.
Terminalclaude -
Enter
/mcpto open the MCP server management screen.Terminal/mcp -
Select
weegloofrom the list. It shows aneeds authenticationstatus.TerminalManage MCP servers > weegloo · ∆ needs authentication weegloo-upload · √ connected -
Check that the connection URL is
https://ai.weegloo.com/mcpand select Authenticate.TerminalWeegloo MCP Server Status: ∆ needs authentication URL: https://ai.weegloo.com/mcp > 1. Authenticate 2. Disable -
When you select Authenticate, the WEEGLOO authentication page opens in your browser. Copy your token with the Copy token button below, paste it, and click Connect Server. Once
weegloochanges toconnected, you are done.
Run npx weegloo interactively and install by choosing each prompted item yourself.
Run the install tool
Run the command below in your terminal and choose each prompted item in turn. Where it asks for the token, copy your token with the Copy token button below and paste it.
Authenticate the MCP connection
Authenticate in the following order.
-
Run Claude Code in your terminal.
Terminalclaude -
Enter
/mcpto open the MCP server management screen.Terminal/mcp -
Select
weegloofrom the list. It shows aneeds authenticationstatus.TerminalManage MCP servers > weegloo · ∆ needs authentication weegloo-upload · √ connected -
Check that the connection URL is
https://ai.weegloo.com/mcpand select Authenticate.TerminalWeegloo MCP Server Status: ∆ needs authentication URL: https://ai.weegloo.com/mcp > 1. Authenticate 2. Disable -
When you select Authenticate, the WEEGLOO authentication page opens in your browser. Copy your token with the Copy token button below, paste it, and click Connect Server. Once
weegloochanges toconnected, you are done.
Run the install tool
Move to the project folder you want to connect, then run the command below in that folder and choose each prompted item in turn. Where it asks for the token, copy your token with the Copy token button below and paste it. Be sure to run it inside that project folder.
Authenticate the MCP connection
Authenticate in the following order.
-
Run Claude Code in your terminal. You must run it inside the project folder you want to connect.
Terminalclaude -
On first run, it may ask whether to enable the new MCP servers. In that case, confirm that
weeglooandweegloo-uploadare checked and pressEnterto submit.TerminalNew MCP servers found in .mcp.json Select any you wish to enable. > [√] weegloo [√] weegloo-upload -
Enter
/mcpto open the MCP server management screen.Terminal/mcp -
Select
weegloofrom the list. It shows aneeds authenticationstatus.TerminalManage MCP servers > weegloo · ∆ needs authentication weegloo-upload · √ connectedIf the servers do not appear in the list: If
weeglooandweegloo-uploaddo not appear in the list, you may not have submitted them on the enable screen in step 2, or they may be disabled. Quit Claude Code, enter the command below in your terminal, and runclaudeagain. When the same screen as step 2 appears again, make sureweeglooandweegloo-uploadare checked and pressEnterto submit.Terminalclaude mcp reset-project-choices -
Check that the connection URL is
https://ai.weegloo.com/mcpand select Authenticate.TerminalWeegloo MCP Server Status: ∆ needs authentication URL: https://ai.weegloo.com/mcp > 1. Authenticate 2. Disable -
When you select Authenticate, the WEEGLOO authentication page opens in your browser. Copy your token with the Copy token button below, paste it, and click Connect Server. Once
weegloochanges toconnected, you are done.
Install MCP and Skills
Copy the install command and run it in your terminal.
Authenticate the MCP connection
Authenticate in the following order.
-
Running the command below in your terminal opens the WEEGLOO authentication page in your browser.
Terminalcodex mcp login weegloo -
On the WEEGLOO authentication page that opens, copy your token with the Copy token button below, paste it, and click Connect Server. An agent that was already running needs to be restarted after authentication completes for the changes to take effect.
Run npx weegloo interactively and install by choosing each prompted item yourself.
Run the install tool
Run the command below in your terminal and choose each prompted item in turn. Where it asks for the token, copy your token with the Copy token button below and paste it.
Authenticate the MCP connection
Authenticate in the following order.
-
Running the command below in your terminal opens the WEEGLOO authentication page in your browser.
Terminalcodex mcp login weegloo -
On the WEEGLOO authentication page that opens, copy your token with the Copy token button below, paste it, and click Connect Server. An agent that was already running needs to be restarted after authentication completes for the changes to take effect.
Run the install tool
Move to the project folder you want to connect, then run the command below in that folder and choose each prompted item in turn. Where it asks for the token, copy your token with the Copy token button below and paste it. Be sure to run it inside that project folder.
Authenticate the MCP connection
Authenticate in the following order.
-
Running the command below in your terminal opens the WEEGLOO authentication page in your browser.
Terminalcodex mcp login weegloo -
On the WEEGLOO authentication page that opens, copy your token with the Copy token button below, paste it, and click Connect Server. An agent that was already running needs to be restarted after authentication completes for the changes to take effect.
Install MCP and Skills
Copy the install command and run it in your terminal.
Authenticate the MCP connection
Authenticate in the following order.
-
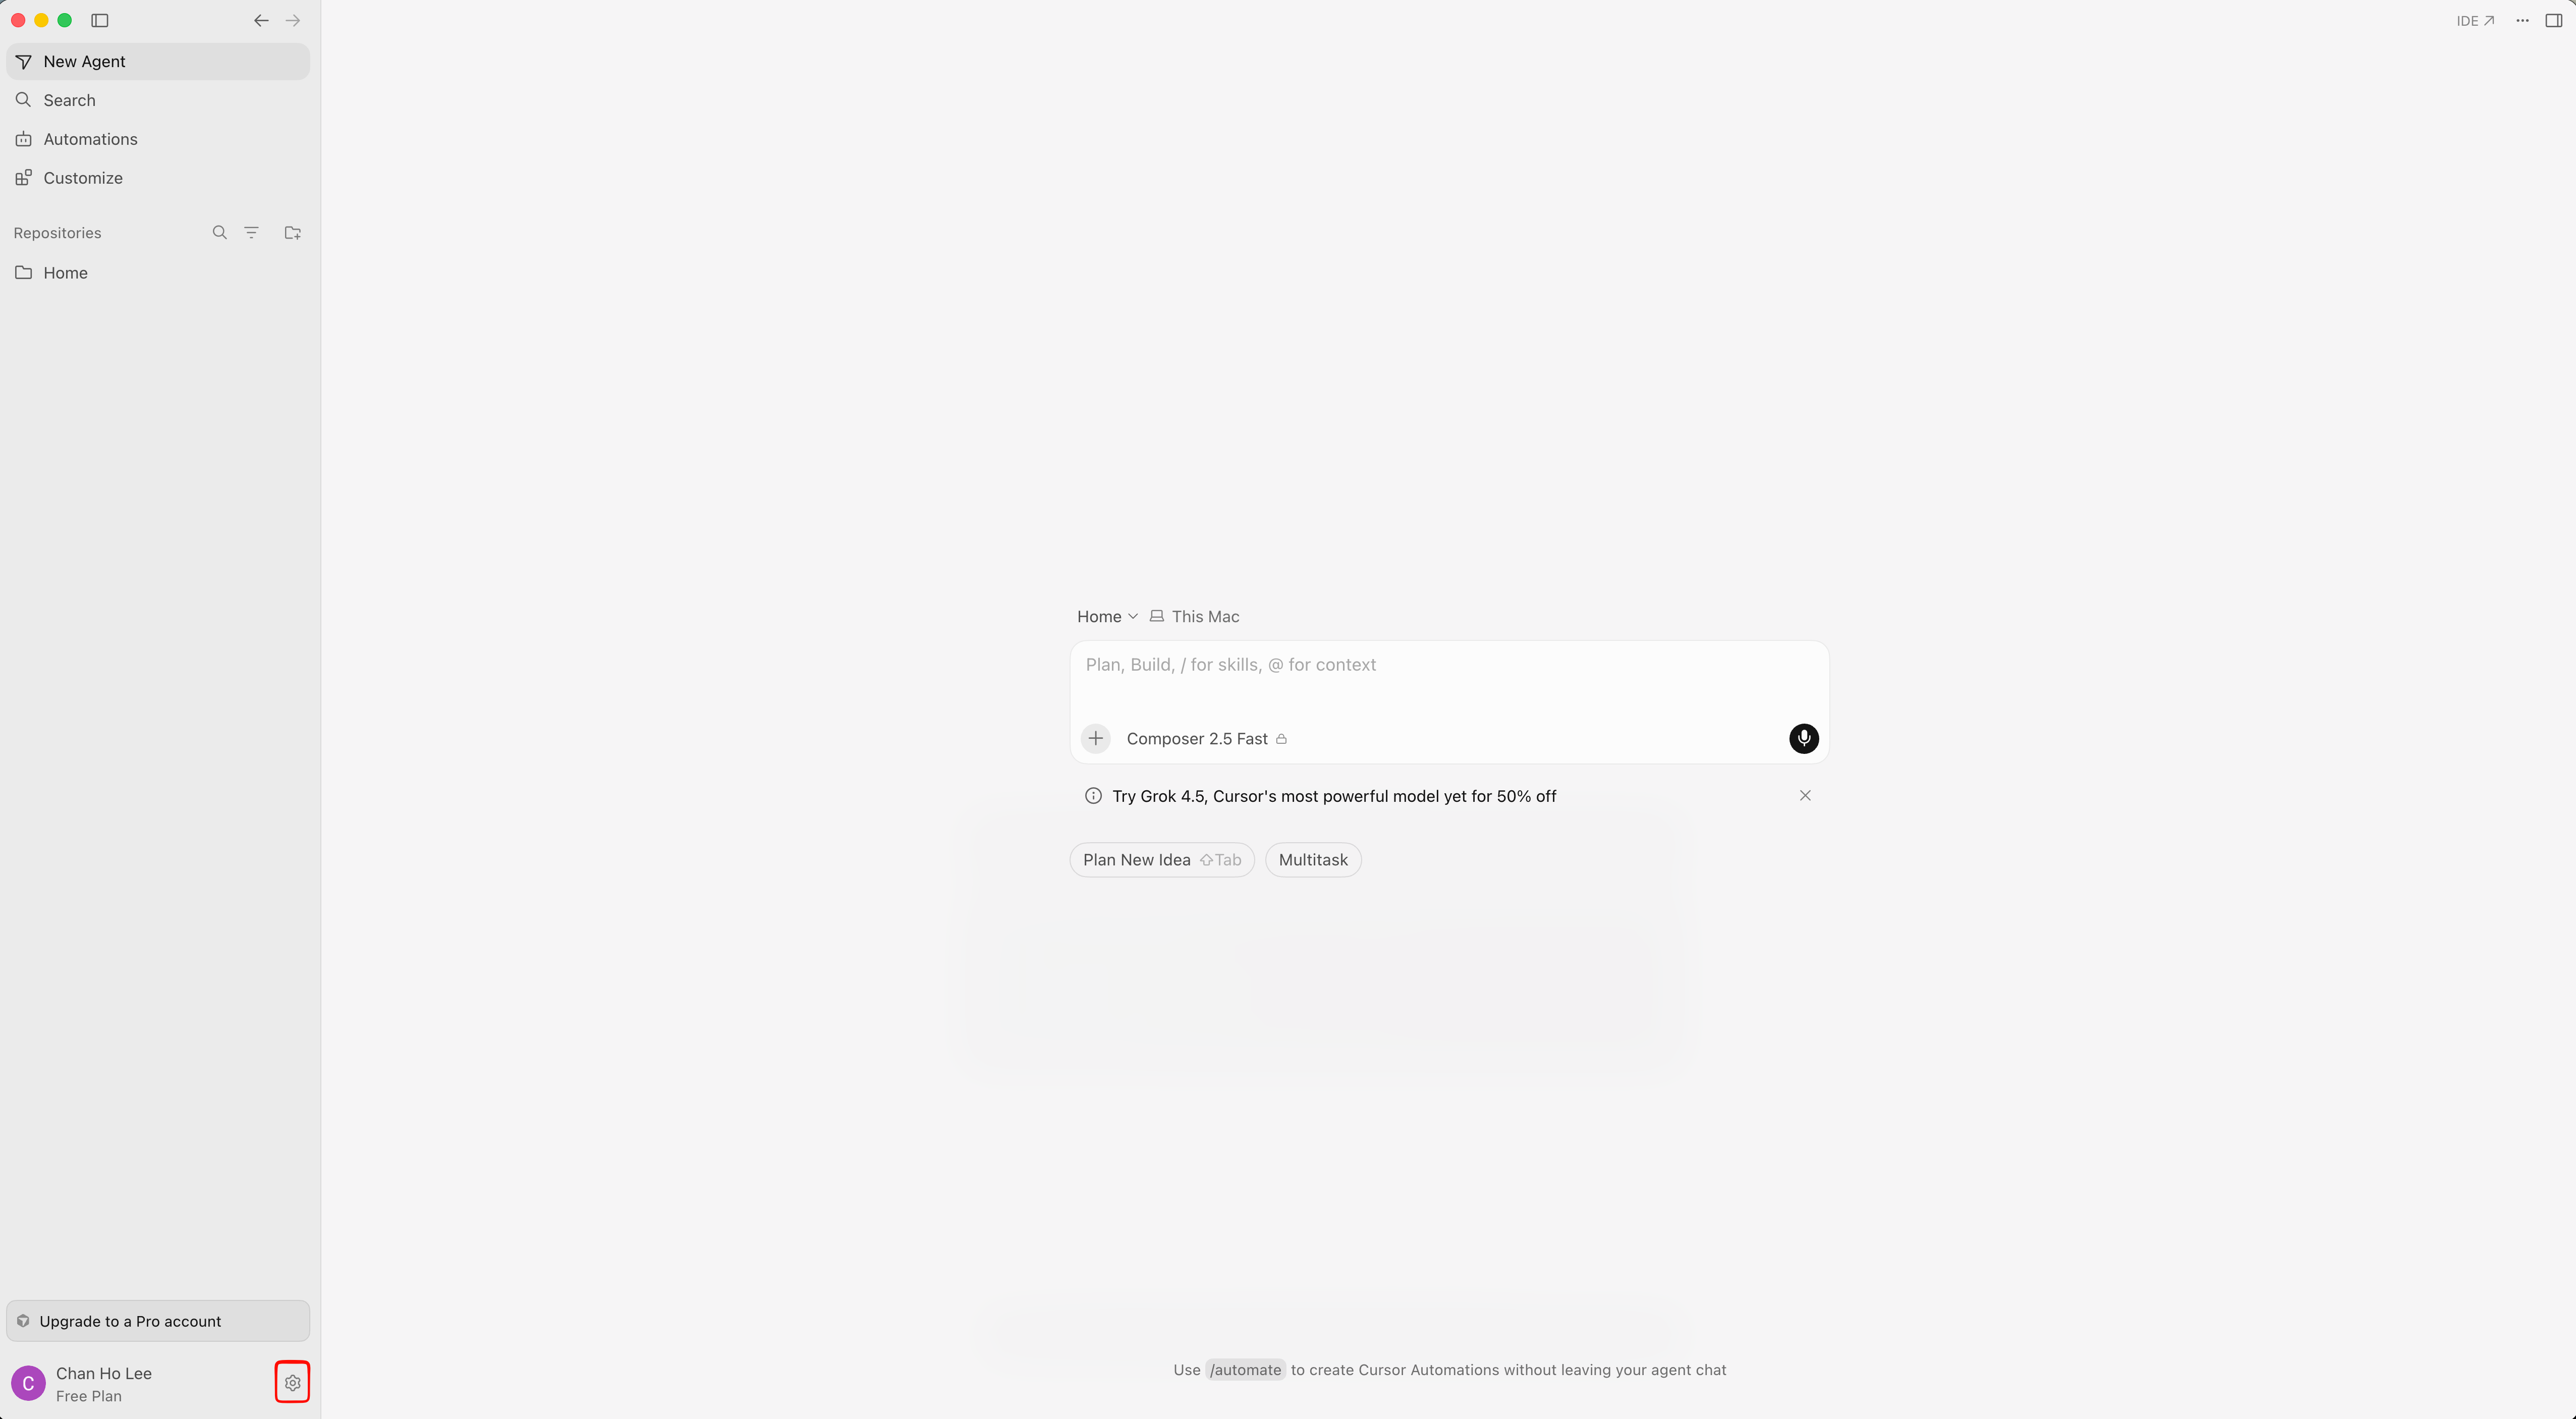
Click the gear icon at the bottom left of Cursor to open Settings.
-
In the left settings menu, select Tools & MCPs to open the Home tab. Click Connect to the right of
weegloo.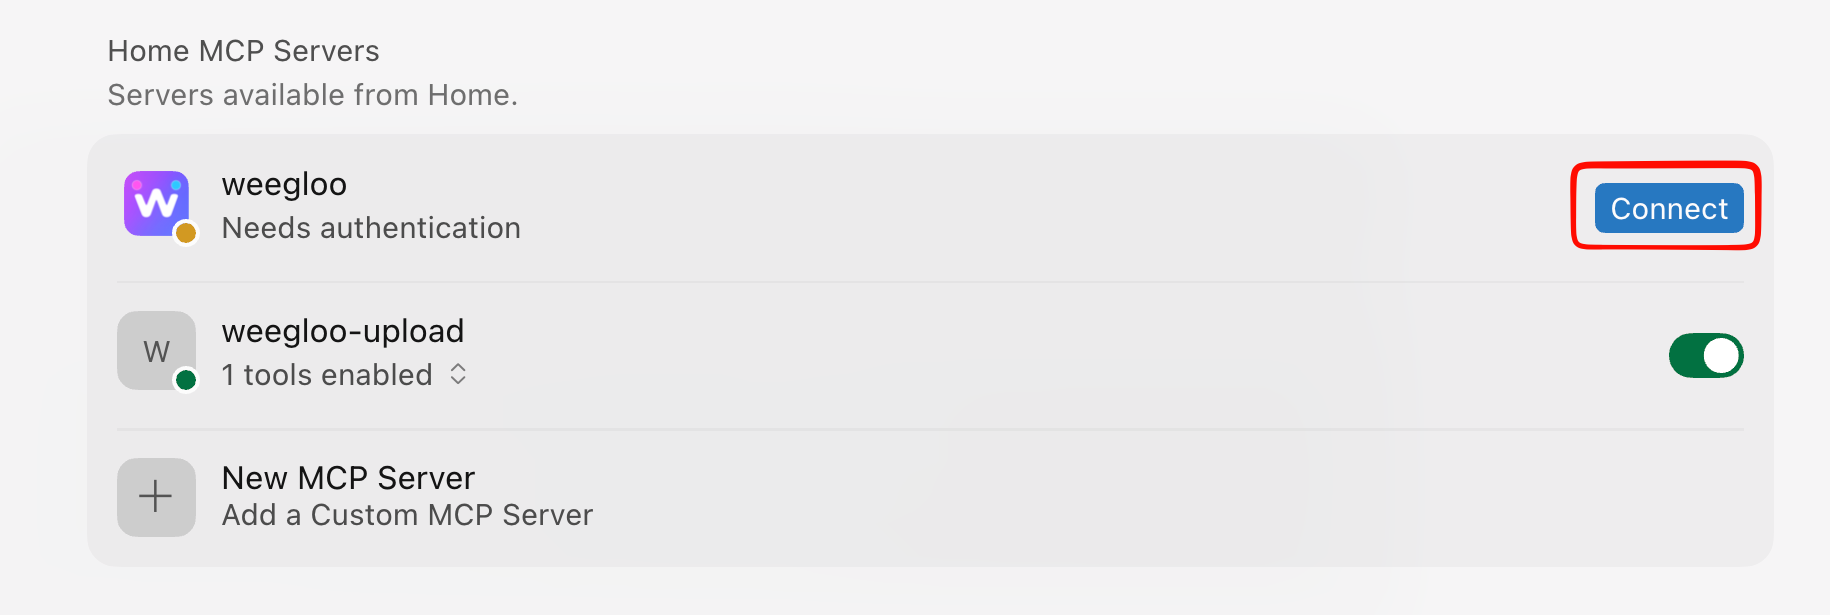
-
The WEEGLOO authentication page opens in your browser. Copy your token with the Copy token button, paste it, and click Connect Server.
-
You can confirm the connection succeeded by the green dots lit next to
weeglooandweegloo-upload.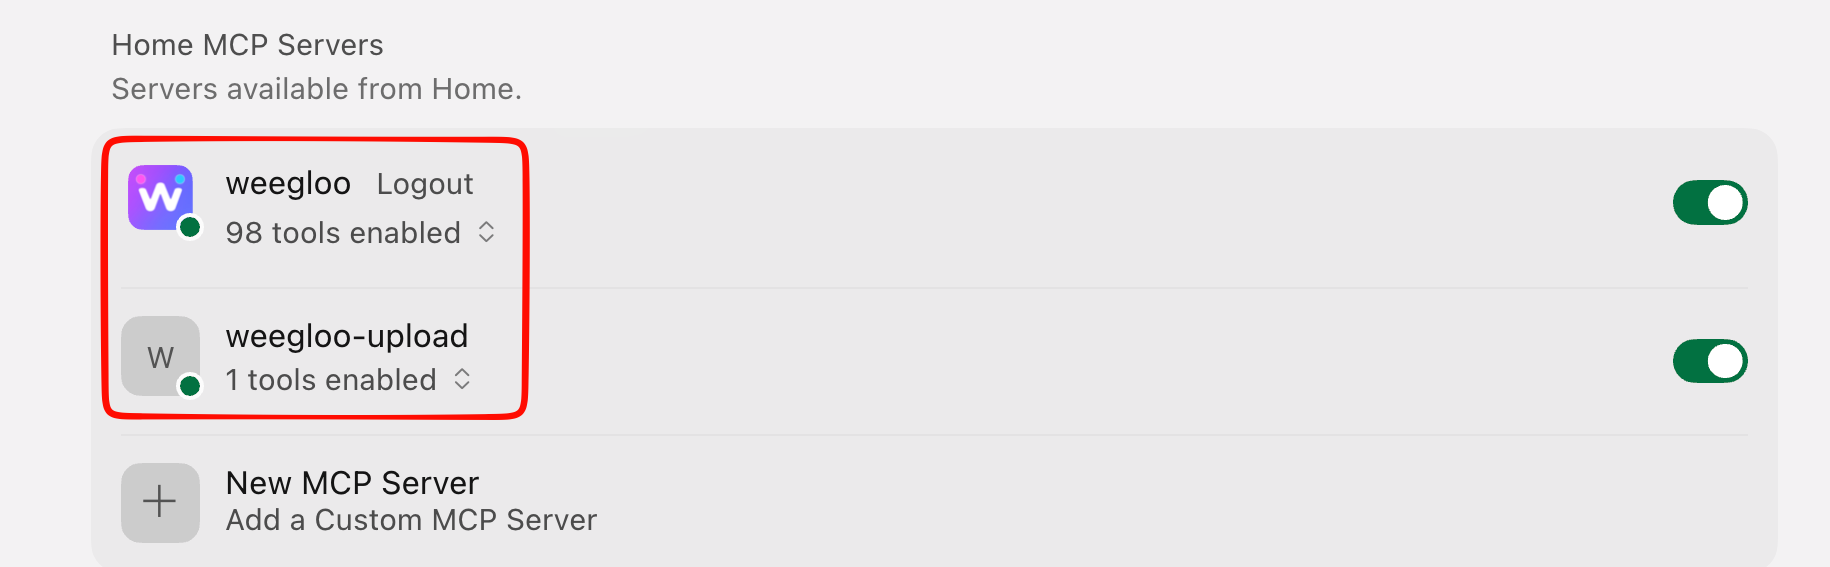
Run npx weegloo interactively and install by choosing each prompted item yourself.
Run the install tool
Run the command below in your terminal and choose each prompted item in turn. Where it asks for the token, copy your token with the Copy token button below and paste it.
Authenticate the MCP connection
Authenticate in the following order.
-
Click the gear icon at the bottom left of Cursor to open Settings.
-
In the left settings menu, select Tools & MCPs to open the Home tab. Click Connect to the right of
weegloo. -
The WEEGLOO authentication page opens in your browser. Copy your token with the Copy token button, paste it, and click Connect Server.
-
You can confirm the connection succeeded by the green dots lit next to
weeglooandweegloo-upload.
Run the install tool
Move to the project folder you want to connect, then run the command below in that folder and choose each prompted item in turn. Where it asks for the token, copy your token with the Copy token button below and paste it. Be sure to run it inside that project folder.
Authenticate the MCP connection
Authenticate in the following order.
-
Click the gear icon at the bottom left of Cursor to open Settings.
-
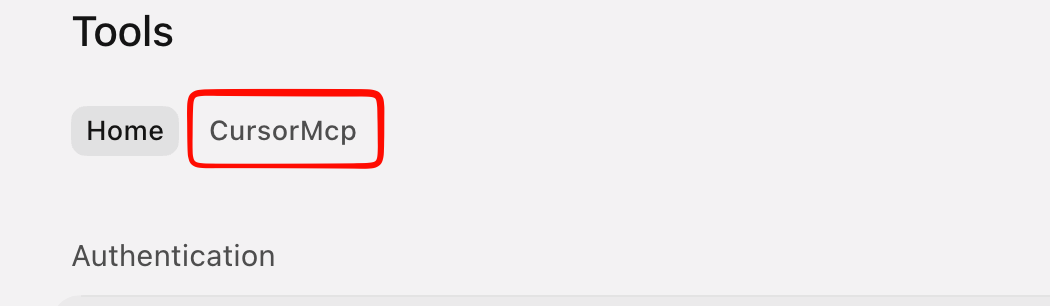
In the left settings menu, select Tools & MCPs, then in the top tabs select the tab named after your current project.
-
Turn on both the
weeglooandweegloo-uploadtoggles in the Installed list.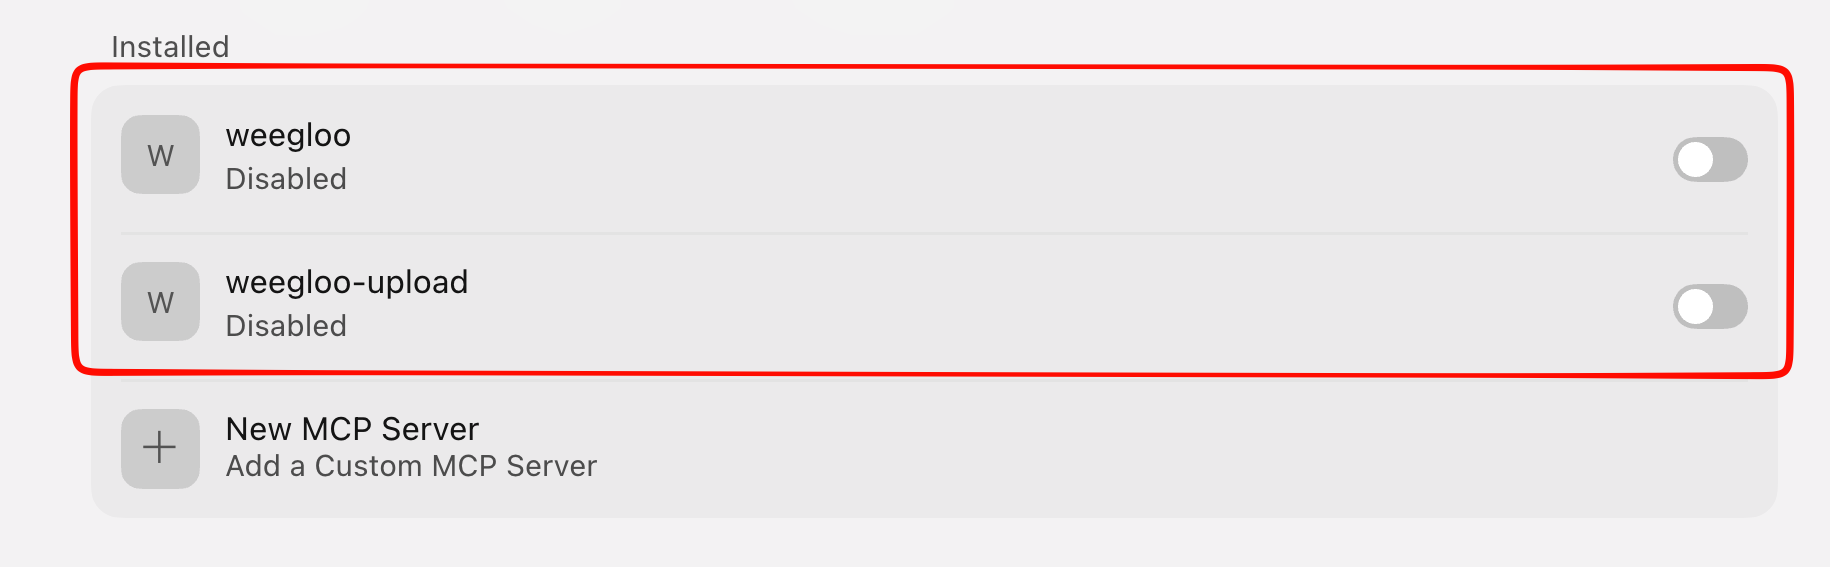
-
When
weegloochanges to Needs authentication, click Connect on the right.weegloo-uploadconnects automatically.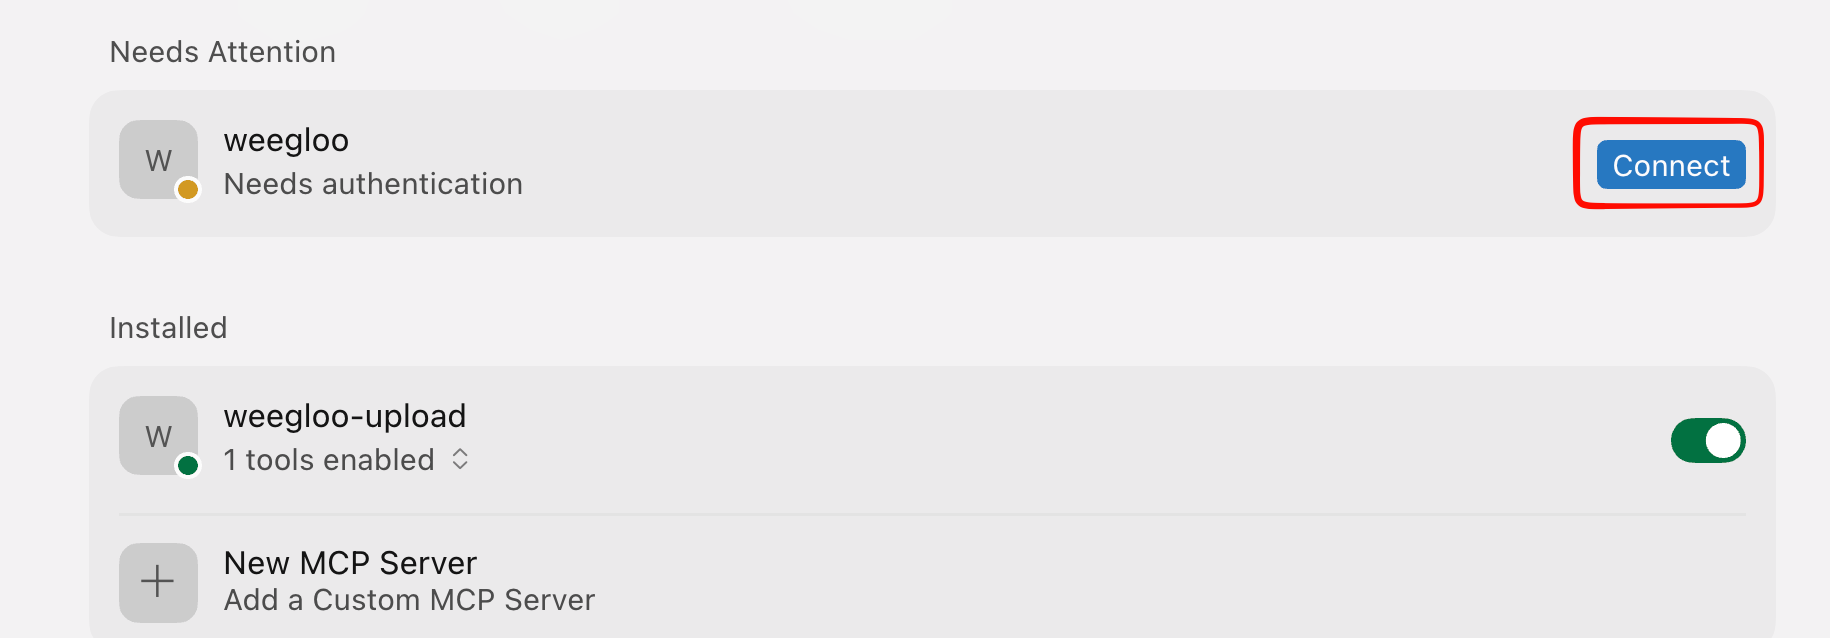
-
The WEEGLOO authentication page opens in your browser. Copy your token with the Copy token button, paste it, and click Connect Server.
-
You can confirm the connection succeeded by the green dots lit next to
weeglooandweegloo-upload.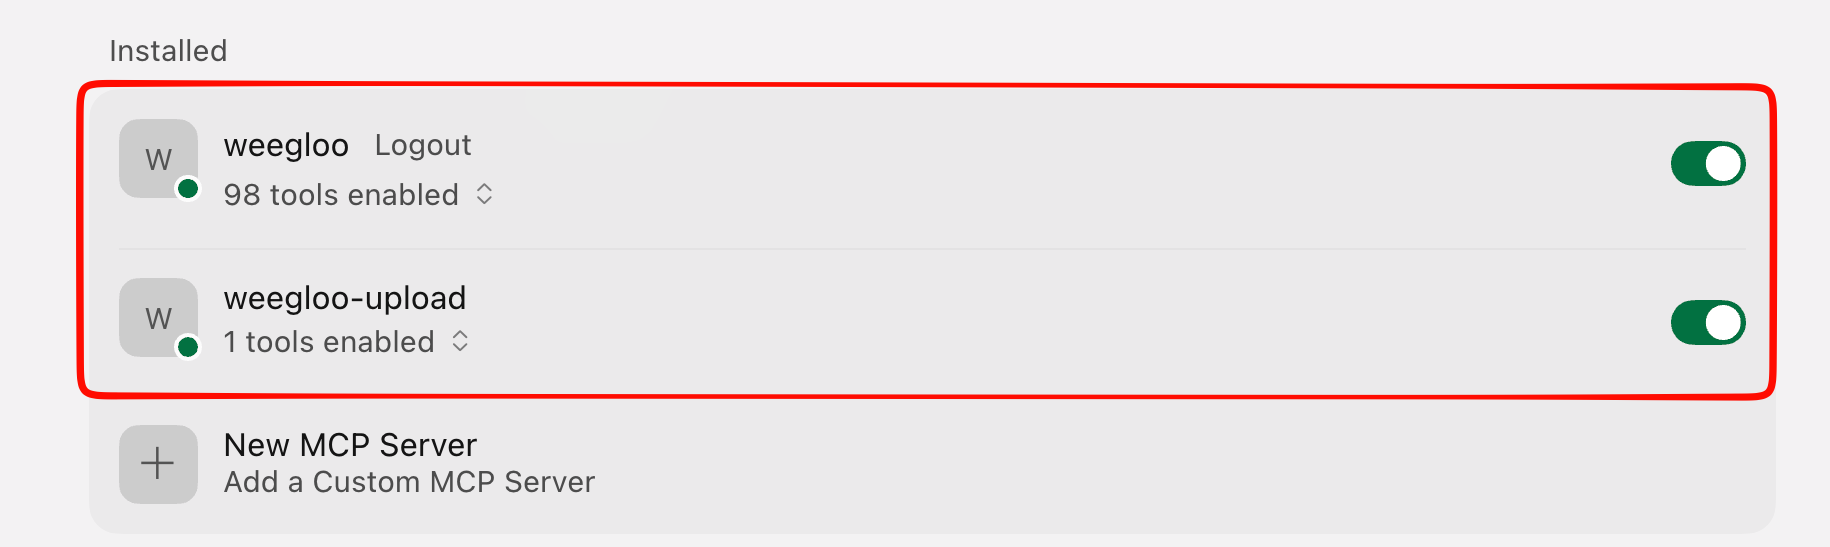
MCP authentication can be unstable in Antigravity
The weegloo MCP server uses a standard stateful HTTP MCP connection, but Antigravity's support for stateful MCP connections is not yet stable, so authentication may fail or need to be retried. If you want a more stable setup flow, we recommend using Claude Code, Codex, or Cursor.
Install MCP and Skills
Copy the install command and run it in your terminal.
Authenticate the MCP connection
Authenticate in the following order.
-
Run Antigravity with
agy.Terminalagy -
Enter
/mcpat the prompt.Terminal/mcp -
Select
weegloo.TerminalMCP Servers Plugins (~/.gemini/config/plugins) > ✗ weegloo error: calling "initialize": sending "initialize": Unauthorized [Auth Needed] ✓ weegloo-upload Tools: CreateUpload Keyboard: ↑/↓ Navigate enter Actions -
Select Authenticate.
TerminalMCP Servers Plugins (~/.gemini/config/plugins) > ✗ weegloo error: calling "initialize": sending "initialize": Unauthorized [Auth Needed] Restart Disable [Authenticate] ✓ weegloo-upload Tools: CreateUpload Keyboard: ←/→ Navigate enter Actions -
In the token input field on the authentication page that opens, paste the token below.
-
Copy the
Codeshown on the Google Antigravity page, return to Antigravity, paste it, and pressEnter.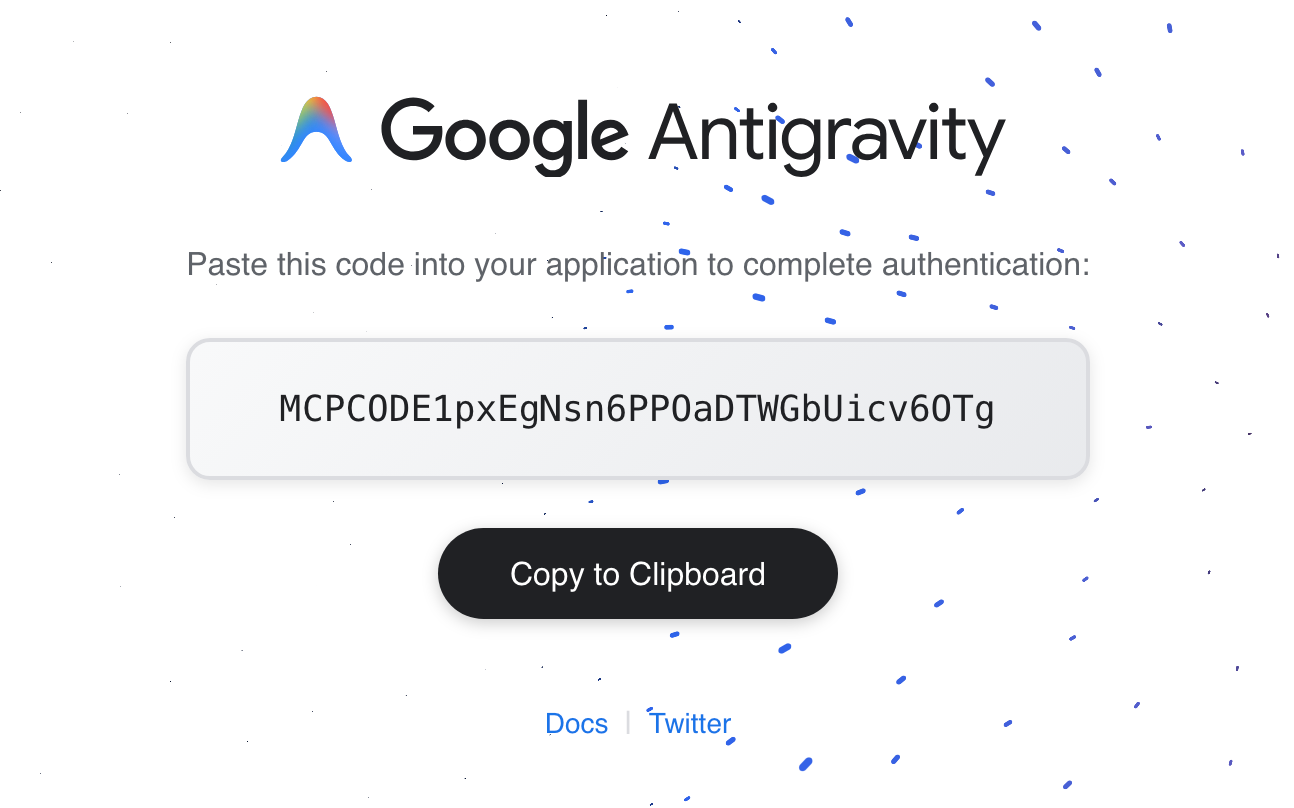
If it shows as an authentication failure
If the message
Authentication failed: no pending auth state for server weeglooappears, it may be a temporary problem on the Antigravity side. This is mostly seen in versions below1.0.16but can also occur in the latest versions, and you can reconnect with the steps below.- Press
Escto return to theMCP Serversscreen. - Press
Esconce more to return to the prompt input screen. - Enter
/mcpagain and it connects after going through theinitializingstep.
- Press
Run npx weegloo interactively and install by choosing each prompted item yourself.
Run the install tool
Run the command below in your terminal and choose each prompted item in turn. Where it asks for the token, copy your token with the Copy token button below and paste it.
Authenticate the MCP connection
Authenticate in the following order.
-
Run Antigravity with
agy.Terminalagy -
Enter
/mcpat the prompt.Terminal/mcp -
Select
weegloo.TerminalMCP Servers Plugins (~/.gemini/config/plugins) > ✗ weegloo error: calling "initialize": sending "initialize": Unauthorized [Auth Needed] ✓ weegloo-upload Tools: CreateUpload Keyboard: ↑/↓ Navigate enter Actions -
Select Authenticate.
TerminalMCP Servers Plugins (~/.gemini/config/plugins) > ✗ weegloo error: calling "initialize": sending "initialize": Unauthorized [Auth Needed] Restart Disable [Authenticate] ✓ weegloo-upload Tools: CreateUpload Keyboard: ←/→ Navigate enter Actions -
In the token input field on the authentication page that opens, paste the token below.
-
Copy the
Codeshown on the Google Antigravity page, return to Antigravity, paste it, and pressEnter.If it shows as an authentication failure
If the message
Authentication failed: no pending auth state for server weeglooappears, it may be a temporary problem on the Antigravity side. This is mostly seen in versions below1.0.16but can also occur in the latest versions, and you can reconnect with the steps below.- Press
Escto return to theMCP Serversscreen. - Press
Esconce more to return to the prompt input screen. - Enter
/mcpagain and it connects after going through theinitializingstep.
- Press
Run the install tool
Move to the project folder you want to connect, then run the command below in that folder and choose each prompted item in turn. Where it asks for the token, copy your token with the Copy token button below and paste it. Be sure to run it inside that project folder.
Authenticate the MCP connection
Authenticate in the following order.
-
Run Antigravity with
agy.Terminalagy -
Enter
/mcpat the prompt.Terminal/mcp -
Select
weegloo.TerminalMCP Servers Plugins (~/.gemini/config/plugins) > ✗ weegloo error: calling "initialize": sending "initialize": Unauthorized [Auth Needed] ✓ weegloo-upload Tools: CreateUpload Keyboard: ↑/↓ Navigate enter Actions -
Select Authenticate.
TerminalMCP Servers Plugins (~/.gemini/config/plugins) > ✗ weegloo error: calling "initialize": sending "initialize": Unauthorized [Auth Needed] Restart Disable [Authenticate] ✓ weegloo-upload Tools: CreateUpload Keyboard: ←/→ Navigate enter Actions -
In the token input field on the authentication page that opens, paste the token below.
-
Copy the
Codeshown on the Google Antigravity page, return to Antigravity, paste it, and pressEnter.If it shows as an authentication failure
If the message
Authentication failed: no pending auth state for server weeglooappears, it may be a temporary problem on the Antigravity side. This is mostly seen in versions below1.0.16but can also occur in the latest versions, and you can reconnect with the steps below.- Press
Escto return to theMCP Serversscreen. - Press
Esconce more to return to the prompt input screen. - Enter
/mcpagain and it connects after going through theinitializingstep.
- Press
Using Android Studio for Weegloo integration is strongly discouraged
Android Studio's built-in AI agent (Gemini) can be used for UI work. However, for code work like Weegloo integration it is very unstable due to AI performance issues, so we strongly recommend using another AI agent such as Claude Code or Codex. Confirmed in 2026.1.1 Patch 2 and earlier versions.
Install MCP and Skills
Copy the install command and run it in your terminal. You must run it inside the project folder you want to connect.
Authenticate the MCP connection
Once installation finishes, you need to enable the MCP server in Android Studio.
-
Go to
Settings → Tools → AI → MCP Servers, then click the JSON View tab.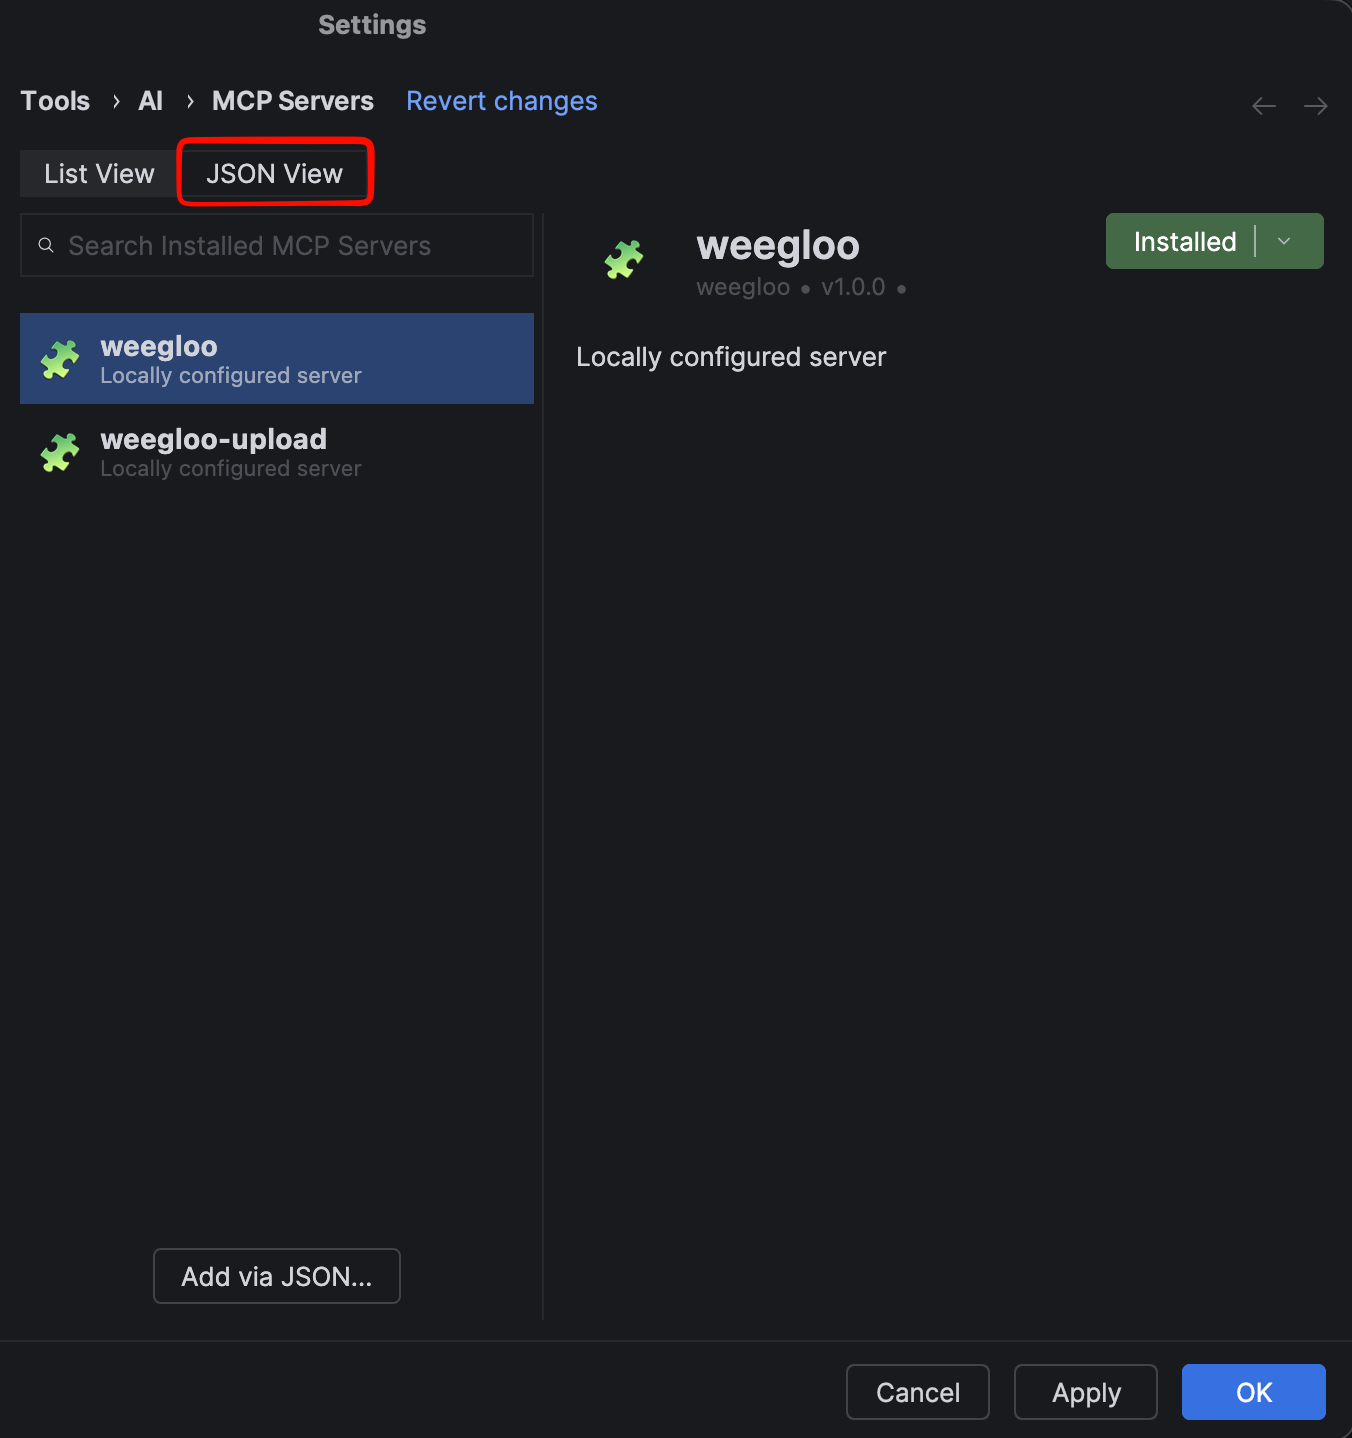
-
Check Enable MCP Servers.
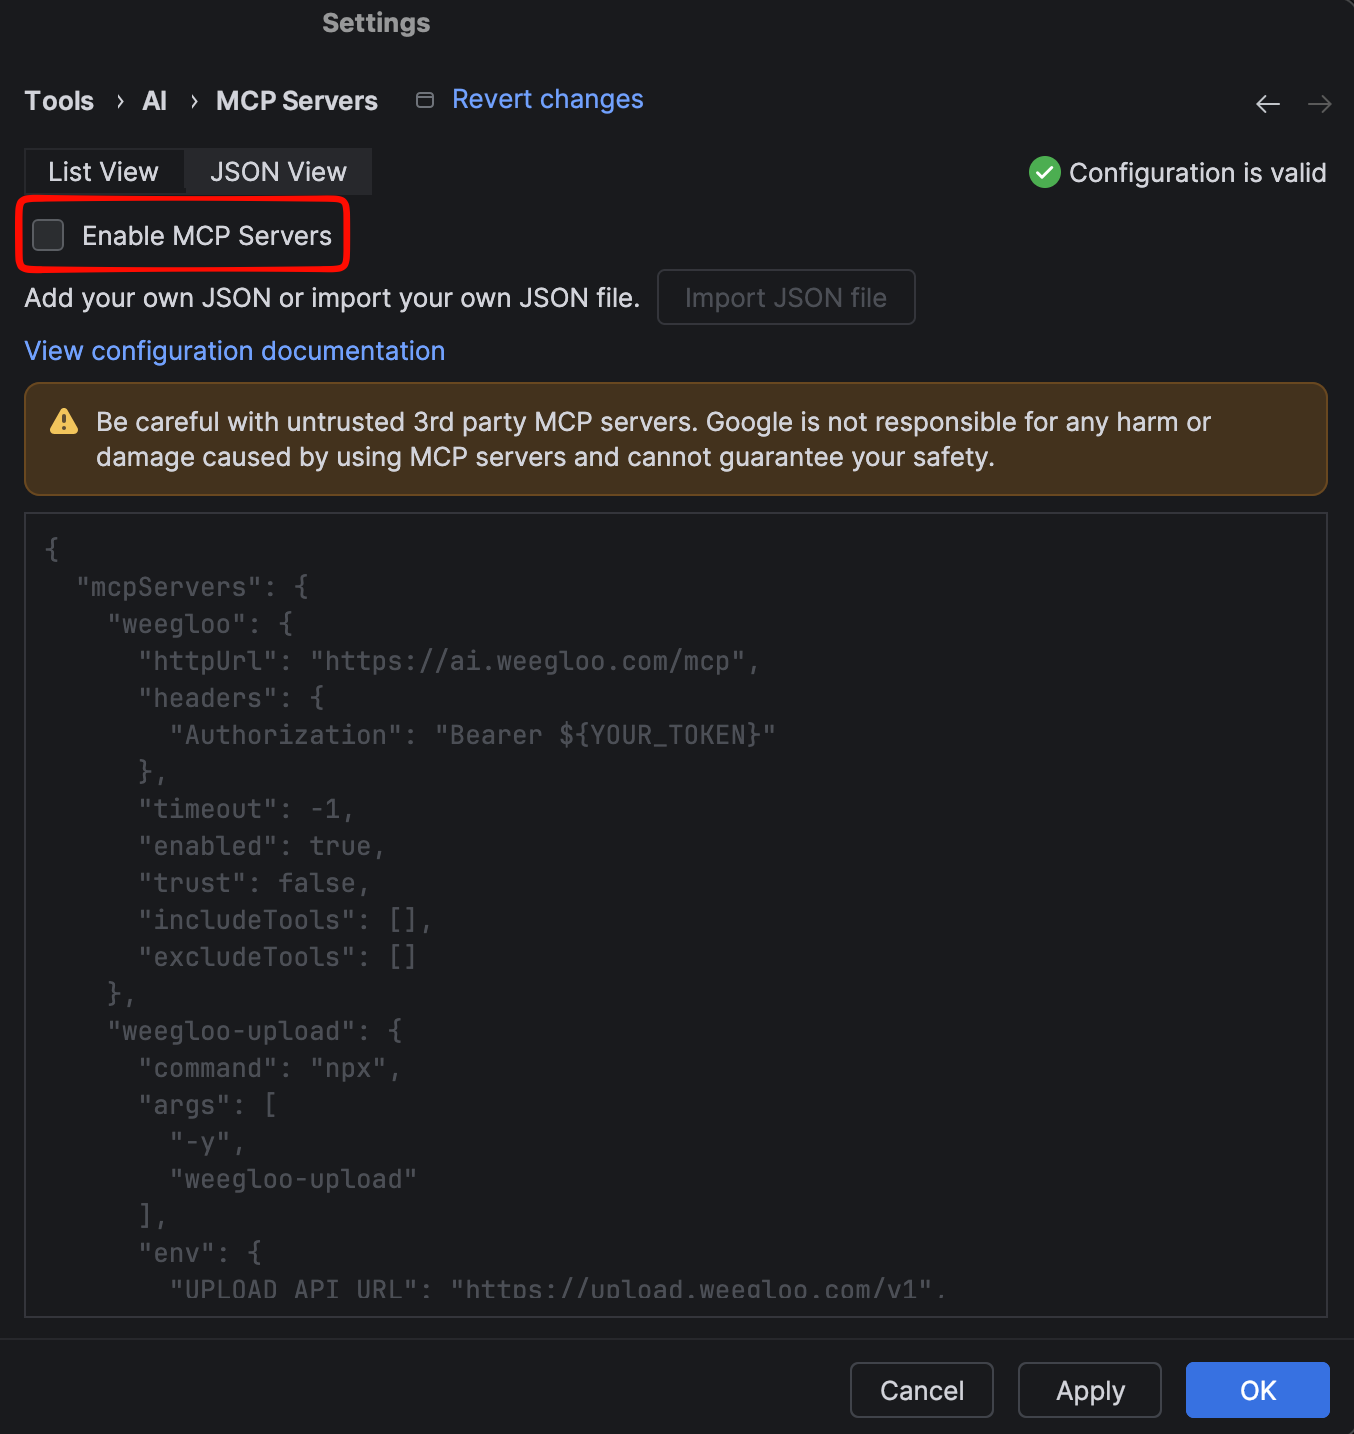
-
Confirm that
weeglooandweegloo-uploadare present in the configuration.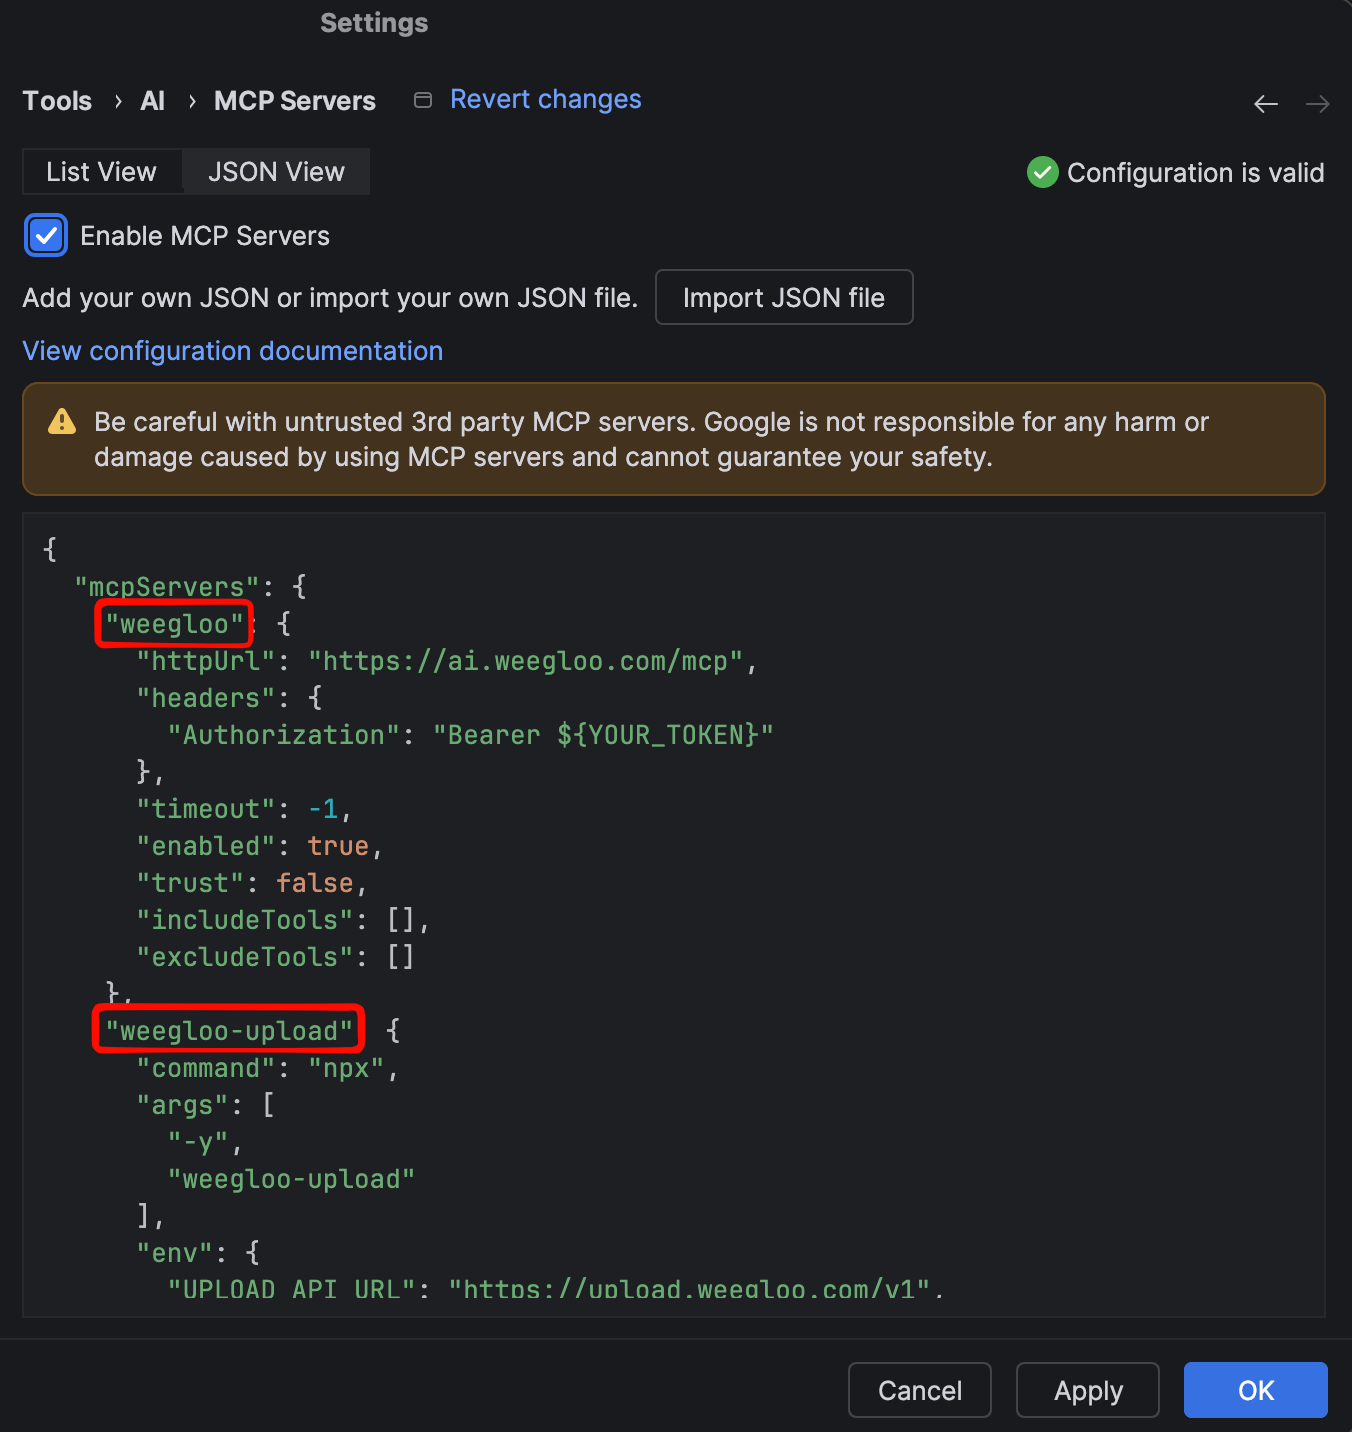
-
Click Apply to apply the settings. You can confirm the connection succeeded by the notification that you are connected to
weeglooandweegloo-upload.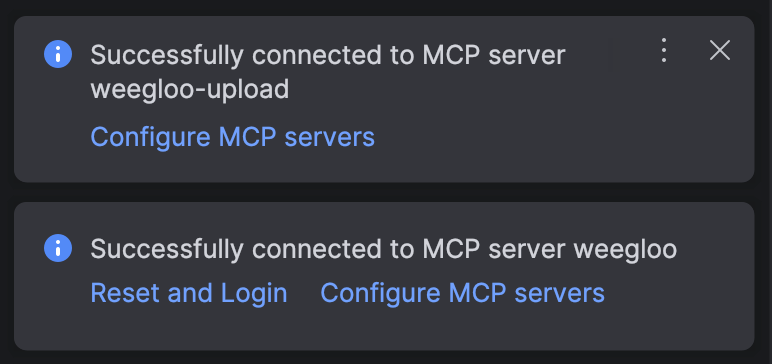
Run npx weegloo interactively and install by choosing each prompted item yourself.
Run the install tool
Move to the project folder you want to connect, then run the command below in that folder and choose each prompted item in turn. Where it asks for the token, copy your token with the Copy token button below and paste it. Be sure to run it inside that project folder.
Authenticate the MCP connection
Once installation finishes, you need to enable the MCP server in Android Studio.
-
Go to
Settings → Tools → AI → MCP Servers, then click the JSON View tab. -
Check Enable MCP Servers.
-
Confirm that
weeglooandweegloo-uploadare present in the configuration. -
Click Apply to apply the settings. You can confirm the connection succeeded by the notification that you are connected to
weeglooandweegloo-upload.
Agent to use in Xcode
Install MCP and Skills
Copy the install command and run it in your terminal. You must run it inside the project folder you want to connect.
Authenticate the MCP connection
Authenticate in the following order.
-
Run Claude Code in your terminal. You must run it inside the project folder you want to connect.
Terminalclaude -
On first run, it may ask whether to enable the new MCP servers. In that case, confirm that
weeglooandweegloo-uploadare checked and pressEnterto submit.TerminalNew MCP servers found in .mcp.json Select any you wish to enable. > [√] weegloo [√] weegloo-upload -
Enter
/mcpto open the MCP server management screen.Terminal/mcp -
Select
weegloofrom the list. It shows aneeds authenticationstatus.TerminalManage MCP servers > weegloo · ∆ needs authentication weegloo-upload · √ connectedIf the servers do not appear in the list: If
weeglooandweegloo-uploaddo not appear in the list, you may not have submitted them on the enable screen in step 2, or they may be disabled. Quit Claude Code, enter the command below in your terminal, and runclaudeagain. When the same screen as step 2 appears again, make sureweeglooandweegloo-uploadare checked and pressEnterto submit.Terminalclaude mcp reset-project-choices -
Check that the connection URL is
https://ai.weegloo.com/mcpand select Authenticate.TerminalWeegloo MCP Server Status: ∆ needs authentication URL: https://ai.weegloo.com/mcp > 1. Authenticate 2. Disable -
When you select Authenticate, the WEEGLOO authentication page opens in your browser. Copy your token with the Copy token button below, paste it, and click Connect Server. Once
weegloochanges toconnected, you are done.
After installation, you need to open a new Xcode Agent session for the settings to take effect.
Run npx weegloo interactively and install by choosing each prompted item yourself.
Run the install tool
Move to the project folder you want to connect, then run the command below in that folder and choose each prompted item in turn. Where it asks for the token, copy your token with the Copy token button below and paste it. Be sure to run it inside that project folder.
Authenticate the MCP connection
Authenticate in the following order.
-
Run Claude Code in your terminal. You must run it inside the project folder you want to connect.
Terminalclaude -
On first run, it may ask whether to enable the new MCP servers. In that case, confirm that
weeglooandweegloo-uploadare checked and pressEnterto submit.TerminalNew MCP servers found in .mcp.json Select any you wish to enable. > [√] weegloo [√] weegloo-upload -
Enter
/mcpto open the MCP server management screen.Terminal/mcp -
Select
weegloofrom the list. It shows aneeds authenticationstatus.TerminalManage MCP servers > weegloo · ∆ needs authentication weegloo-upload · √ connectedIf the servers do not appear in the list: If
weeglooandweegloo-uploaddo not appear in the list, you may not have submitted them on the enable screen in step 2, or they may be disabled. Quit Claude Code, enter the command below in your terminal, and runclaudeagain. When the same screen as step 2 appears again, make sureweeglooandweegloo-uploadare checked and pressEnterto submit.Terminalclaude mcp reset-project-choices -
Check that the connection URL is
https://ai.weegloo.com/mcpand select Authenticate.TerminalWeegloo MCP Server Status: ∆ needs authentication URL: https://ai.weegloo.com/mcp > 1. Authenticate 2. Disable -
When you select Authenticate, the WEEGLOO authentication page opens in your browser. Copy your token with the Copy token button below, paste it, and click Connect Server. Once
weegloochanges toconnected, you are done.
After installation, you need to open a new Xcode Agent session for the settings to take effect.
Install MCP and Skills
Copy the install command and run it in your terminal. You must run it inside the project folder you want to connect.
Authenticate the MCP connection
Authenticate in the following order.
-
Running the command below in your terminal opens the WEEGLOO authentication page in your browser.
Terminalcodex mcp login weegloo -
On the WEEGLOO authentication page that opens, copy your token with the Copy token button below, paste it, and click Connect Server. An agent that was already running needs to be restarted after authentication completes for the changes to take effect.
After installation, you need to open a new Xcode Agent session for the settings to take effect.
Run npx weegloo interactively and install by choosing each prompted item yourself.
Run the install tool
Move to the project folder you want to connect, then run the command below in that folder and choose each prompted item in turn. Where it asks for the token, copy your token with the Copy token button below and paste it. Be sure to run it inside that project folder.
Authenticate the MCP connection
Authenticate in the following order.
-
Running the command below in your terminal opens the WEEGLOO authentication page in your browser.
Terminalcodex mcp login weegloo -
On the WEEGLOO authentication page that opens, copy your token with the Copy token button below, paste it, and click Connect Server. An agent that was already running needs to be restarted after authentication completes for the changes to take effect.
After installation, you need to open a new Xcode Agent session for the settings to take effect.
3. One line is all it takes
You do not even have to describe what you are building. This one line is enough.
Integrate this with WEEGLOO.
The agent looks at the screens you built and works out for itself what kind of service it is. Then it completes the features you need, such as members, permissions, and search. If it is a web service, it even handles deployment for you.
What comes next
- Integrate with one sentence: covers in detail the flow of building all the features you need at once with the single phrase "Integrate this with WEEGLOO".
- Store your data and pull it back out: an example of asking for features one at a time, such as data, search, and members.
- What is WEEGLOO?: covers what WEEGLOO is and why you would use it.
- Before You Start: covers the full blueprint for when you work by hand in the content studio.
- Keeping up to date: covers how to keep the Skills and Rules you installed up to date.