

Getting Brevo ready to send
This page is where you get the values you will enter when you use Brevo as your sending server in Sending email.
Brevo has no such thing as a mail account. You tell Brevo the address you want customers to see, and you have to get confirmation that the address is really yours before you can send from it. There are two ways to get that confirmation: verify a single address, or authenticate the whole domain that address belongs to. Once dailycloset.com is authenticated, you can send from orders@dailycloset.com and from support@dailycloset.com alike, and you do not need to create a separate mailbox for those addresses.
Getting the values from Brevo
After signing in to Brevo, work through the three steps below in order.
Authenticating your domain
You can use Brevo without a domain. Verifying an email address you already use enables you to send. However, we recommend authenticating a domain first for reliable email delivery. If you do not have a domain, skip this step and go to step 2.
-
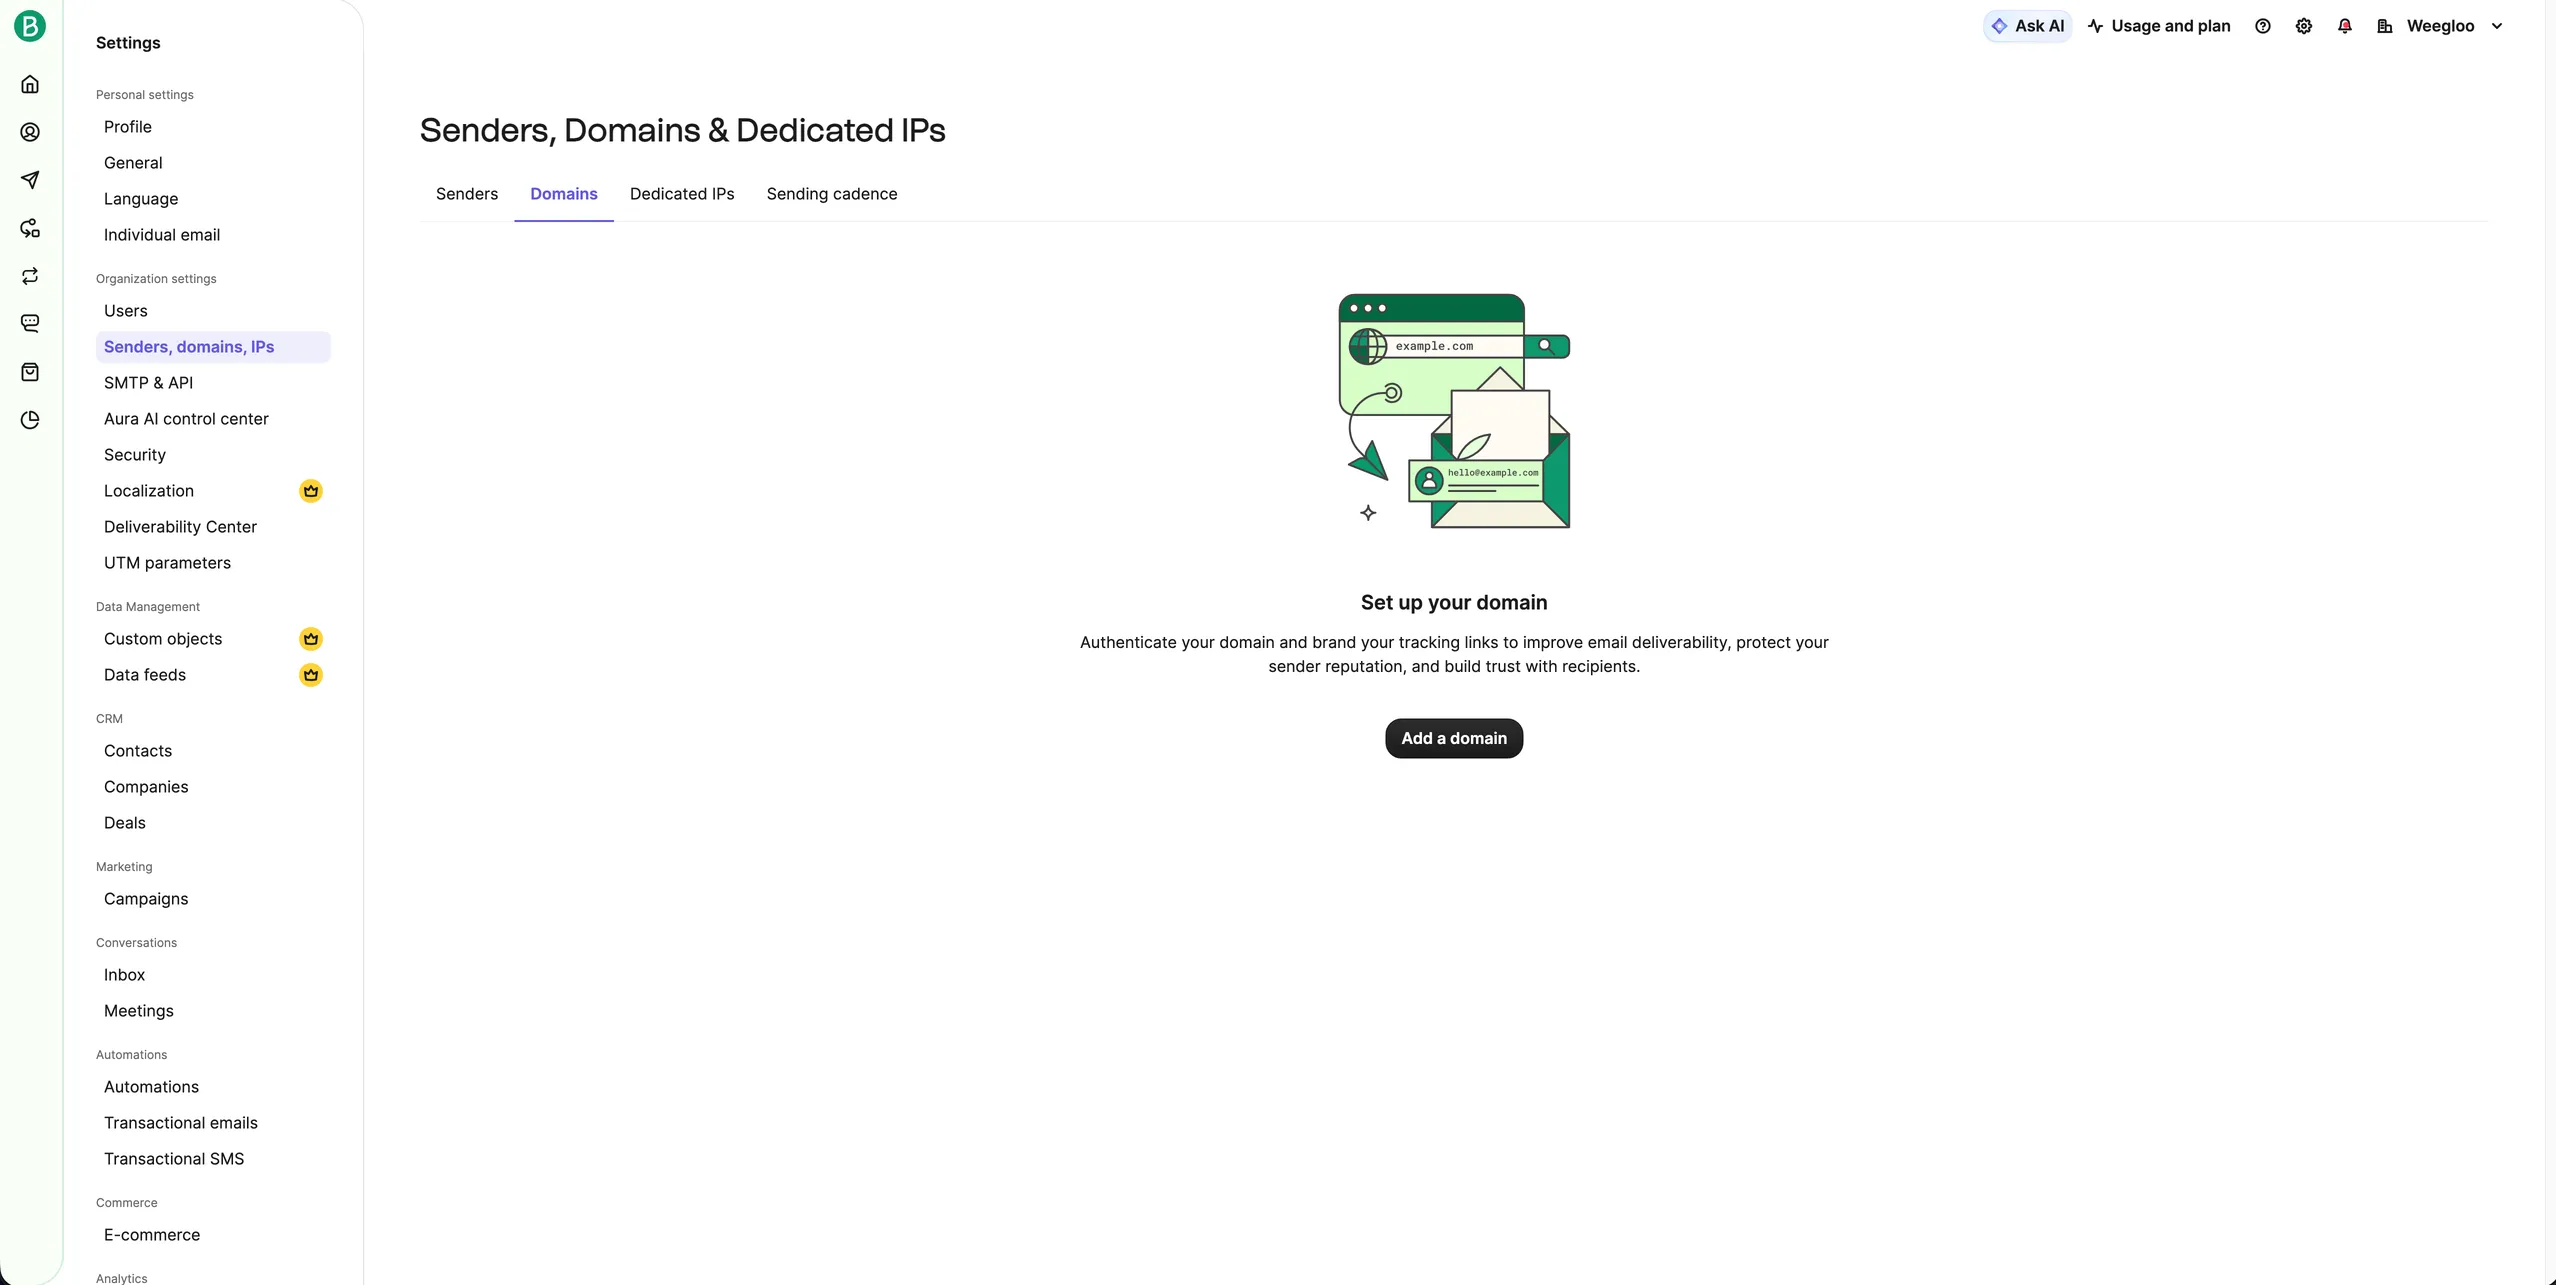
In Settings in the left menu, press Senders, domains, IPs.
-
Press the Domains tab.
-
Press Add a domain.
-
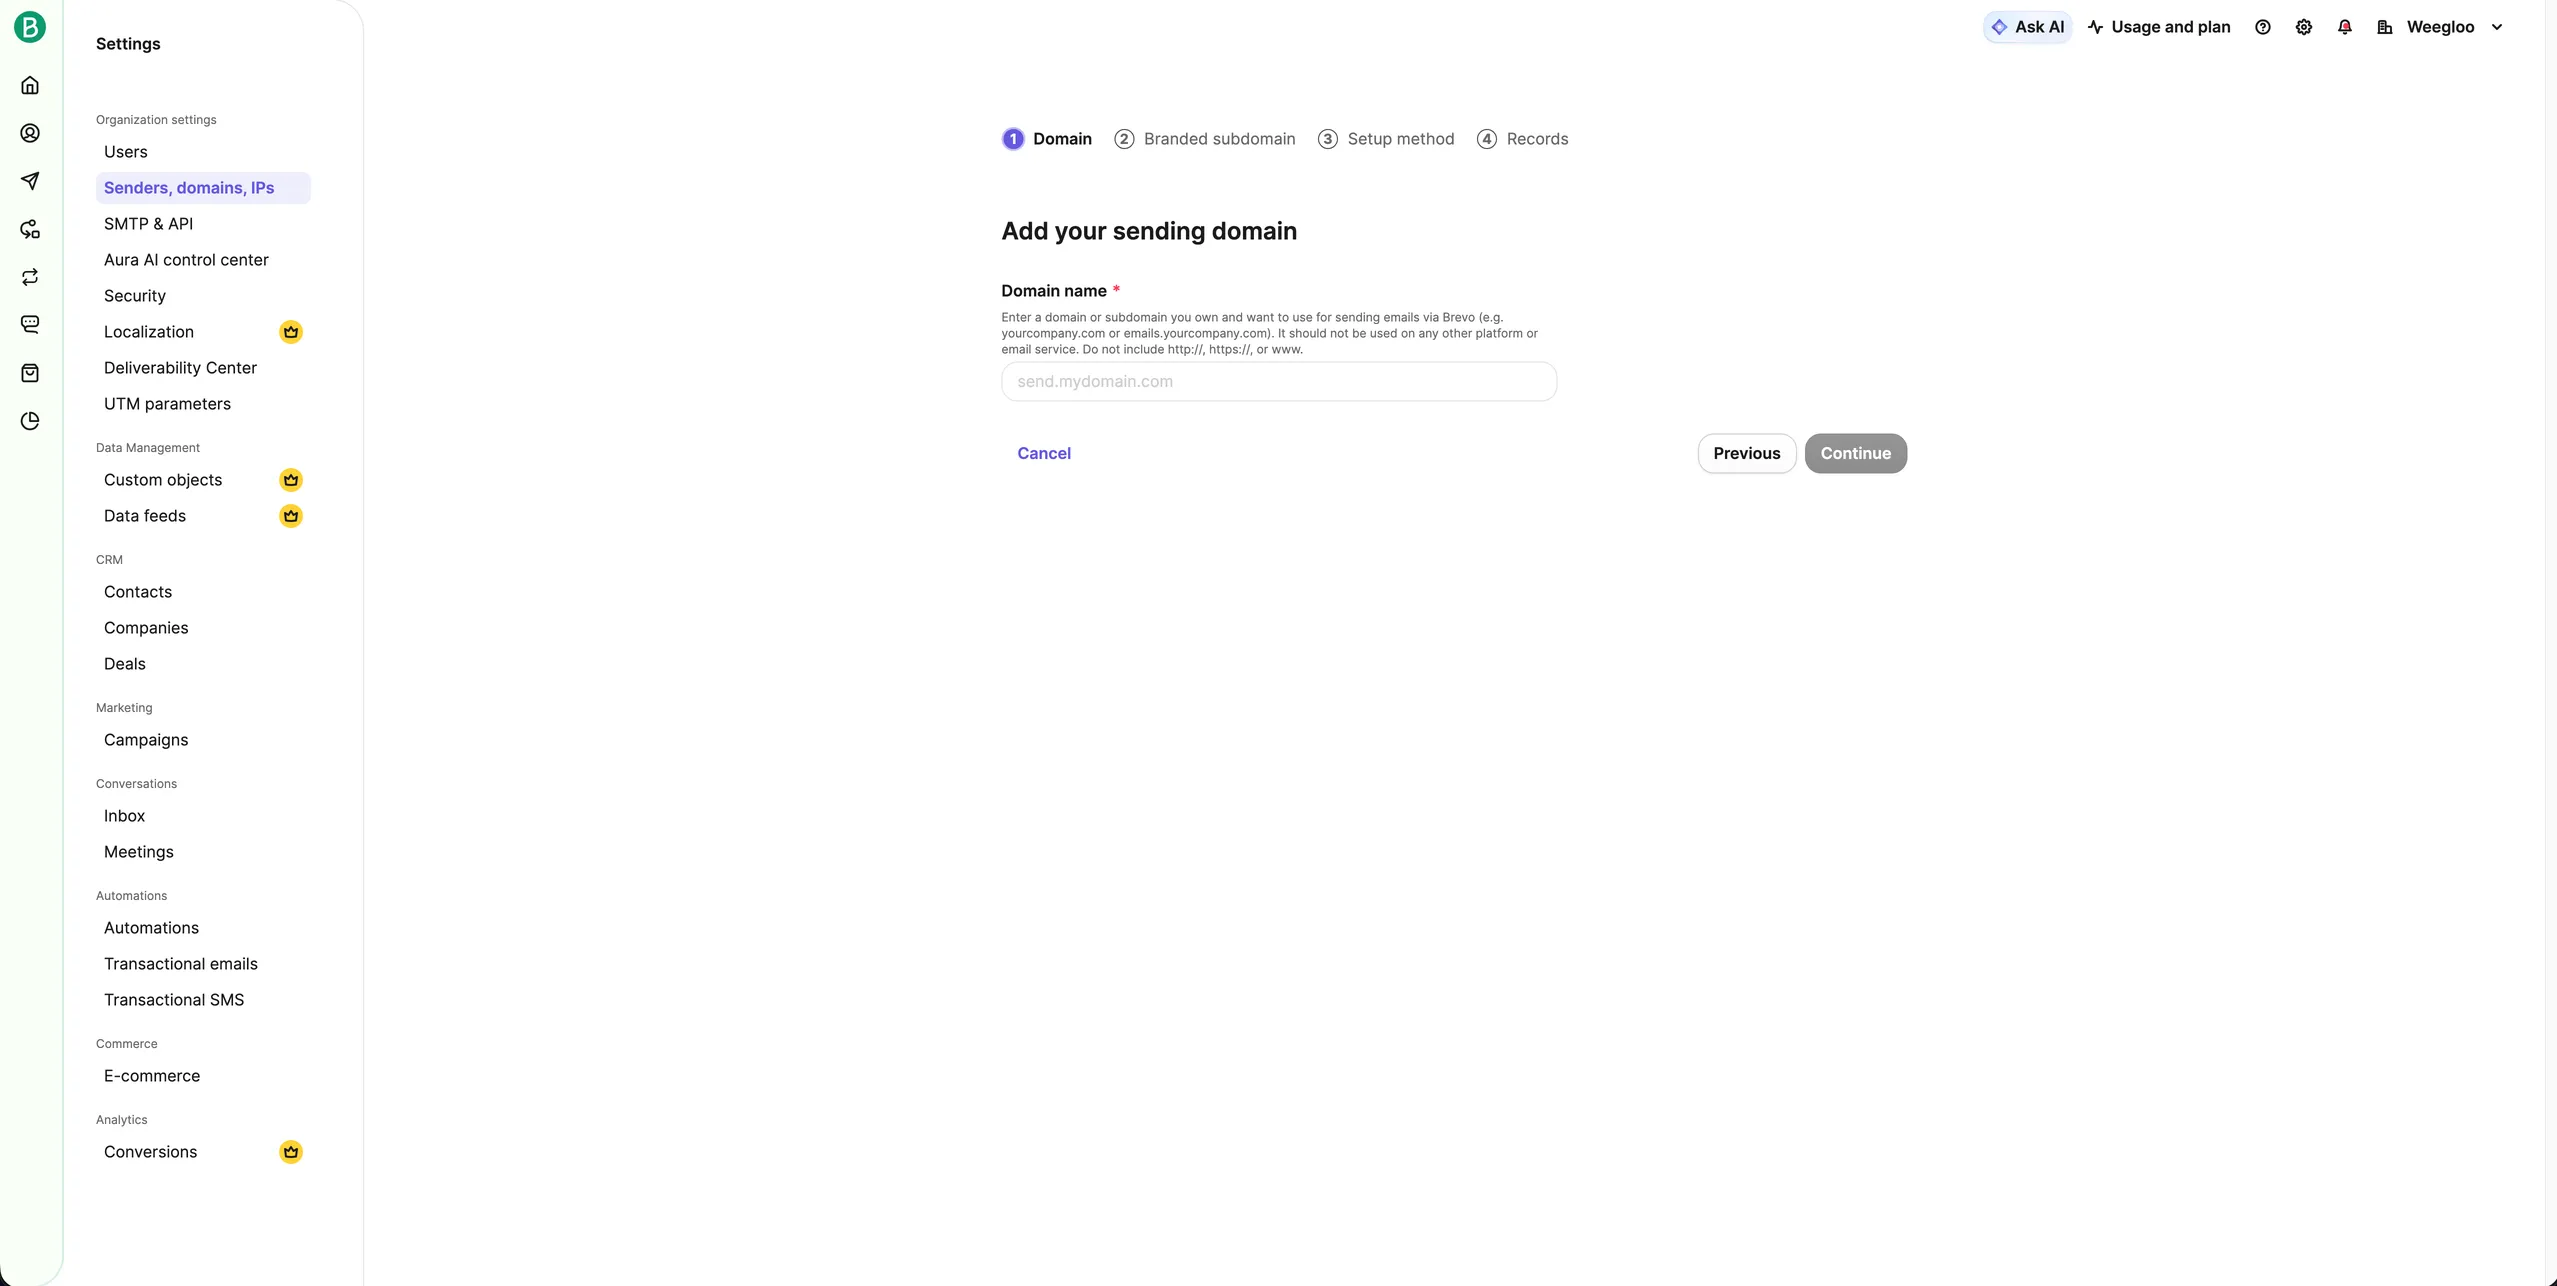
In Domain name, enter your domain. Leave out
http://orwww.and write only the address. -
Press Continue.
-
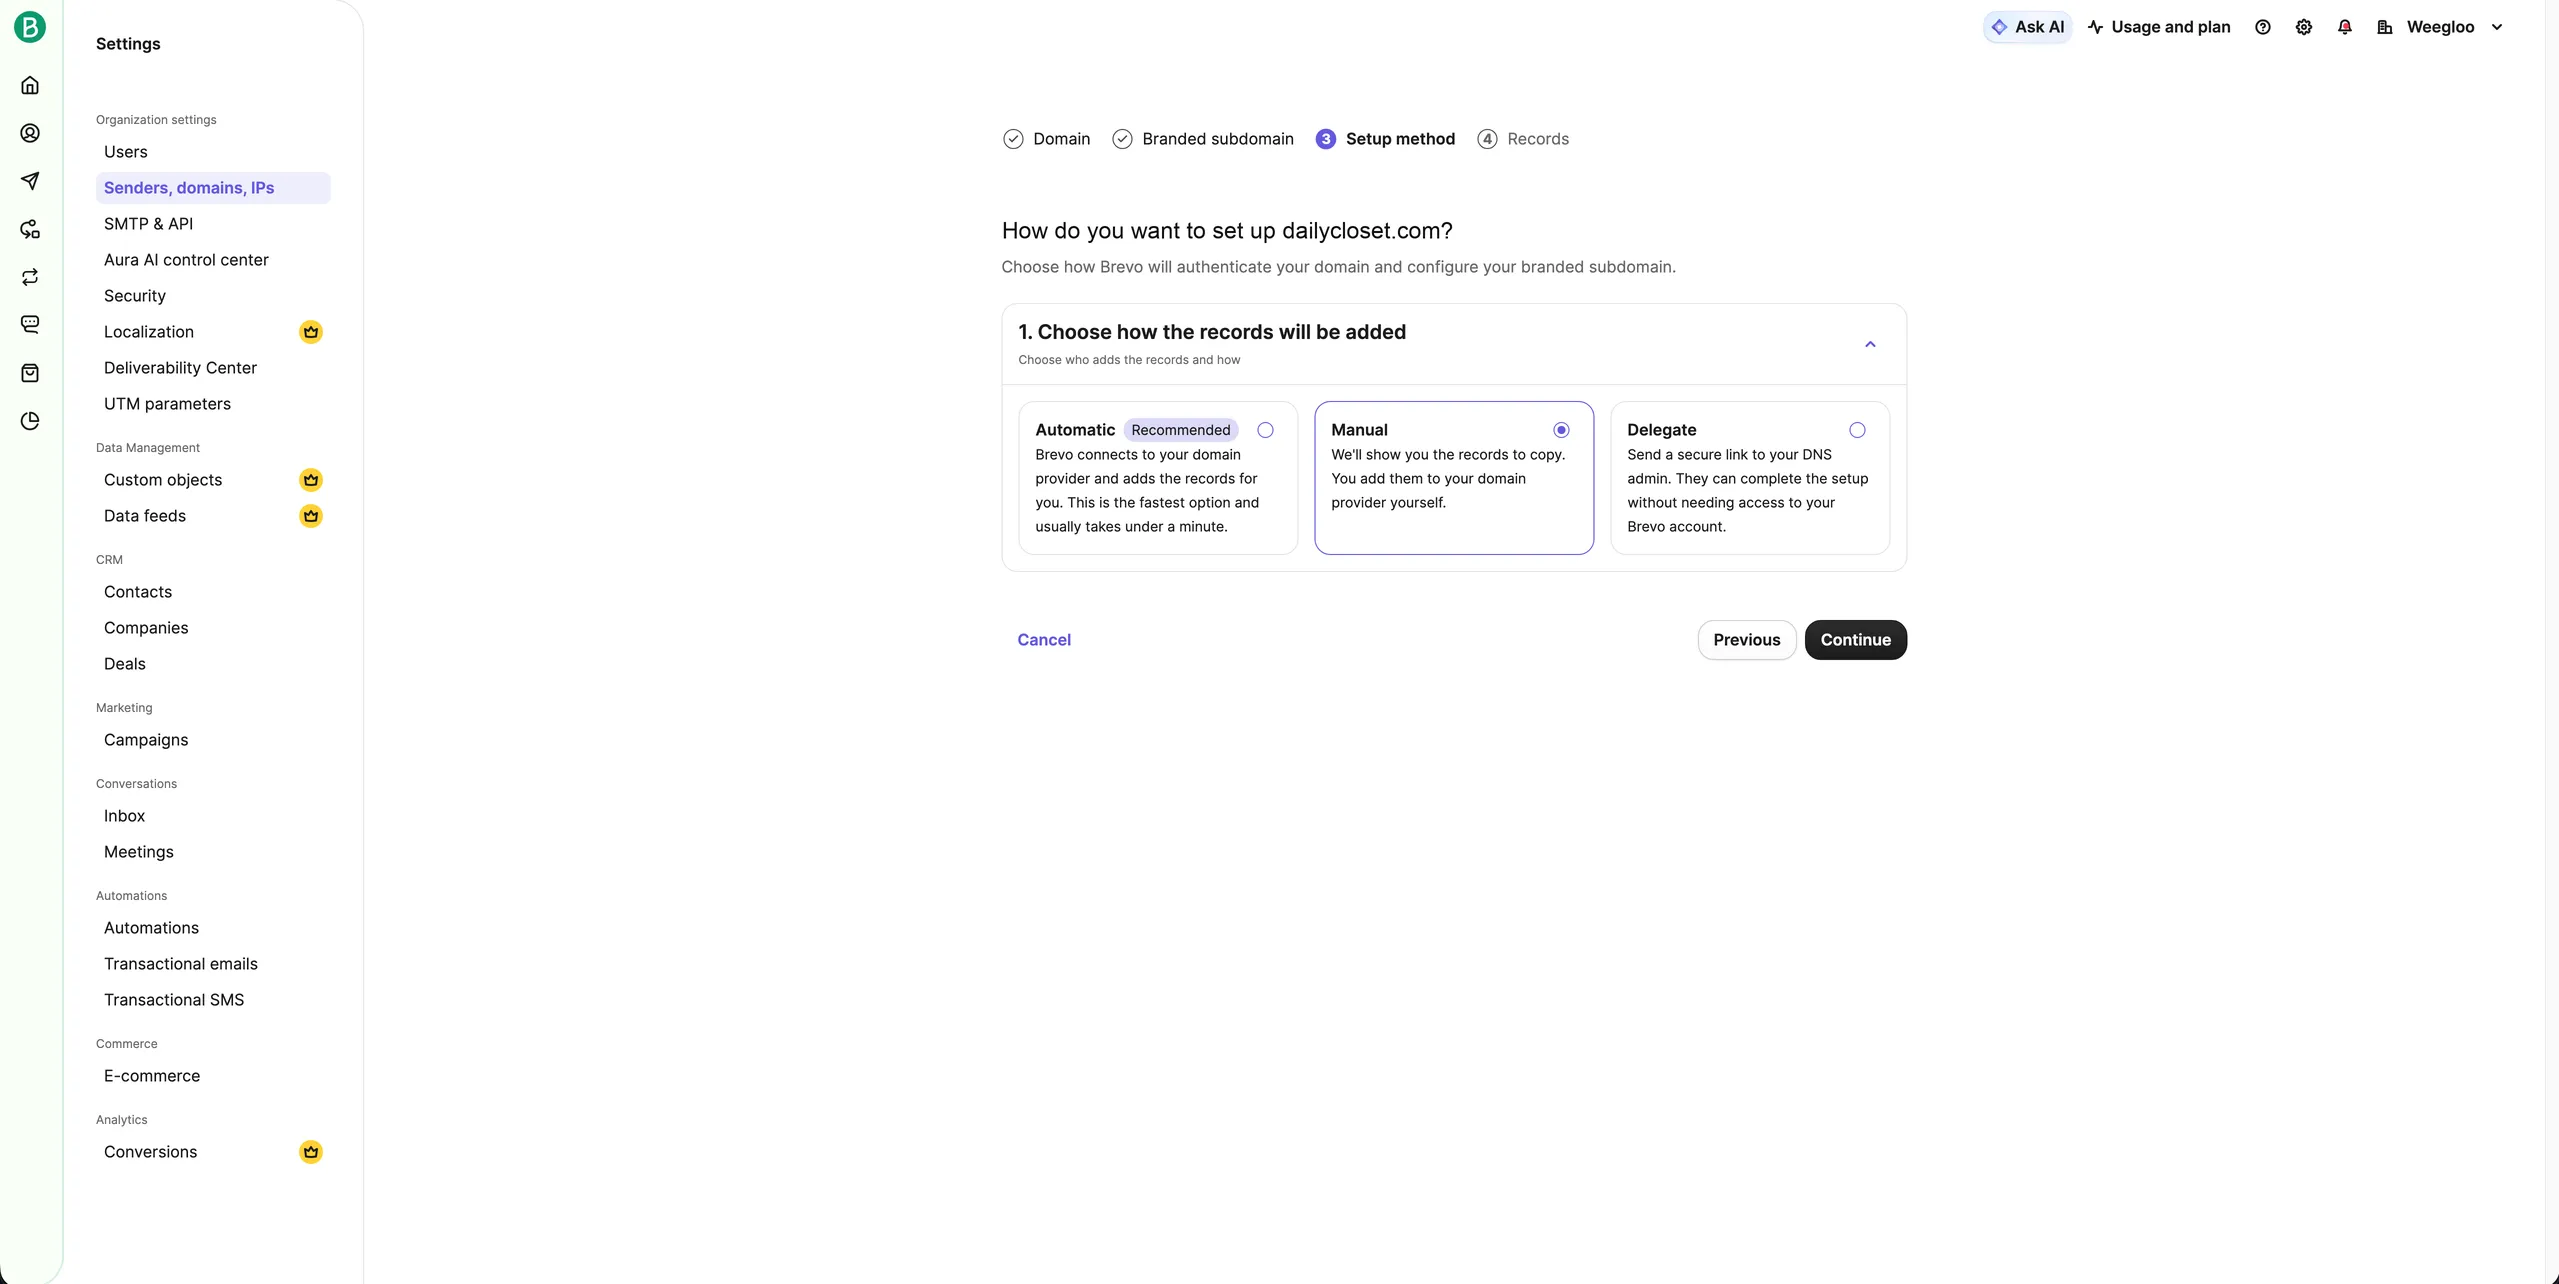
Select how to register the records. Automatic is the fastest.
-
Press Continue.
-
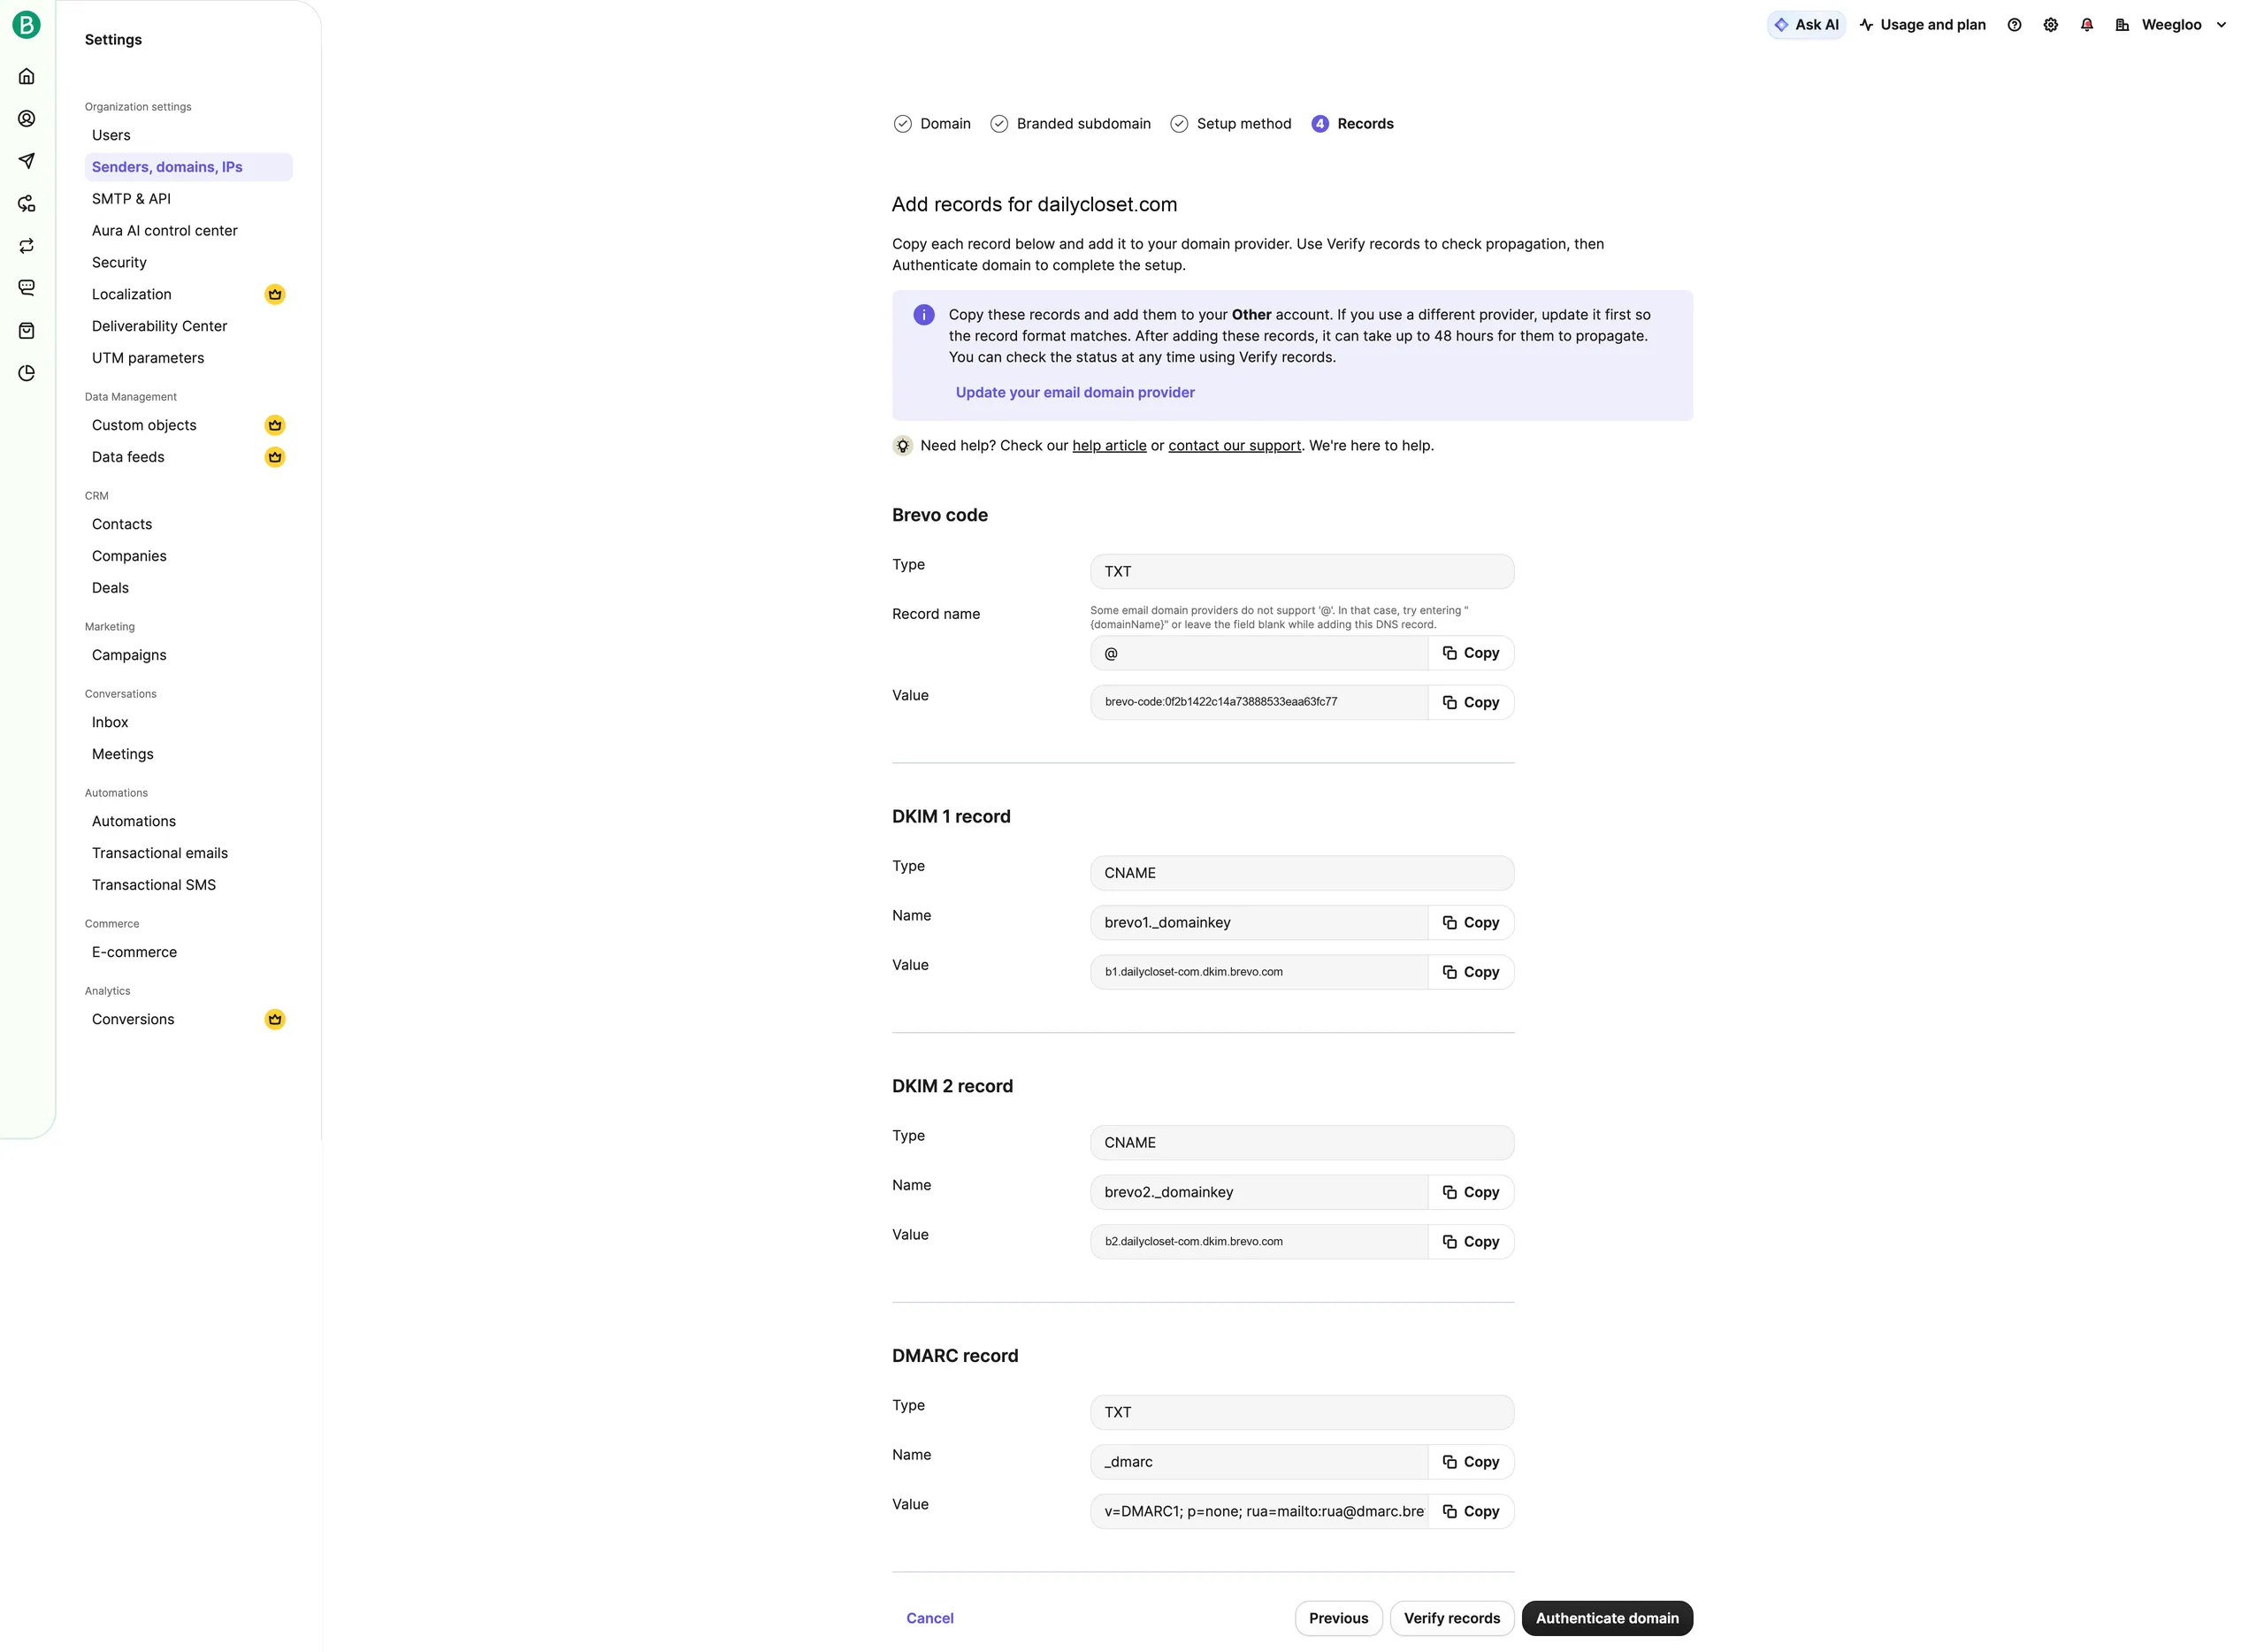
If you chose Manual, register the values displayed on the screen exactly as they are in the management screen of the place you purchased the domain from.
-
Press Verify records to check the values went in correctly.
-
Press Authenticate domain.
-
Wait until Authentication status in the list changes to Authenticated.
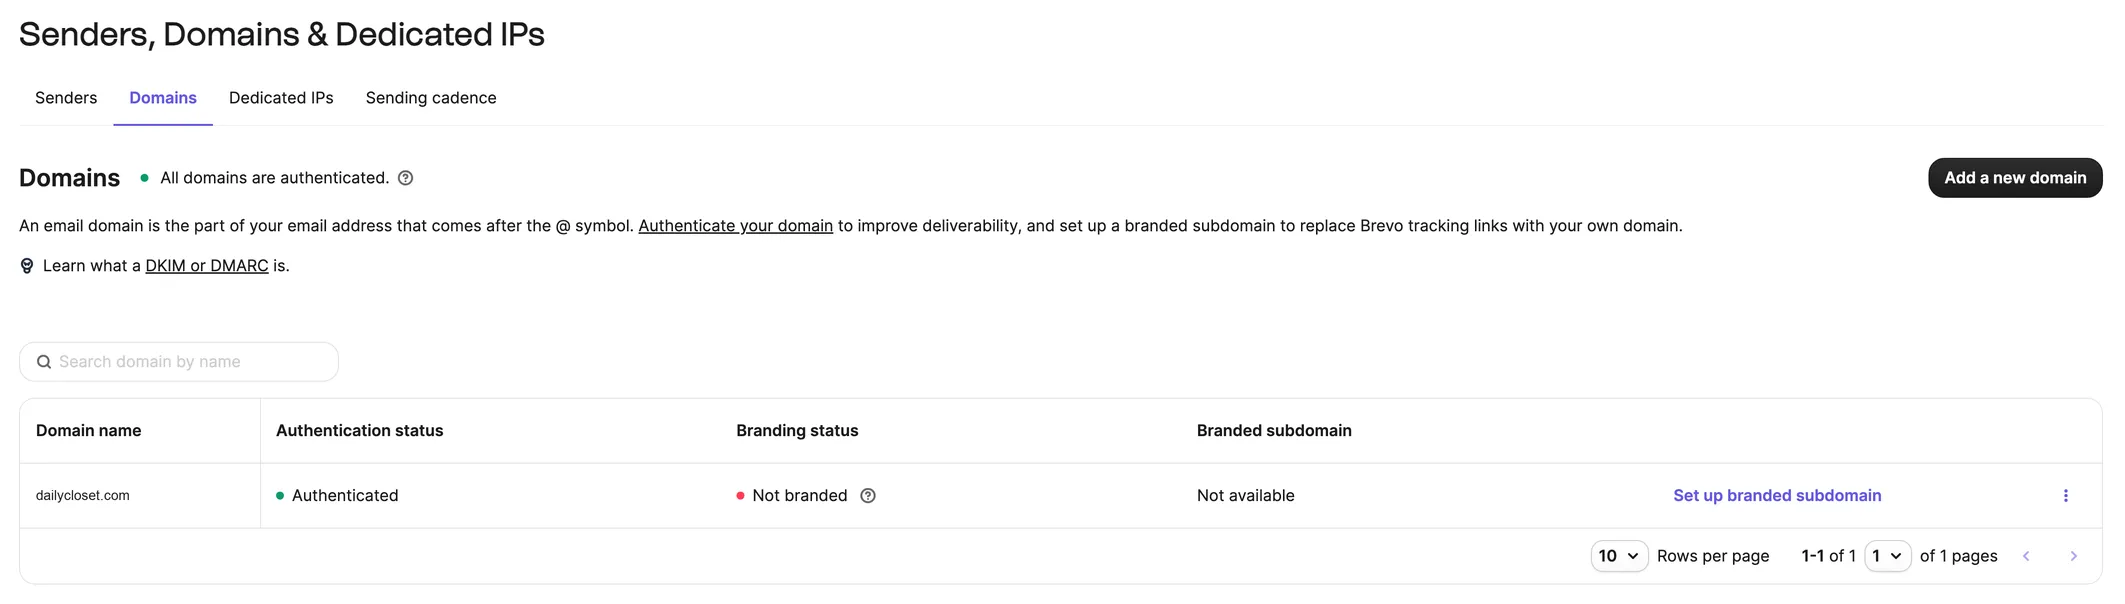
A record is a setting that records which server a domain connects to. With Automatic, Brevo connects directly to where you purchased the domain and registers the records on your behalf, so you do not need to open the management screen yourself. Manual is selected when the connection cannot be made through Automatic. It takes time for the settings to propagate.
Mail may not be delivered if you do not authenticate your domain
Since 2024, Gmail, Yahoo, and Microsoft have applied stricter authentication requirements to email senders. Without authenticating a domain, it is difficult to meet these requirements. Brevo also displays a warning for such senders, and emails you send may fail to reach recipients or be classified as spam.
Registering a sending address
This is where you set the name and address customers will see in their inbox.
-
Press the Senders tab.
-
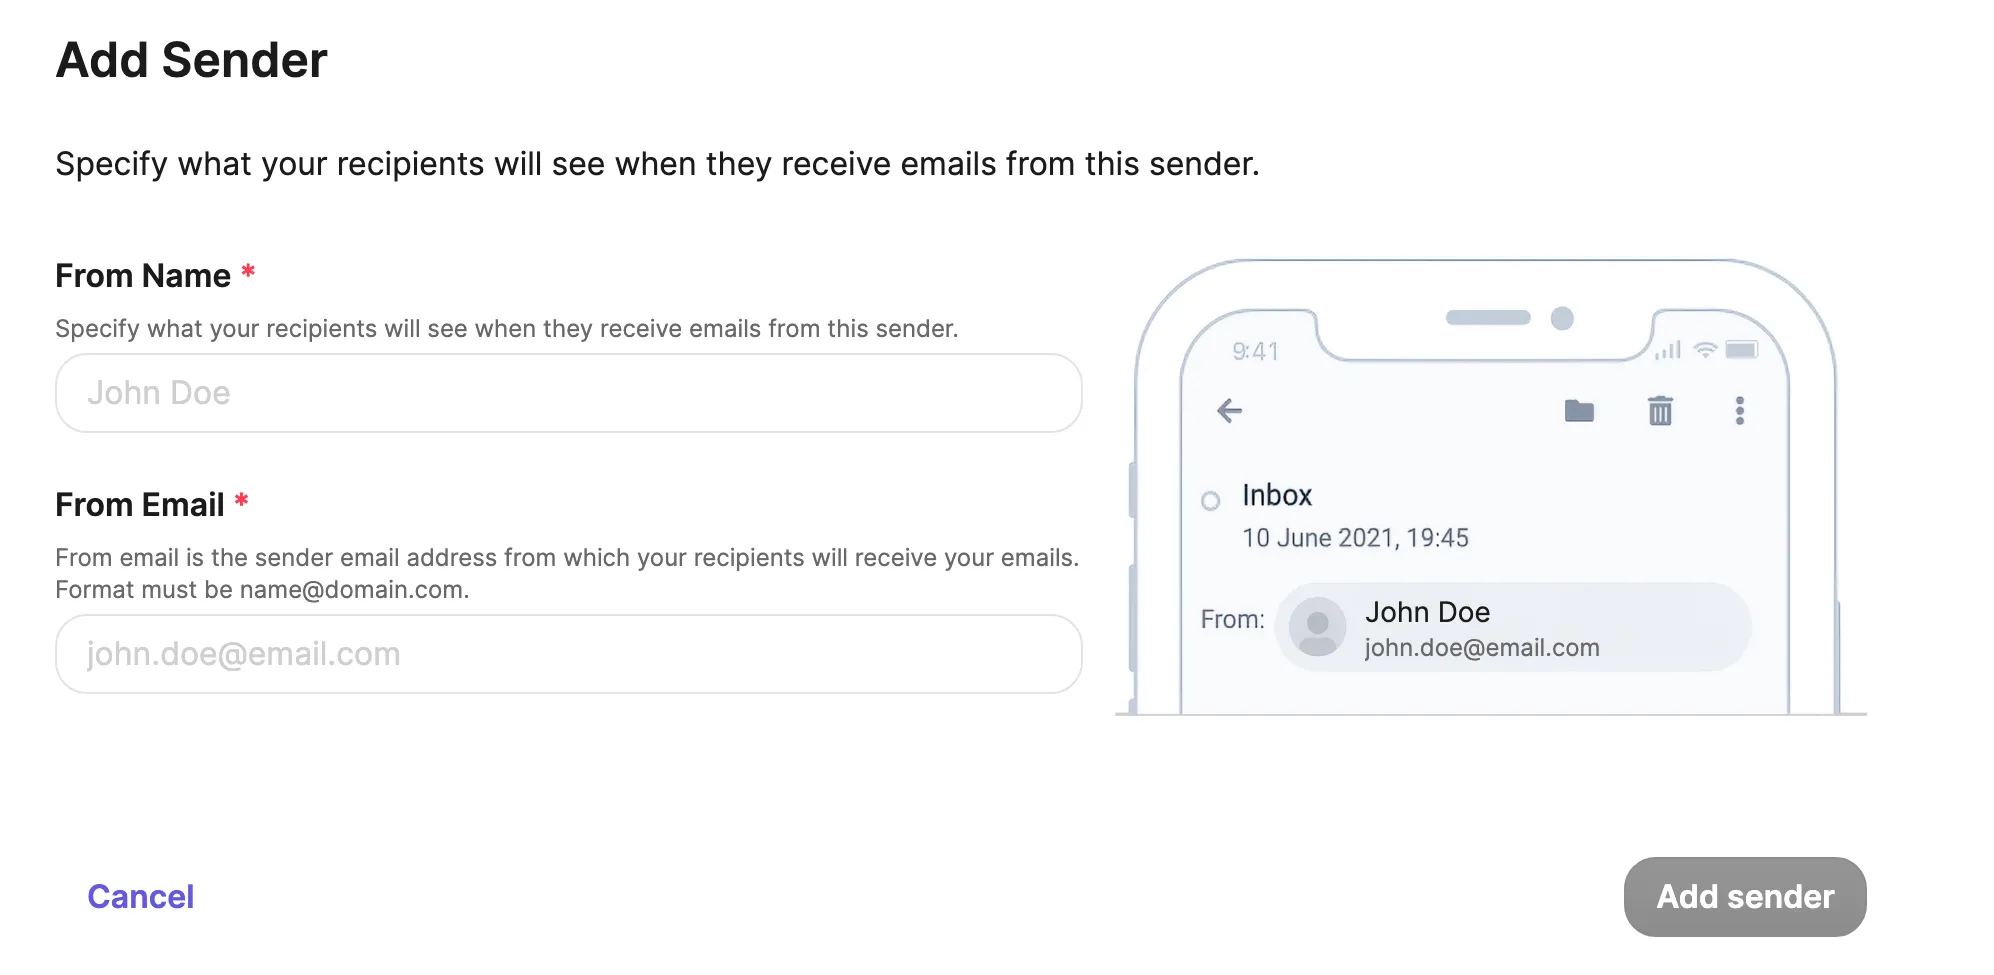
Press Add sender.
-
In From Name, enter the name customers will see (for example,
Clothing store support). -
In From Email, enter the address you will send from.
-
Press Add sender.
-
If you did not authenticate a domain, enter the six-digit number from the mail sent to that address on the screen.
-
Check that it appears in the list as Verified.
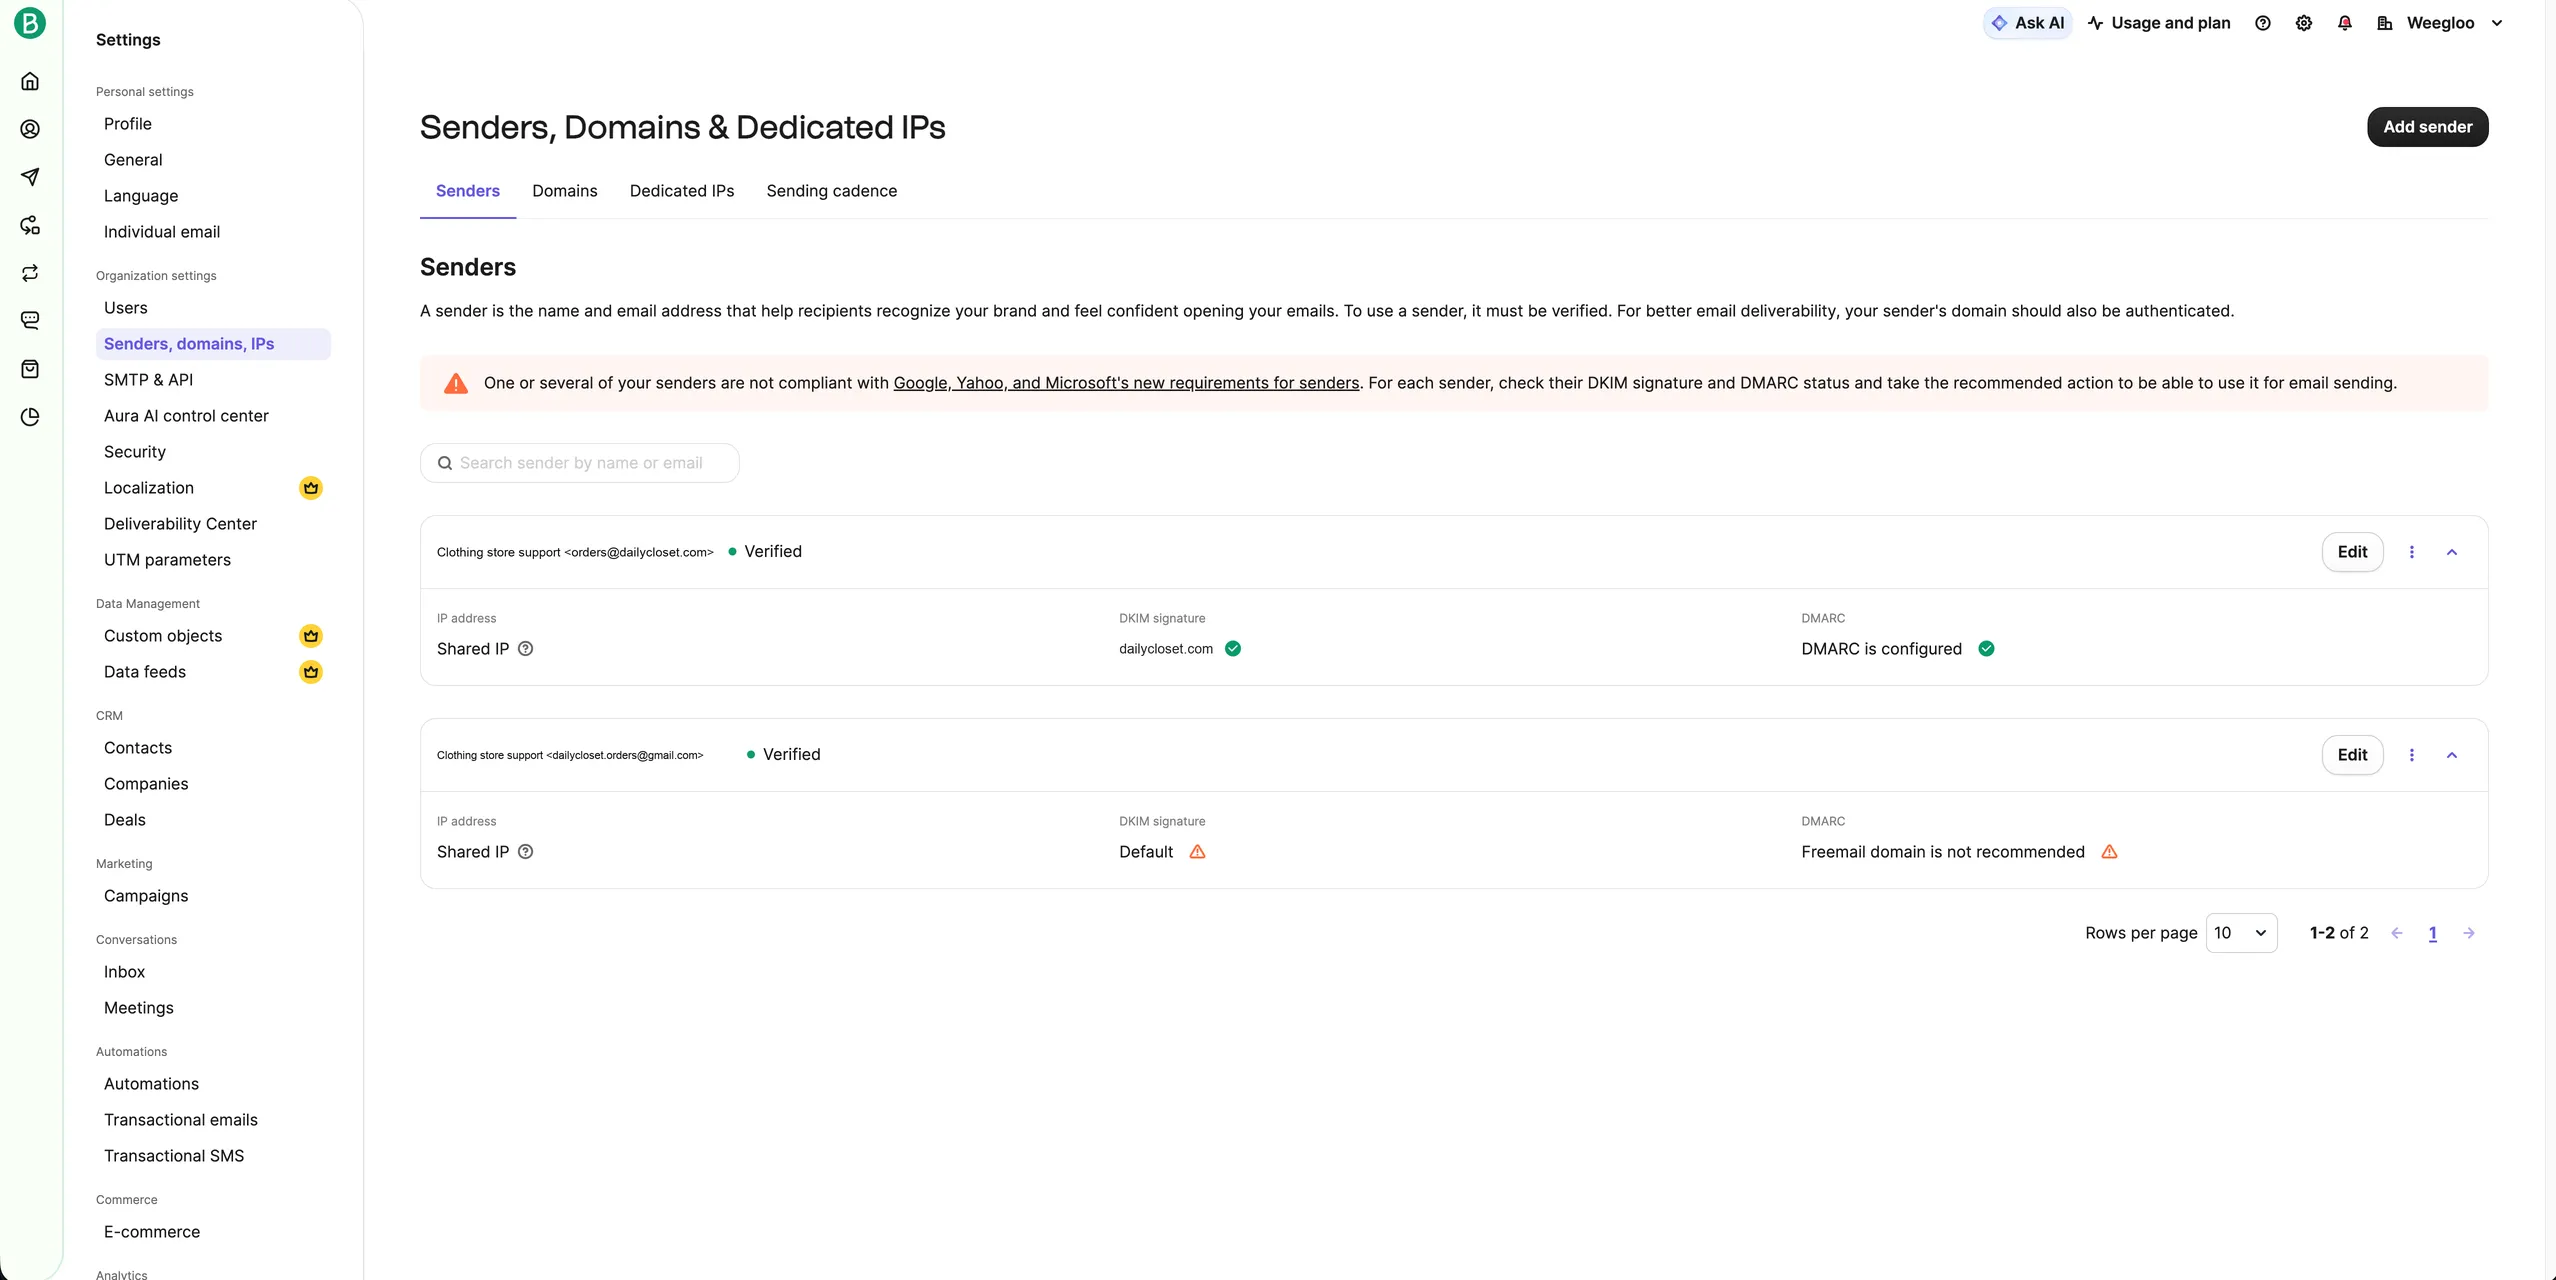
If you authenticated a domain in step 1 and entered an address on that domain, you skip item 6. An address whose domain is authenticated gets a green mark next to DKIM signature and DMARC in the list. An unauthenticated address can still be used, but it carries a warning, and a notice also appears above the list saying there is a sender that does not meet the conditions.
Creating an SMTP key
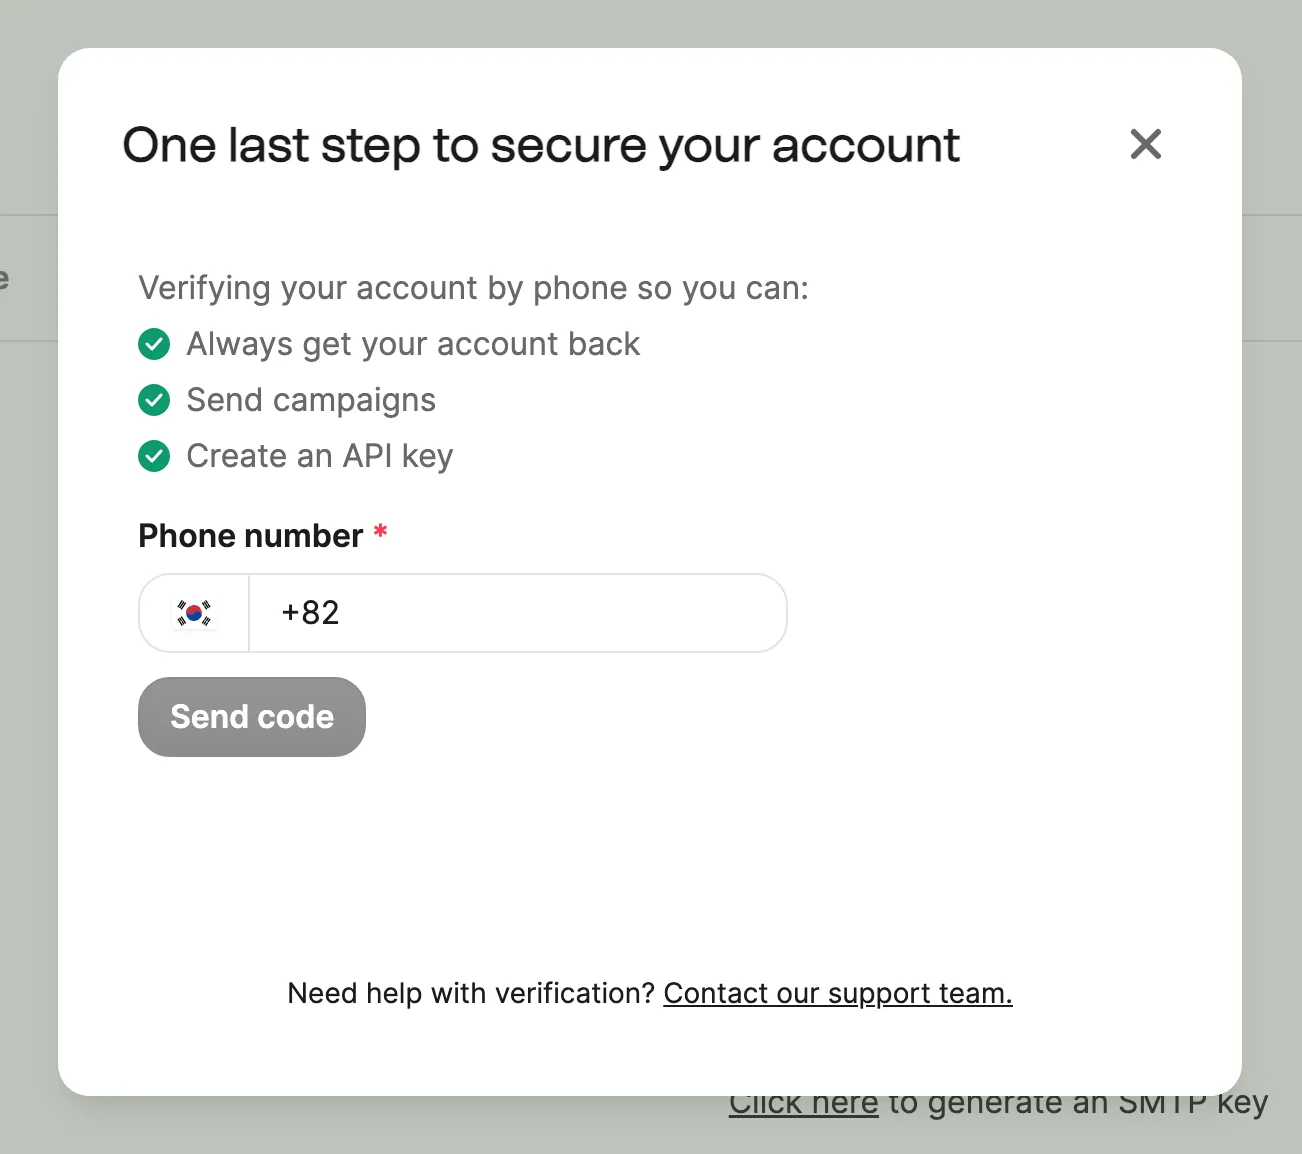
This is the value WEEGLOO will use to log in to Brevo. When you try to create a key, a phone verification window pops up first.
-
When the verification window appears, enter your number, press Send code, and enter the number you receive.
-
Press SMTP & API in the left menu.
-
Make sure you are on the SMTP tab.
-
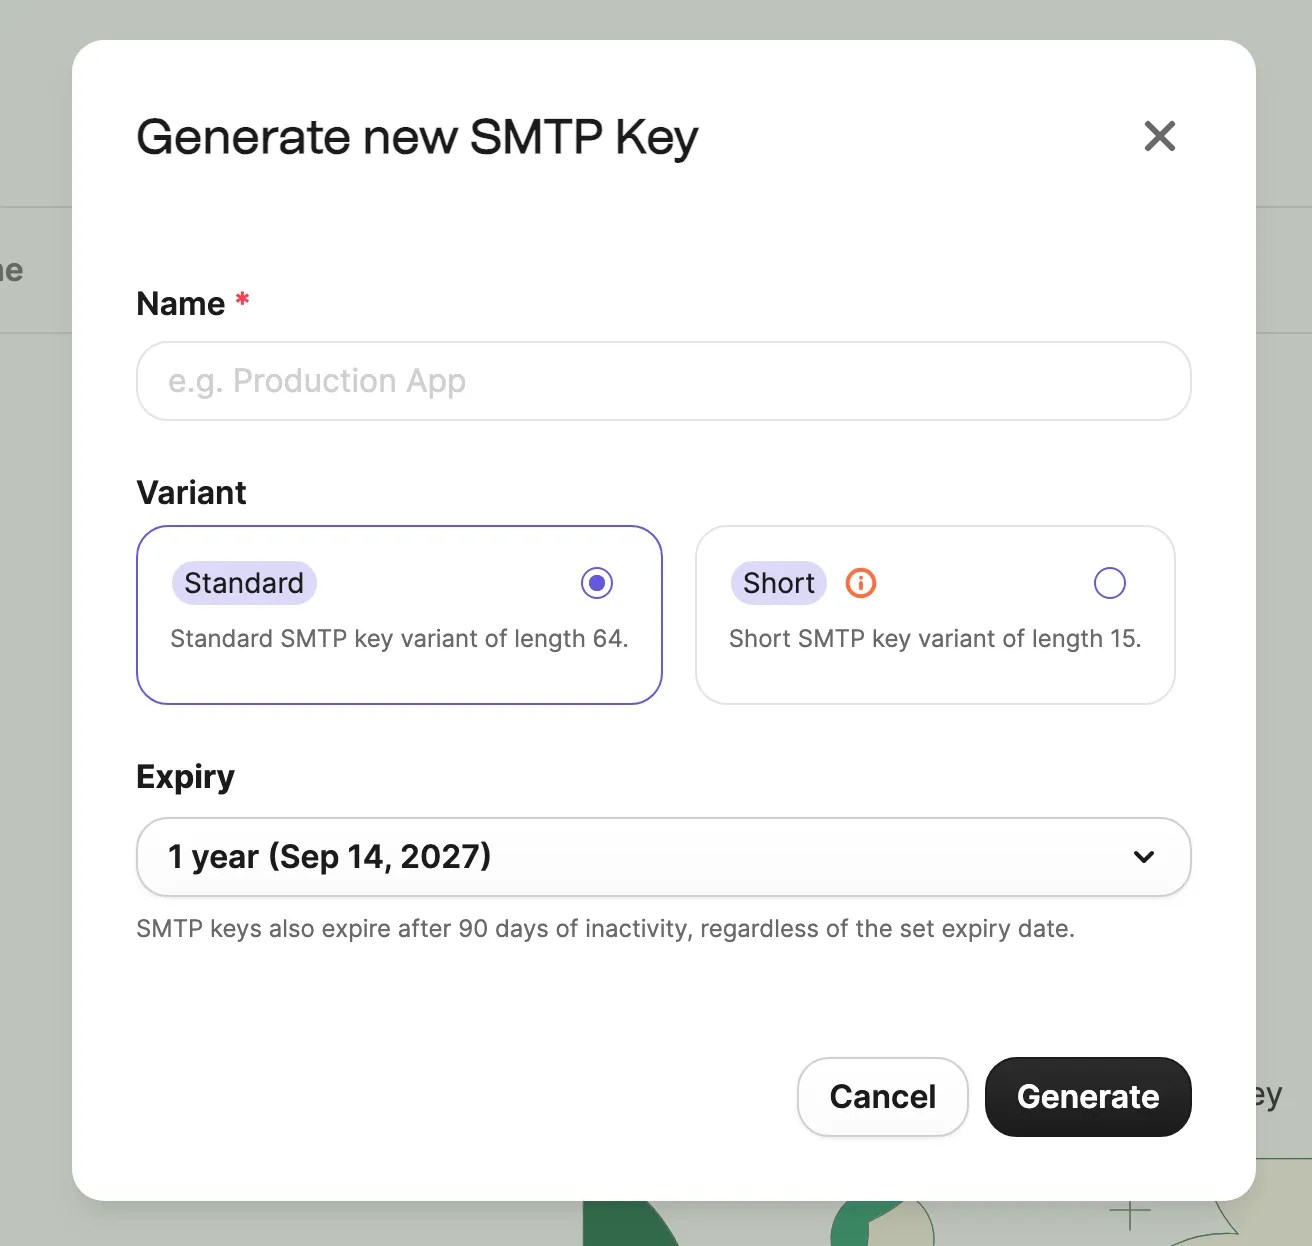
Press Generate SMTP key.
-
In Name, enter a name you will recognize later (for example,
Weegloo mail). -
Press Generate.
-
Copy down the key value that appears.
You can leave Variant and Expiry as they are.
Once you close the window the key is not shown again
If you lose it you have to create a new one. As noted at the bottom of the screen, the key expires if it goes unused for 90 days. If it expires, you have to create a new one and register it with WEEGLOO again.
Entering the values you received into WEEGLOO
Now you have an authenticated sending address and an SMTP key. One last thing to check is the username.
- Look at Your SMTP Settings on the SMTP & API screen.
- Copy down the address written in Login. This value is the username you enter into WEEGLOO.
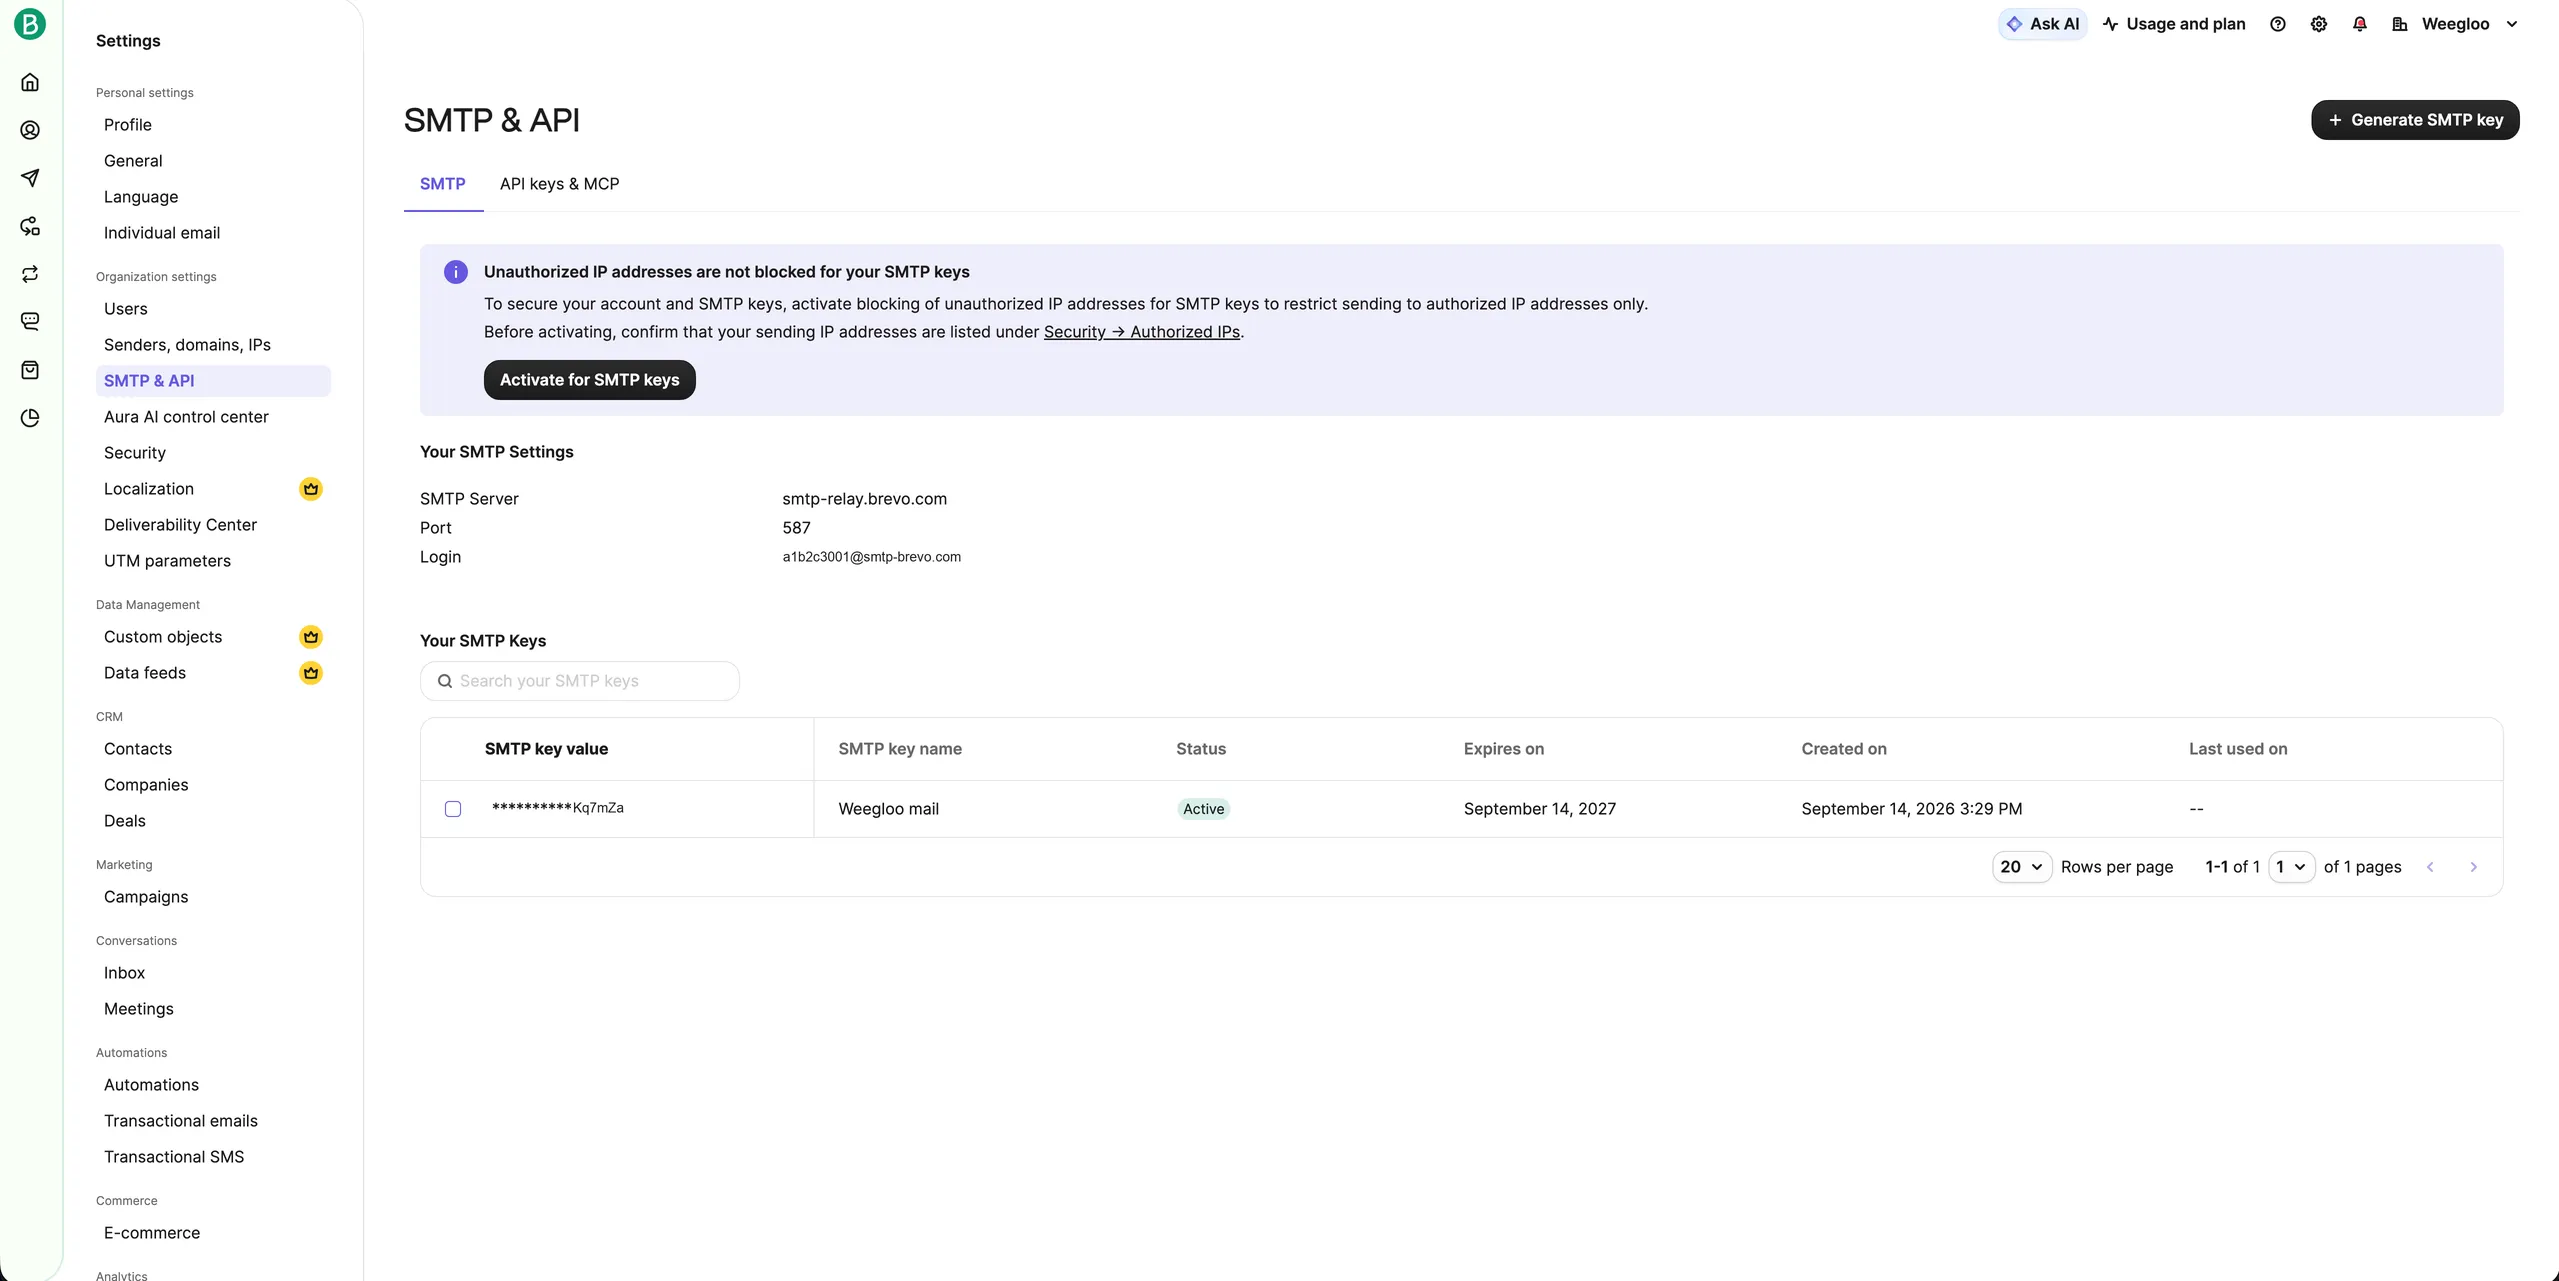
Go back to the registration steps in Sending email. In Provider, choose Custom SMTP and enter the values below.
| Where to enter it | Value |
|---|---|
| SMTP server | smtp-relay.brevo.com |
| Port | 587 |
| Username | The address written in Login under Your SMTP Settings |
| Password | The SMTP key you just received |
| From address | The address you registered and had authenticated earlier |
Do not confuse the two
The username is not your own mail address. It is an address Brevo generates for you, ending in smtp-brevo.com. Do not enter this value in the from address field.
What you enter in the password field is the SMTP key. Brevo also issues a separate API key, but mail does not go out with that.
If you left the integration to an AI agent and it told you to go get the values, paste the username, the SMTP key, and the from address into the chat window and carry on with what you were doing. The agent handles the rest of the setup from there.
What to do next
- Sending email: Covers registering a sender with the values you received, and what you register in an Email Account.
- Script: Covers how to build the task that actually sends mail to customers with the sender you registered.
- Email Account: Covers the request and response formats and field specifications used to register and manage a sender directly from a program.