

Claude 设置
Claude Desktop 中内置了编码 agent Claude Code,位于 Code 标签页。WEEGLOO MCP 服务器就是通过这个 Code 标签页连接和使用的。借助这一连接,Code 标签页中的 agent 就能直接创建、读取和修改 Content Type、Content、Media 等资源。安装工具在安装 MCP 服务器的同时,也会安装 Skills 和 Rules,帮助 Code 标签页中的 agent 按预期的方式使用 WEEGLOO API。Skills 是讲解如何出色完成特定任务的指南,Rules 则是贯穿各项任务都要遵守的规则。先用安装工具一次性完成设置,再用 claude 的 /mcp 完成认证,就能在 Code 标签页中直接使用。
关于 MCP 服务器和 Skills、Rules 的详细内容,分别在 MCP 和 Skills 与 Rules 页面中介绍。本页只讲如何连接到 Claude Desktop 的 Code 标签页。
Claude Desktop 的 Code 标签页由 Claude Code 驱动。WEEGLOO 也是通过 Code 标签页,以与 Claude Code 相同的 MCP、Skills、Rules 设置进行连接的。需要已安装 Claude Code,以便在终端中运行 claude 命令。如果还没有,请参阅 Claude Code 安装指南。
准备工作
要运行下面的安装命令,需要 Node.js。请先用以下命令确认 Node.js 是否已安装,以及版本是否为 18 及以上。
如果已安装 Node.js 但没有 npx,请用下面的命令把 npm 更新到最新版本。更新 npm 会一并安装 npx。
如果尚未安装 Node.js 或版本过低,请按照所用操作系统对应的方法安装 Node.js。
如果没有 Homebrew,请先在 brew.sh 安装,或在 nodejs.org 直接下载 Node.js。
如果没有 winget 或无法识别,请在 nodejs.org 下载 LTS 安装文件。安装后需要重新打开终端。
发行版自带的软件包可能是旧版本,因此推荐使用可在多个发行版上使用的 nvm 来安装。
如需直接下载安装文件,请在 nodejs.org 查看。
进行连接
基本安装只需复制本页的安装命令,在终端中运行一次即可。若想逐步自行选择安装过程中的各项,请打开 自定义安装。
安装 MCP · Skills
复制安装命令,并在终端中运行它。
认证 MCP
请按下面的顺序进行认证。
此步骤需要 Claude Code CLI(claude)。如果还没有,请先安装 Claude Code。
-
在终端中运行 Claude Code。
终端claude -
输入
/mcp,打开 MCP 服务器管理界面。终端/mcp -
在列表中选择
weegloo。它会显示为needs authentication状态。终端Manage MCP servers > weegloo · ∆ needs authentication weegloo-upload · √ connected -
确认连接地址为
https://ai.weegloo.com/mcp,然后选择 Authenticate。终端Weegloo MCP Server Status: ∆ needs authentication URL: https://ai.weegloo.com/mcp > 1. Authenticate 2. Disable -
选择 Authenticate 后,浏览器会打开如下所示的 WEEGLOO 认证页面。用 复制令牌 按钮复制令牌并粘贴,然后点击 连接服务器。当
weegloo变为connected时即完成。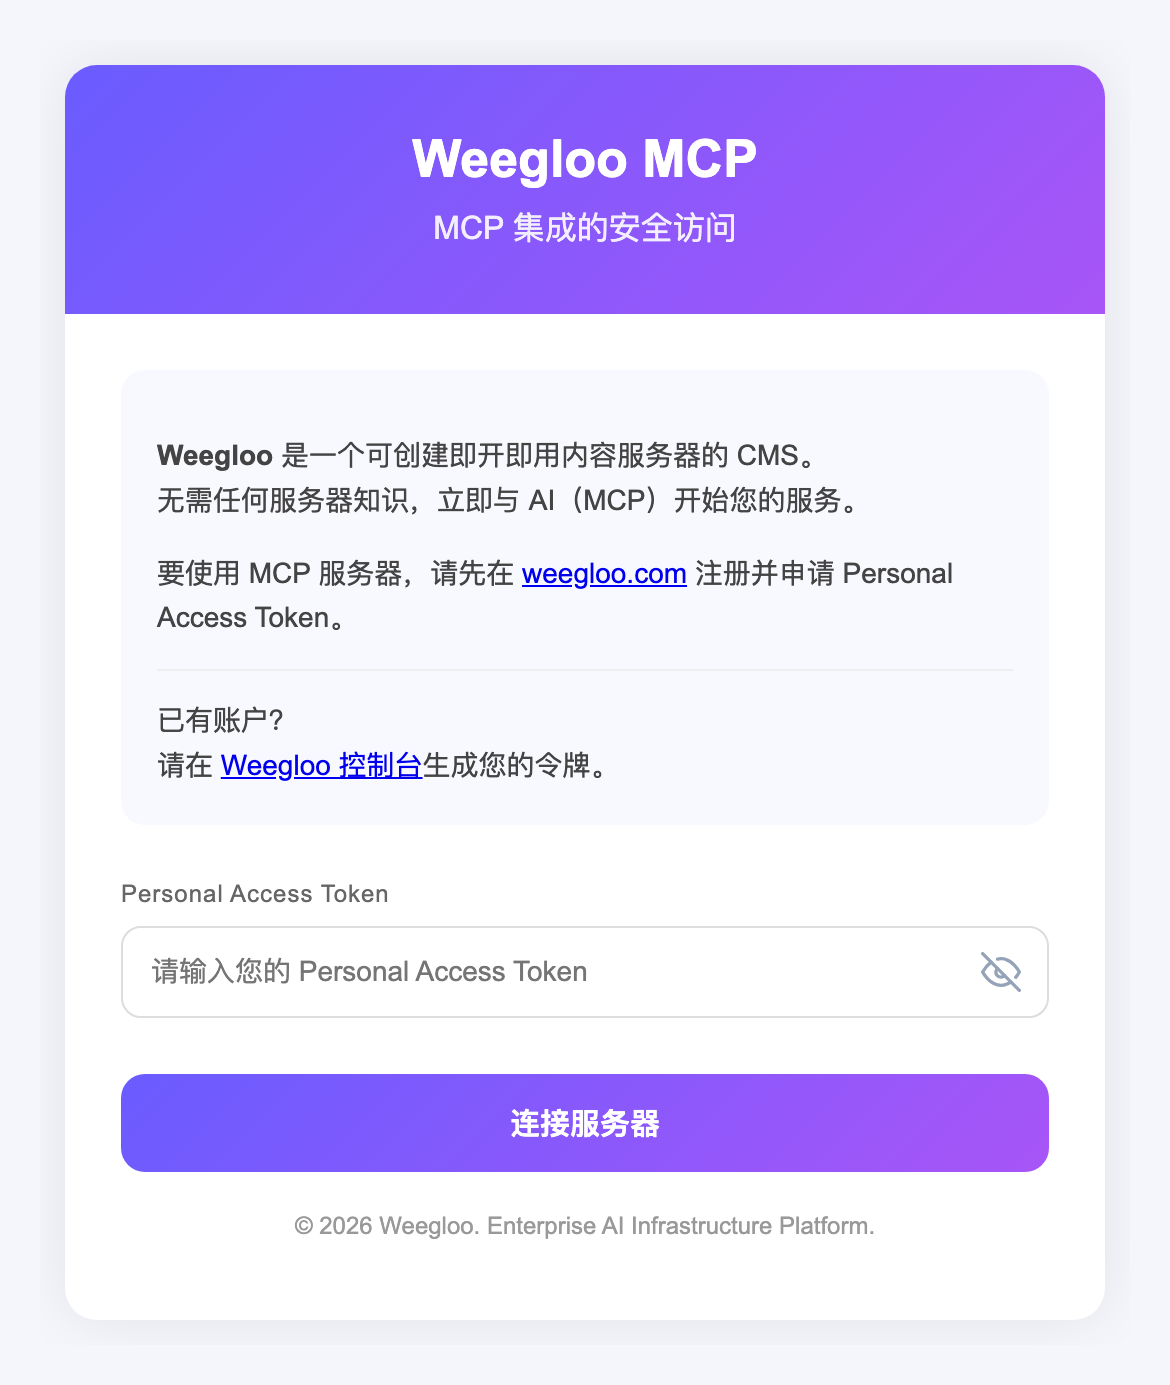
安装 MCP · Skills
复制安装命令,并在终端中运行它。请务必在你要连接的项目文件夹内运行。
认证 MCP
请按下面的顺序进行认证。
此步骤需要 Claude Code CLI(claude)。如果还没有,请先安装 Claude Code。
-
在终端中运行 Claude Code。请务必在你要连接的项目文件夹内运行。
终端claude -
首次运行时,可能会询问是否启用新的 MCP 服务器。这种情况下,请确认
weegloo和weegloo-upload处于已勾选状态,然后按Enter提交。终端New MCP servers found in .mcp.json Select any you wish to enable. > [√] weegloo [√] weegloo-upload -
输入
/mcp,打开 MCP 服务器管理界面。终端/mcp -
在列表中选择
weegloo。它会显示为needs authentication状态。终端Manage MCP servers > weegloo · ∆ needs authentication weegloo-upload · √ connected如果列表中看不到服务器:如果在列表中看不到
weegloo和weegloo-upload,可能是没有在第 2 步的启用界面提交,或者它们处于禁用状态。请退出 Claude Code,在终端中输入下面的命令,然后重新运行claude。如果再次出现与第 2 步相同的界面,请在weegloo和weegloo-upload处于勾选状态下按Enter提交。终端claude mcp reset-project-choices -
确认连接地址为
https://ai.weegloo.com/mcp,然后选择 Authenticate。终端Weegloo MCP Server Status: ∆ needs authentication URL: https://ai.weegloo.com/mcp > 1. Authenticate 2. Disable -
选择 Authenticate 后,浏览器会打开如下所示的 WEEGLOO 认证页面。用 复制令牌 按钮复制令牌并粘贴,然后点击 连接服务器。当
weegloo变为connected时即完成。
以交互方式运行 npx weegloo,自行选择所询问的各项来完成安装。
运行安装工具
在终端中运行下面的命令,并按顺序选择所询问的各项。在要求输入 Token 的位置,用下方的 复制令牌 按钮复制令牌并粘贴。
认证 MCP
请按下面的顺序进行认证。
此步骤需要 Claude Code CLI(claude)。如果还没有,请先安装 Claude Code。
-
在终端中运行 Claude Code。
终端claude -
输入
/mcp,打开 MCP 服务器管理界面。终端/mcp -
在列表中选择
weegloo。它会显示为needs authentication状态。终端Manage MCP servers > weegloo · ∆ needs authentication weegloo-upload · √ connected -
确认连接地址为
https://ai.weegloo.com/mcp,然后选择 Authenticate。终端Weegloo MCP Server Status: ∆ needs authentication URL: https://ai.weegloo.com/mcp > 1. Authenticate 2. Disable -
选择 Authenticate 后,浏览器会打开如下所示的 WEEGLOO 认证页面。用 复制令牌 按钮复制令牌并粘贴,然后点击 连接服务器。当
weegloo变为connected时即完成。
运行安装工具
先进入你要连接的项目文件夹,然后在该文件夹中运行下面的命令,并按顺序选择所询问的各项。在要求输入 Token 的位置,用下方的 复制令牌 按钮复制令牌并粘贴。请务必在该项目文件夹内运行。
认证 MCP
请按下面的顺序进行认证。
此步骤需要 Claude Code CLI(claude)。如果还没有,请先安装 Claude Code。
-
在终端中运行 Claude Code。请务必在你要连接的项目文件夹内运行。
终端claude -
首次运行时,可能会询问是否启用新的 MCP 服务器。这种情况下,请确认
weegloo和weegloo-upload处于已勾选状态,然后按Enter提交。终端New MCP servers found in .mcp.json Select any you wish to enable. > [√] weegloo [√] weegloo-upload -
输入
/mcp,打开 MCP 服务器管理界面。终端/mcp -
在列表中选择
weegloo。它会显示为needs authentication状态。终端Manage MCP servers > weegloo · ∆ needs authentication weegloo-upload · √ connected如果列表中看不到服务器:如果在列表中看不到
weegloo和weegloo-upload,可能是没有在第 2 步的启用界面提交,或者它们处于禁用状态。请退出 Claude Code,在终端中输入下面的命令,然后重新运行claude。如果再次出现与第 2 步相同的界面,请在weegloo和weegloo-upload处于勾选状态下按Enter提交。终端claude mcp reset-project-choices -
确认连接地址为
https://ai.weegloo.com/mcp,然后选择 Authenticate。终端Weegloo MCP Server Status: ∆ needs authentication URL: https://ai.weegloo.com/mcp > 1. Authenticate 2. Disable -
选择 Authenticate 后,浏览器会打开如下所示的 WEEGLOO 认证页面。用 复制令牌 按钮复制令牌并粘贴,然后点击 连接服务器。当
weegloo变为connected时即完成。
MCP 服务器配置文件
Code 标签页直接沿用 Claude Code 的 MCP、Skills、Rules 设置。因此,连接的服务器不会出现在 Claude Desktop 的连接器、插件、MCP 界面中,只能在 Code 标签页中使用。要查看已安装的服务器,请在终端中运行 claude 并输入 /mcp。下面的 .mcp.json 同样由安装工具自动生成和管理,因此几乎无需自行打开查看。以下配置内容是为需要具体配置文件结构和路径的用户提供的参考资料。
weegloo 服务器以 HTTP 方式连接到 https://ai.weegloo.com/mcp,处理文件的 weegloo-upload 服务器通过 npx 运行,并使用 Personal Access Token 进行认证。
{
  "mcpServers": {
    "weegloo": {
      "type": "http",
      "url": "https://ai.weegloo.com/mcp"
    },
    "weegloo-upload": {
      "command": "npx",
      "args": ["-y", "weegloo-upload"],
      "env": {
        "UPLOAD_API_URL": "https://upload.weegloo.com/v1",
        "AUTH_BEARER_TOKEN": "<Personal Access Token>"
      }
    }
  }
}
要更换服务器分组,请在 weegloo 服务器的 url 末尾附加 group 值。例如,要使用所有工具,就写成 https://ai.weegloo.com/mcp?group=all。各分组的工具构成请参阅 MCP 服务器分组。
Skills
Claude Code 原生支持 Skills。安装工具会把每个 Skill 组织为一个目录放入。全局安装使用 ~/.claude/skills/,项目安装使用项目文件夹中的 .claude/skills/。
Rules
Claude Code 原生支持 Rules。安装工具会把每条规则组织为一个 .md 文件放入。全局安装使用 ~/.claude/rules/,项目安装使用项目文件夹中的 .claude/rules/。
下一步
- MCP:介绍服务器分组、文件上传服务器等作为连接基础的内容。
- Skills 与 Rules:介绍安装工具一并安装的 Skills 和 Rules 是什么。
- 保持最新状态:介绍如何让已安装的 Skills 和 Rules 保持最新。
- 用 AI 迁移静态页面:跟随流程,用已连接的 MCP 把实际页面迁移为基于内容的服务。