

立即开始
WEEGLOO 是一个把你创建的界面完善成真实服务的平台。你无需学习内容工作室的用法,也无需了解通信格式,只要用自然语言吩咐你正在使用的 AI 智能体,它就会把会员、数据、发布、部署等界面背后所需的一切自动准备好。底层有一套连大规模服务都能承载的内容管理系统(CMS),无论什么样的服务都能搭建在它之上。连接之后,说一句话就够了。
1. 准备工作
运行下面的安装命令需要 Node.js。请先使用以下命令确认是否已安装,以及版本是否为 18 或更高版本。
如果已安装 Node.js 但没有 npx,请使用下面的命令将 npm 更新到最新版本。更新 npm 时会一并安装 npx。
如果尚未安装 Node.js,或者版本过低,请根据你使用的操作系统安装 Node.js。
如果没有 Homebrew,请先从 brew.sh 安装,或者从 nodejs.org 直接下载 Node.js。
如果尚未安装 winget,或者无法识别该命令,请从 nodejs.org 下载 LTS 安装文件。安装完成后,需要重新打开终端。
发行版的软件包可能不是最新版本,因此建议使用可在多种发行版上使用的 nvm 进行安装。
如需直接下载安装文件,请前往 nodejs.org 查看。
2. 连接 AI 智能体
选择你在用的编程工具。基本安装只需复制本页的安装命令,在终端中运行一次即可。如果想逐步自行选择安装过程,请打开自定义安装。
所用工具
安装 MCP · Skills
复制安装命令,在终端中运行。
连接 MCP 认证
请按下面的顺序进行认证。
此步骤需要 Claude Code CLI(claude)。如果还没有,请安装 Claude Code。
-
在终端中运行 Claude Code。
终端claude -
输入
/mcp打开 MCP 服务器管理界面。终端/mcp -
在列表中选择
weegloo。它会显示为needs authentication状态。终端Manage MCP servers > weegloo · ∆ needs authentication weegloo-upload · √ connected -
确认连接地址是否为
https://ai.weegloo.com/mcp,然后选择 Authenticate。终端Weegloo MCP Server Status: ∆ needs authentication URL: https://ai.weegloo.com/mcp > 1. Authenticate 2. Disable -
选择 Authenticate 后,浏览器中会打开 WEEGLOO 认证页面。用下面的复制令牌按钮复制令牌并粘贴,然后点击连接服务器。当
weegloo变为connected时即完成。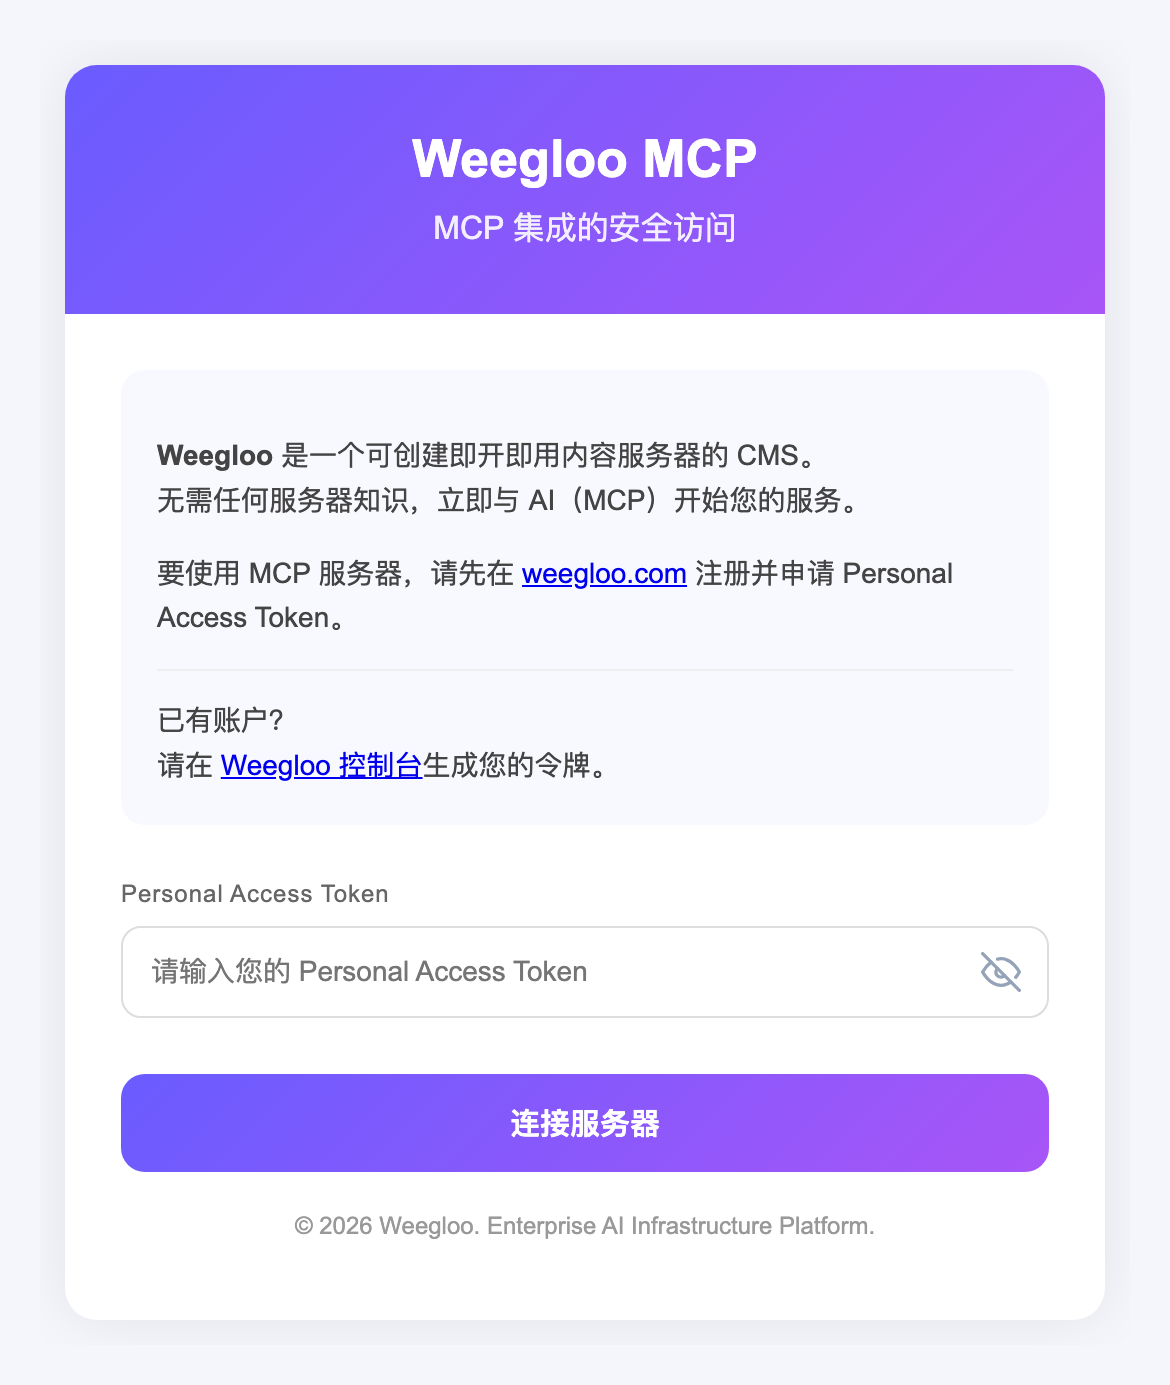
以交互方式运行 npx weegloo,逐项选择进行安装。
运行安装工具
在终端中运行下面的命令,依次选择所问的项目。在询问令牌的地方,用下面的复制令牌按钮复制令牌并粘贴。
连接 MCP 认证
请按下面的顺序进行认证。
此步骤需要 Claude Code CLI(claude)。如果还没有,请安装 Claude Code。
-
在终端中运行 Claude Code。
终端claude -
输入
/mcp打开 MCP 服务器管理界面。终端/mcp -
在列表中选择
weegloo。它会显示为needs authentication状态。终端Manage MCP servers > weegloo · ∆ needs authentication weegloo-upload · √ connected -
确认连接地址是否为
https://ai.weegloo.com/mcp,然后选择 Authenticate。终端Weegloo MCP Server Status: ∆ needs authentication URL: https://ai.weegloo.com/mcp > 1. Authenticate 2. Disable -
选择 Authenticate 后,浏览器中会打开 WEEGLOO 认证页面。用下面的复制令牌按钮复制令牌并粘贴,然后点击连接服务器。当
weegloo变为connected时即完成。
运行安装工具
先进入要对接的项目文件夹,然后在该文件夹中运行下面的命令,依次选择所问的项目。在询问令牌的地方,用下面的复制令牌按钮复制令牌并粘贴。务必在该项目文件夹内运行。
连接 MCP 认证
请按下面的顺序进行认证。
此步骤需要 Claude Code CLI(claude)。如果还没有,请安装 Claude Code。
-
在终端中运行 Claude Code。务必在要对接的项目文件夹内运行。
终端claude -
首次运行时,可能会询问是否启用新的 MCP 服务器。这种情况下,确认
weegloo和weegloo-upload处于已勾选状态,然后按Enter提交。终端New MCP servers found in .mcp.json Select any you wish to enable. > [√] weegloo [√] weegloo-upload -
输入
/mcp打开 MCP 服务器管理界面。终端/mcp -
在列表中选择
weegloo。它会显示为needs authentication状态。终端Manage MCP servers > weegloo · ∆ needs authentication weegloo-upload · √ connected如果列表中看不到服务器:如果在列表中看不到
weegloo和weegloo-upload,可能是在第 2 步的启用界面没有提交,或者处于已停用状态。请退出 Claude Code,在终端中输入下面的命令,然后重新运行claude。如果再次出现与第 2 步相同的界面,请在weegloo和weegloo-upload处于勾选状态下按Enter提交。终端claude mcp reset-project-choices -
确认连接地址是否为
https://ai.weegloo.com/mcp,然后选择 Authenticate。终端Weegloo MCP Server Status: ∆ needs authentication URL: https://ai.weegloo.com/mcp > 1. Authenticate 2. Disable -
选择 Authenticate 后,浏览器中会打开 WEEGLOO 认证页面。用下面的复制令牌按钮复制令牌并粘贴,然后点击连接服务器。当
weegloo变为connected时即完成。
安装 MCP · Skills
复制安装命令,在终端中运行。
连接 MCP 认证
请按下面的顺序进行认证。
-
在终端中运行 Claude Code。
终端claude -
输入
/mcp打开 MCP 服务器管理界面。终端/mcp -
在列表中选择
weegloo。它会显示为needs authentication状态。终端Manage MCP servers > weegloo · ∆ needs authentication weegloo-upload · √ connected -
确认连接地址是否为
https://ai.weegloo.com/mcp,然后选择 Authenticate。终端Weegloo MCP Server Status: ∆ needs authentication URL: https://ai.weegloo.com/mcp > 1. Authenticate 2. Disable -
选择 Authenticate 后,浏览器中会打开 WEEGLOO 认证页面。用下面的复制令牌按钮复制令牌并粘贴,然后点击连接服务器。当
weegloo变为connected时即完成。
以交互方式运行 npx weegloo,逐项选择进行安装。
运行安装工具
在终端中运行下面的命令,依次选择所问的项目。在询问令牌的地方,用下面的复制令牌按钮复制令牌并粘贴。
连接 MCP 认证
请按下面的顺序进行认证。
-
在终端中运行 Claude Code。
终端claude -
输入
/mcp打开 MCP 服务器管理界面。终端/mcp -
在列表中选择
weegloo。它会显示为needs authentication状态。终端Manage MCP servers > weegloo · ∆ needs authentication weegloo-upload · √ connected -
确认连接地址是否为
https://ai.weegloo.com/mcp,然后选择 Authenticate。终端Weegloo MCP Server Status: ∆ needs authentication URL: https://ai.weegloo.com/mcp > 1. Authenticate 2. Disable -
选择 Authenticate 后,浏览器中会打开 WEEGLOO 认证页面。用下面的复制令牌按钮复制令牌并粘贴,然后点击连接服务器。当
weegloo变为connected时即完成。
运行安装工具
先进入要对接的项目文件夹,然后在该文件夹中运行下面的命令,依次选择所问的项目。在询问令牌的地方,用下面的复制令牌按钮复制令牌并粘贴。务必在该项目文件夹内运行。
连接 MCP 认证
请按下面的顺序进行认证。
-
在终端中运行 Claude Code。务必在要对接的项目文件夹内运行。
终端claude -
首次运行时,可能会询问是否启用新的 MCP 服务器。这种情况下,确认
weegloo和weegloo-upload处于已勾选状态,然后按Enter提交。终端New MCP servers found in .mcp.json Select any you wish to enable. > [√] weegloo [√] weegloo-upload -
输入
/mcp打开 MCP 服务器管理界面。终端/mcp -
在列表中选择
weegloo。它会显示为needs authentication状态。终端Manage MCP servers > weegloo · ∆ needs authentication weegloo-upload · √ connected如果列表中看不到服务器:如果在列表中看不到
weegloo和weegloo-upload,可能是在第 2 步的启用界面没有提交,或者处于已停用状态。请退出 Claude Code,在终端中输入下面的命令,然后重新运行claude。如果再次出现与第 2 步相同的界面,请在weegloo和weegloo-upload处于勾选状态下按Enter提交。终端claude mcp reset-project-choices -
确认连接地址是否为
https://ai.weegloo.com/mcp,然后选择 Authenticate。终端Weegloo MCP Server Status: ∆ needs authentication URL: https://ai.weegloo.com/mcp > 1. Authenticate 2. Disable -
选择 Authenticate 后,浏览器中会打开 WEEGLOO 认证页面。用下面的复制令牌按钮复制令牌并粘贴,然后点击连接服务器。当
weegloo变为connected时即完成。
安装 MCP · Skills
复制安装命令,在终端中运行。
连接 MCP 认证
请按下面的顺序进行认证。
-
在终端中运行下面的命令后,浏览器中会打开 WEEGLOO 认证页面。
终端codex mcp login weegloo -
在打开的 WEEGLOO 认证页面中,用下面的复制令牌按钮复制令牌并粘贴,然后点击连接服务器。已经在运行的智能体需要在认证完成后重启才会生效。
以交互方式运行 npx weegloo,逐项选择进行安装。
运行安装工具
在终端中运行下面的命令,依次选择所问的项目。在询问令牌的地方,用下面的复制令牌按钮复制令牌并粘贴。
连接 MCP 认证
请按下面的顺序进行认证。
-
在终端中运行下面的命令后,浏览器中会打开 WEEGLOO 认证页面。
终端codex mcp login weegloo -
在打开的 WEEGLOO 认证页面中,用下面的复制令牌按钮复制令牌并粘贴,然后点击连接服务器。已经在运行的智能体需要在认证完成后重启才会生效。
运行安装工具
先进入要对接的项目文件夹,然后在该文件夹中运行下面的命令,依次选择所问的项目。在询问令牌的地方,用下面的复制令牌按钮复制令牌并粘贴。务必在该项目文件夹内运行。
连接 MCP 认证
请按下面的顺序进行认证。
-
在终端中运行下面的命令后,浏览器中会打开 WEEGLOO 认证页面。
终端codex mcp login weegloo -
在打开的 WEEGLOO 认证页面中,用下面的复制令牌按钮复制令牌并粘贴,然后点击连接服务器。已经在运行的智能体需要在认证完成后重启才会生效。
安装 MCP · Skills
复制安装命令,在终端中运行。
连接 MCP 认证
请按下面的顺序进行认证。
-
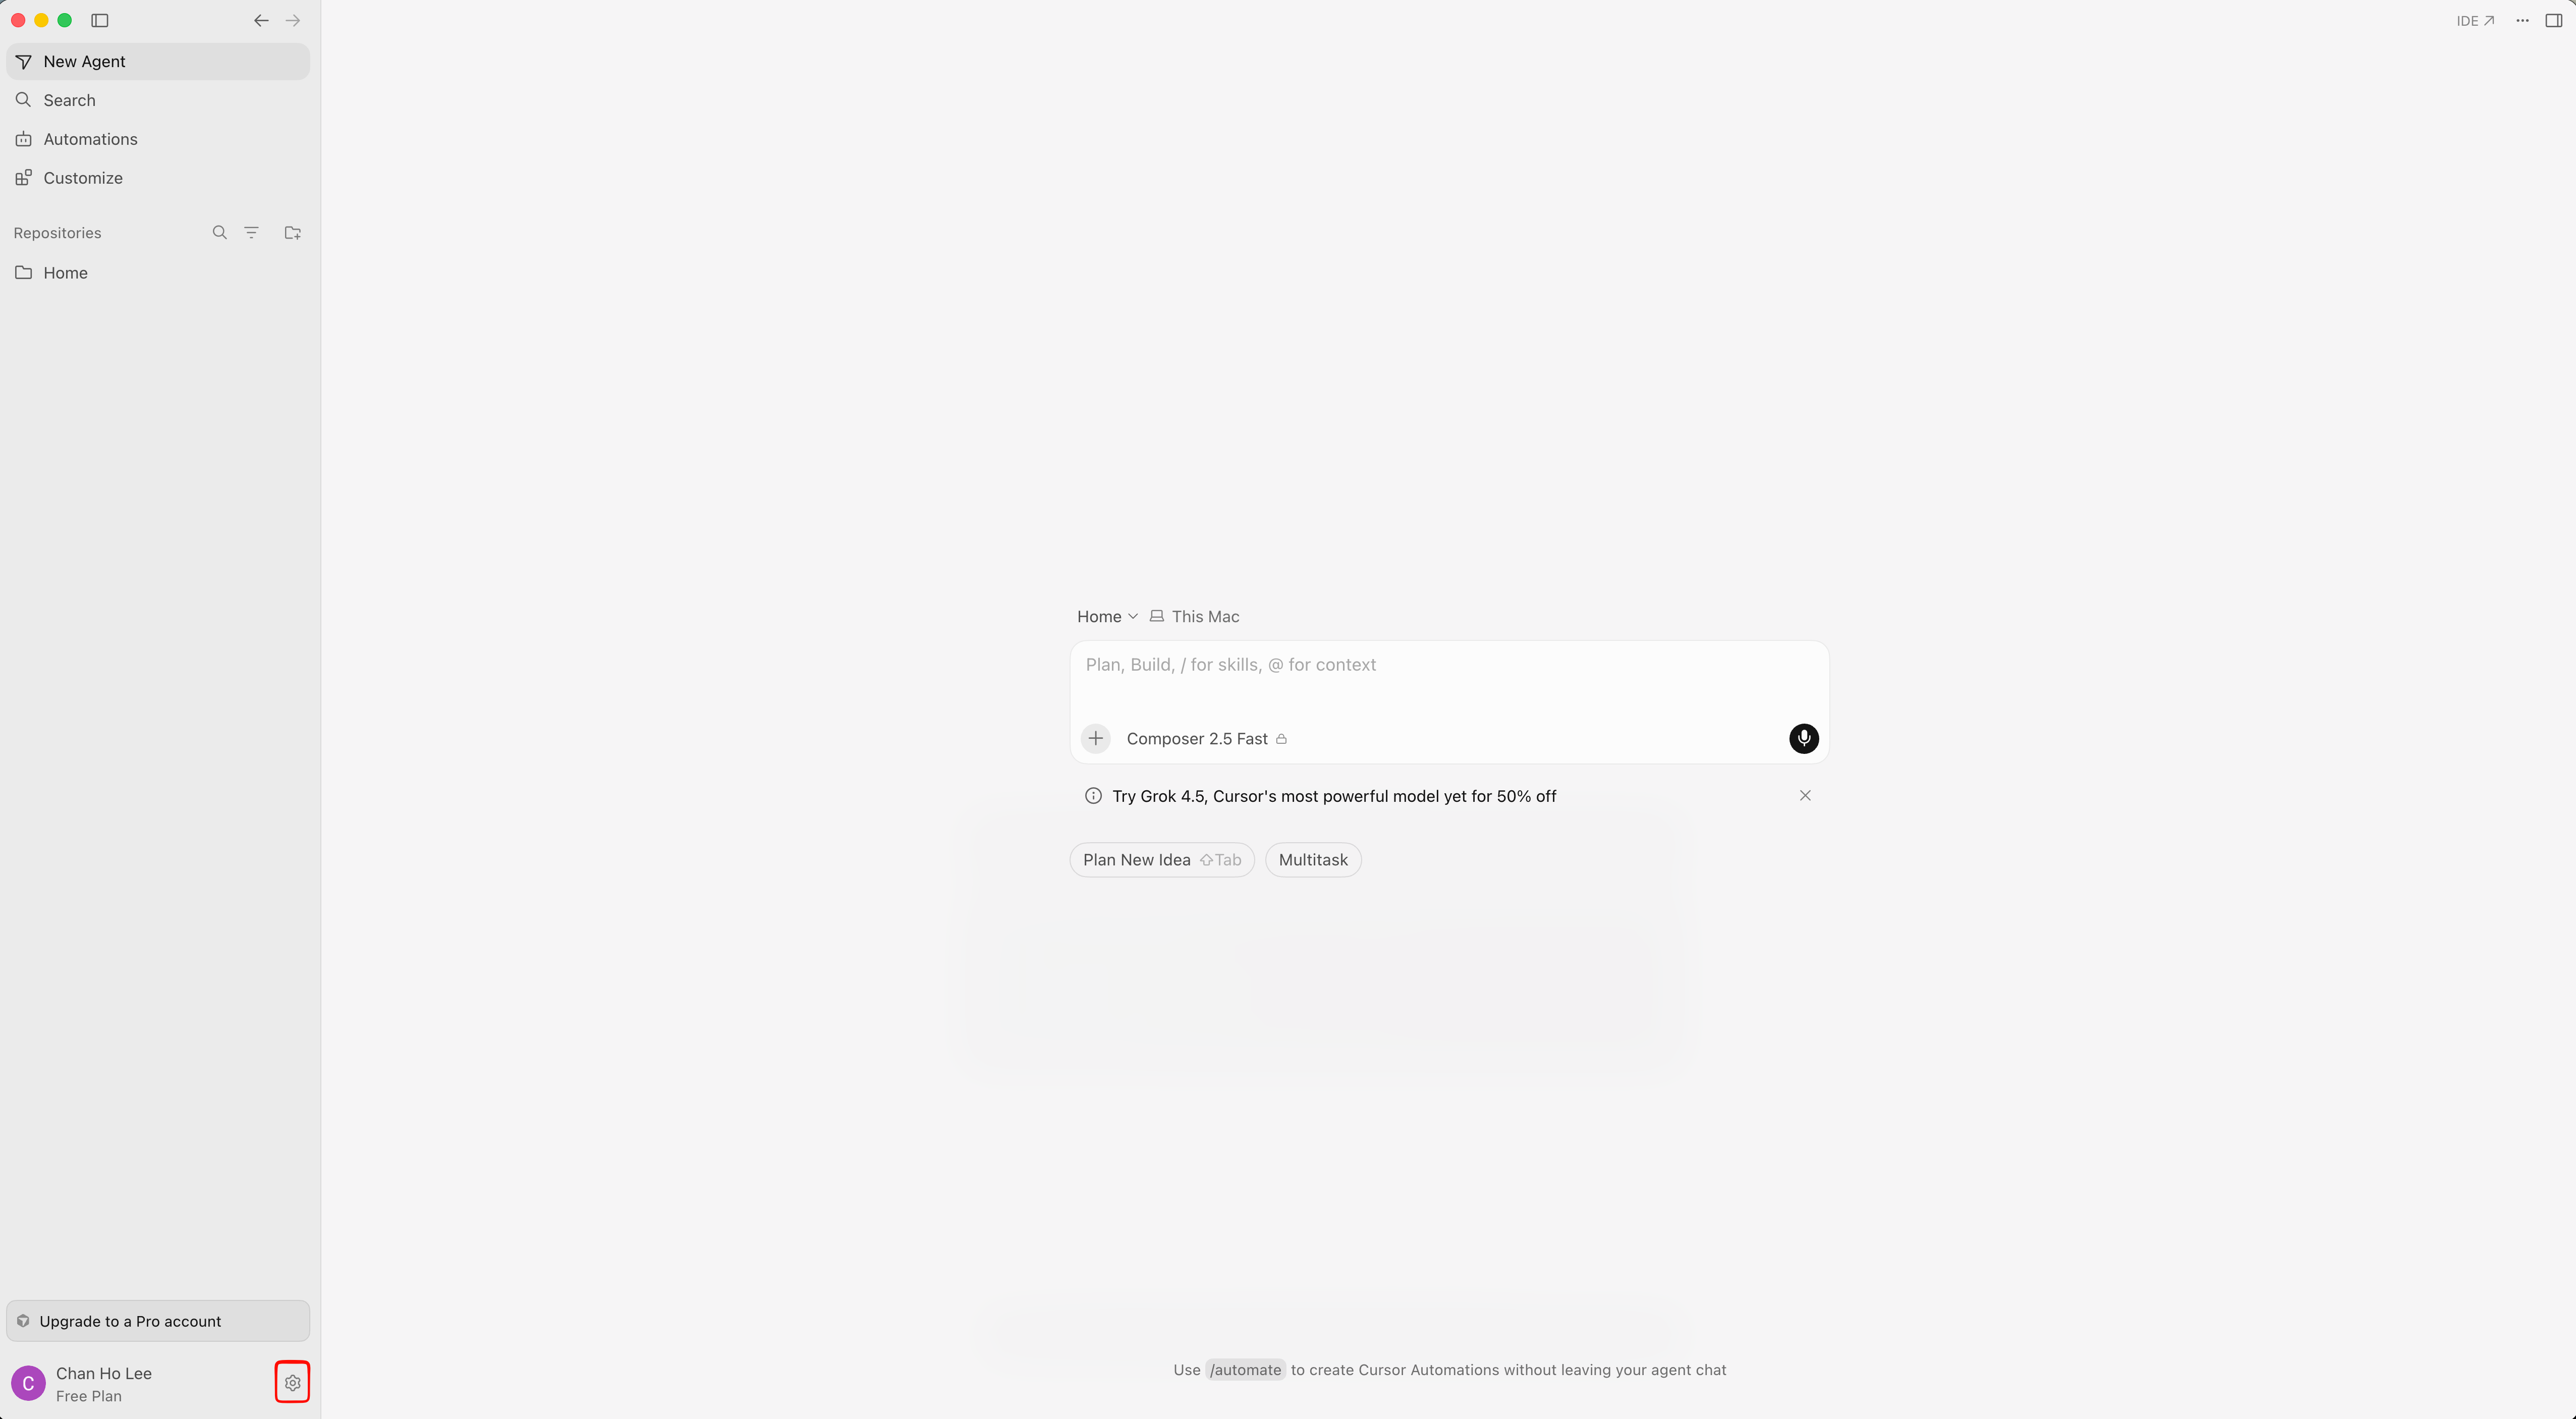
点击 Cursor 左下角的齿轮图标,打开设置。
-
在左侧设置菜单中选择 Tools & MCPs,会打开 Home 标签页。点击
weegloo右侧的 Connect。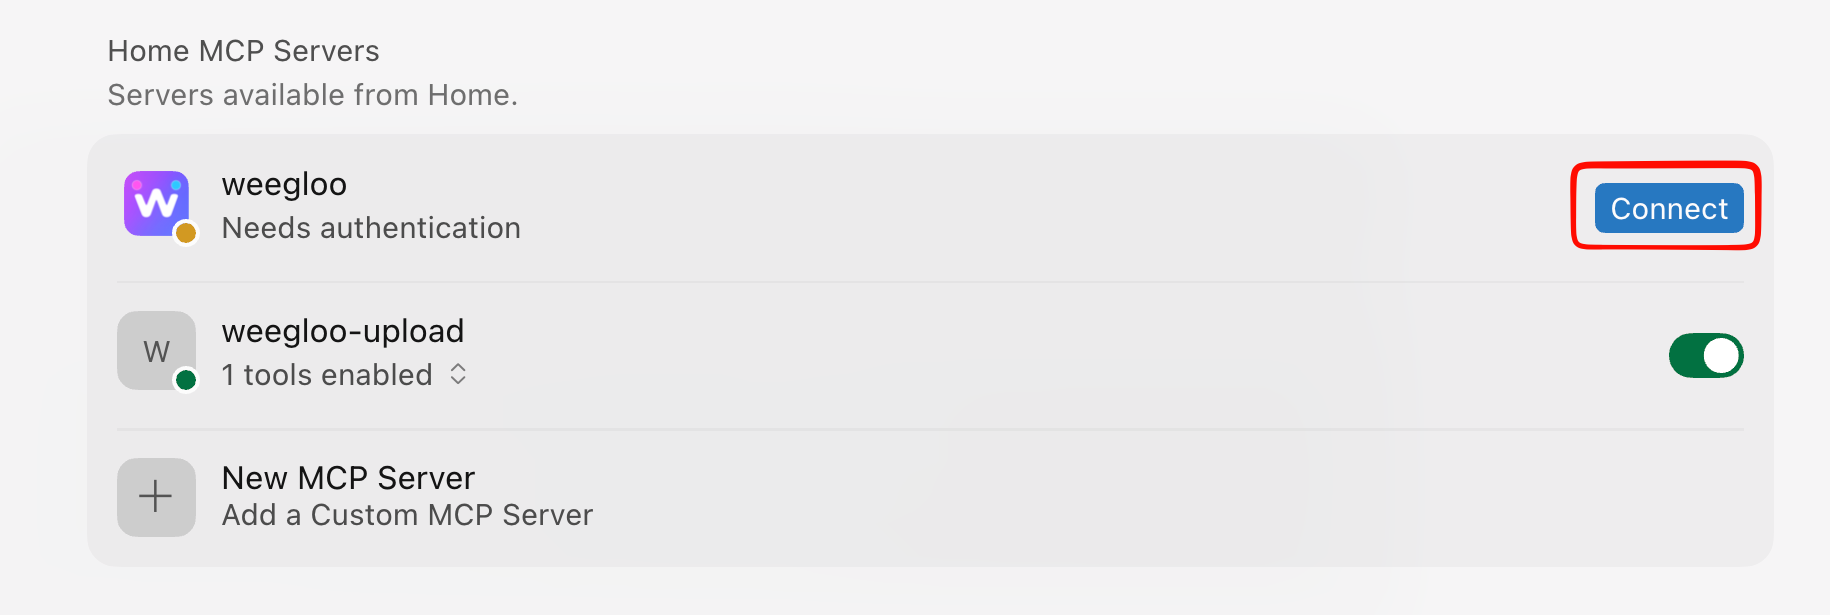
-
浏览器中会打开 WEEGLOO 认证页面。用复制令牌按钮复制令牌并粘贴,然后点击连接服务器。
-
通过
weegloo和weegloo-upload旁边亮起的绿色圆点,可以确认连接成功。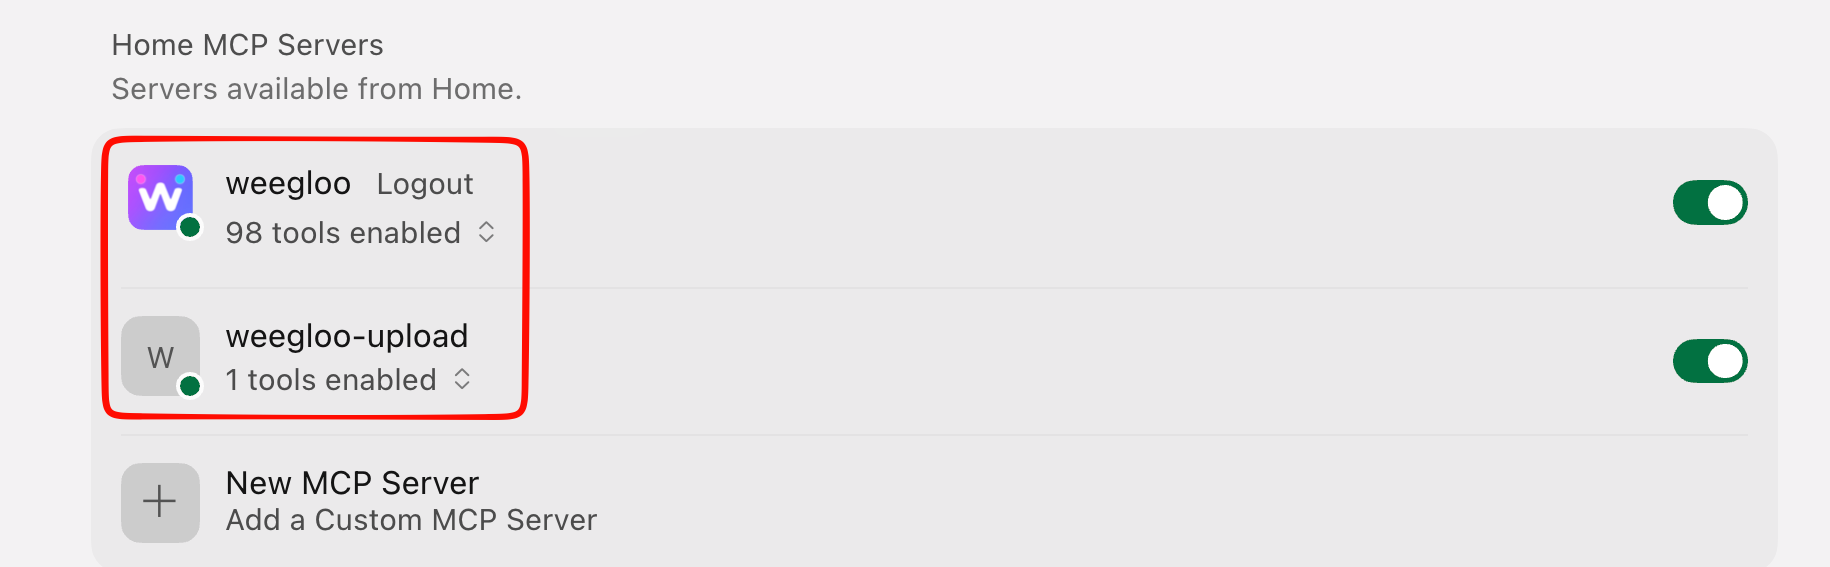
以交互方式运行 npx weegloo,逐项选择进行安装。
运行安装工具
在终端中运行下面的命令,依次选择所问的项目。在询问令牌的地方,用下面的复制令牌按钮复制令牌并粘贴。
连接 MCP 认证
请按下面的顺序进行认证。
-
点击 Cursor 左下角的齿轮图标,打开设置。
-
在左侧设置菜单中选择 Tools & MCPs,会打开 Home 标签页。点击
weegloo右侧的 Connect。 -
浏览器中会打开 WEEGLOO 认证页面。用复制令牌按钮复制令牌并粘贴,然后点击连接服务器。
-
通过
weegloo和weegloo-upload旁边亮起的绿色圆点,可以确认连接成功。
运行安装工具
先进入要对接的项目文件夹,然后在该文件夹中运行下面的命令,依次选择所问的项目。在询问令牌的地方,用下面的复制令牌按钮复制令牌并粘贴。务必在该项目文件夹内运行。
连接 MCP 认证
请按下面的顺序进行认证。
-
点击 Cursor 左下角的齿轮图标,打开设置。
-
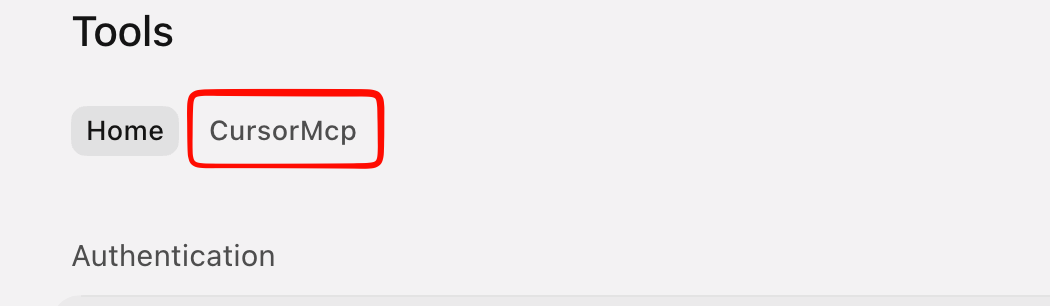
在左侧设置菜单中选择 Tools & MCPs,然后在上方标签页中选择以当前项目名称命名的标签页。
-
打开 Installed 列表中
weegloo和weegloo-upload的开关。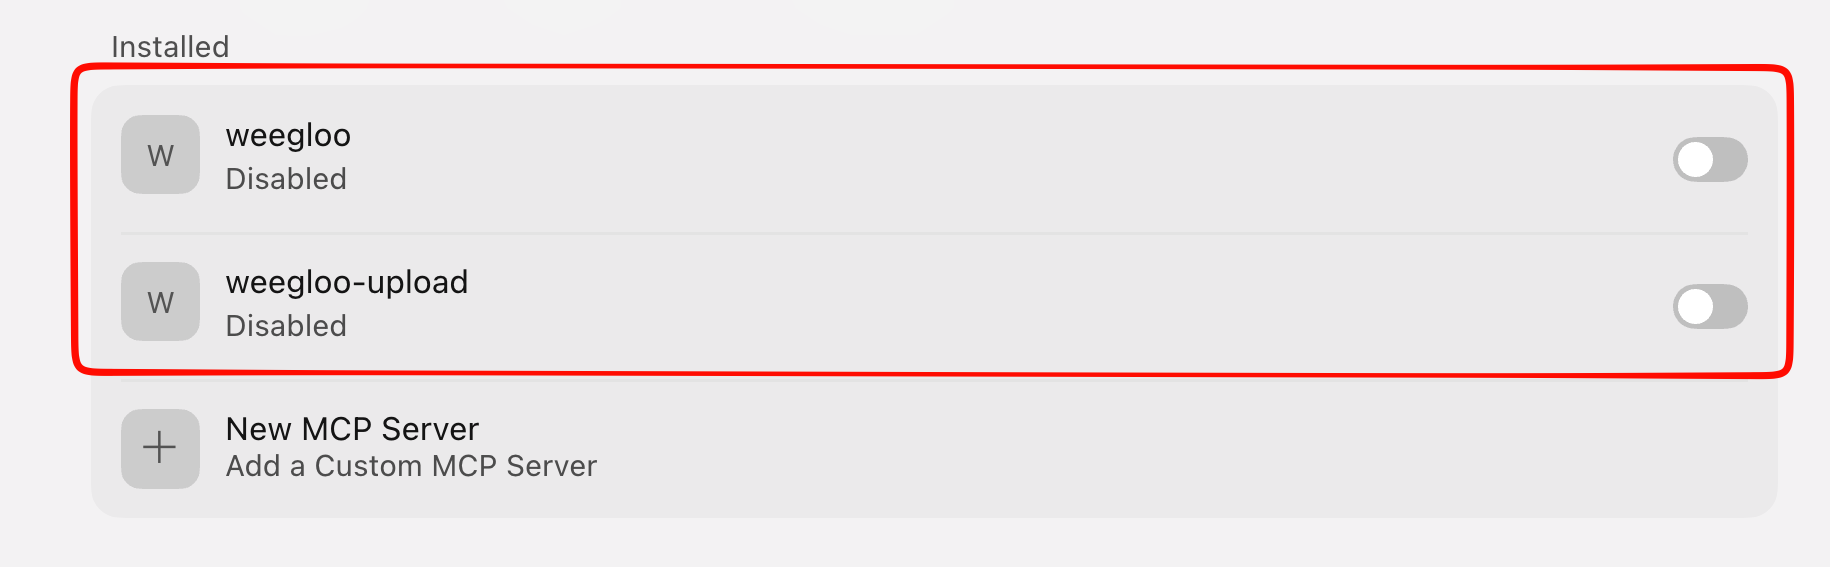
-
当
weegloo变为 Needs authentication 时,点击右侧的 Connect。weegloo-upload会自动连接。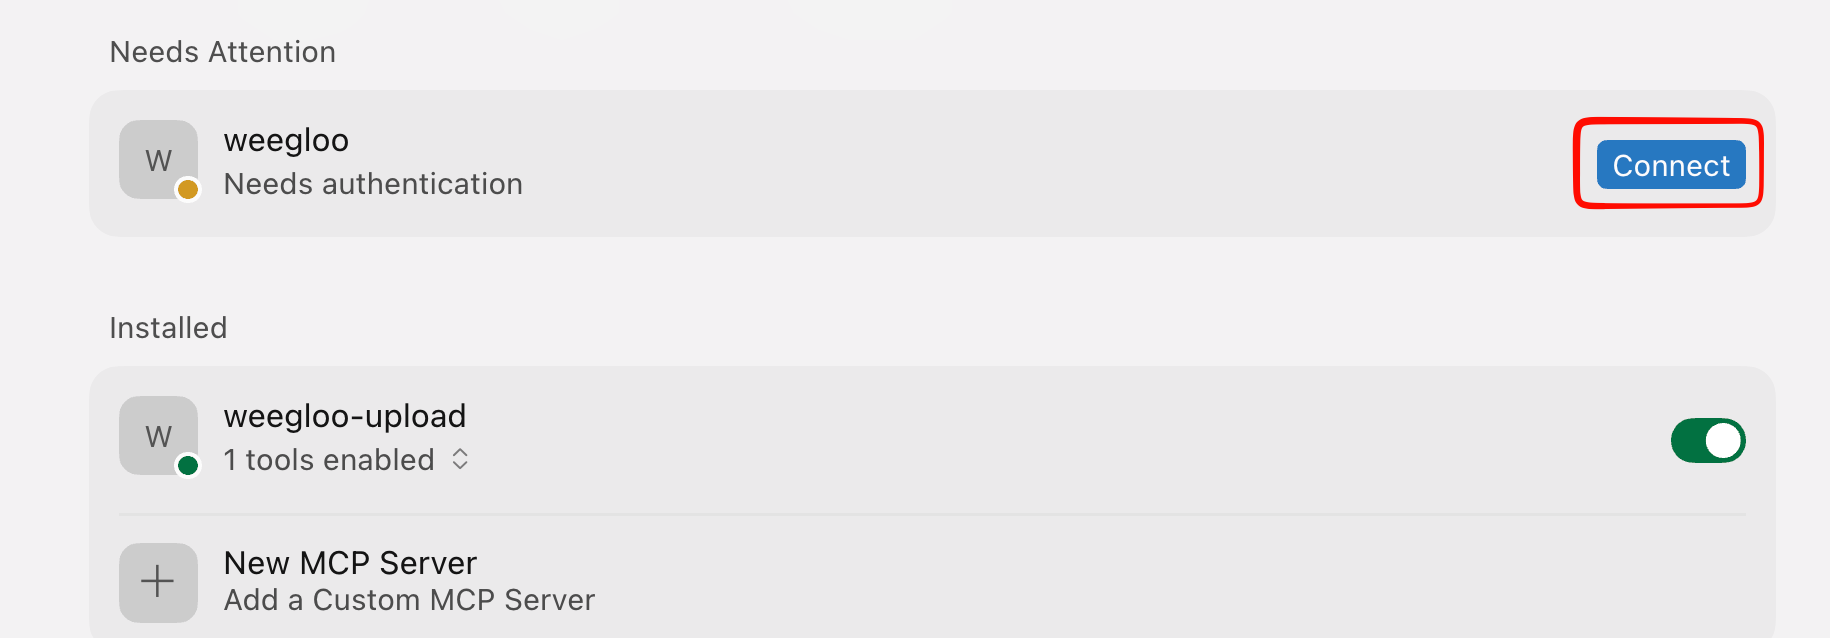
-
浏览器中会打开 WEEGLOO 认证页面。用复制令牌按钮复制令牌并粘贴,然后点击连接服务器。
-
通过
weegloo和weegloo-upload旁边亮起的绿色圆点,可以确认连接成功。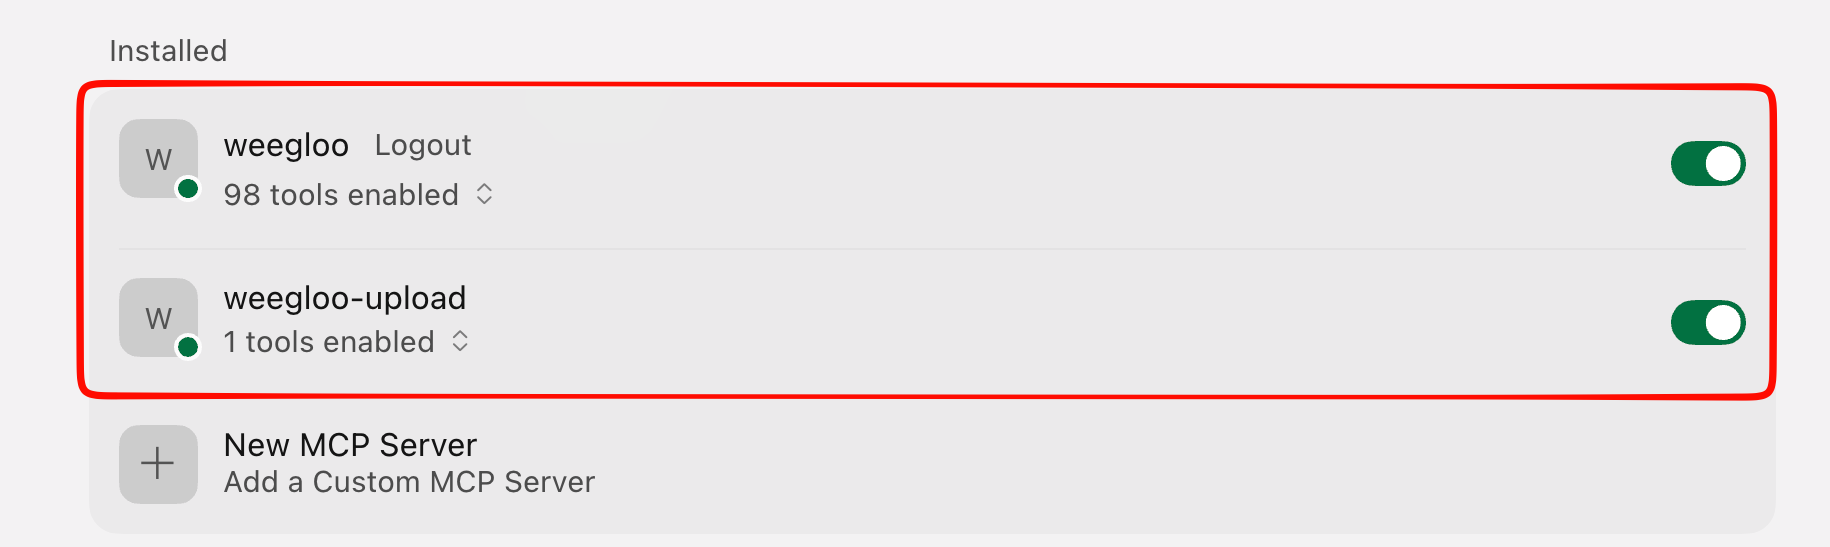
在 Antigravity 中 MCP 认证可能不稳定
weegloo MCP 服务器使用常规的 stateful HTTP MCP 连接,但 Antigravity 对 stateful MCP 连接的支持尚不稳定,可能会导致认证失败或需要重试。如果希望更稳定的设置流程,建议使用 Claude Code、Codex 或 Cursor。
安装 MCP · Skills
复制安装命令,在终端中运行。
连接 MCP 认证
请按下面的顺序进行认证。
-
用
agy运行 Antigravity。终端agy -
在提示符中输入
/mcp。终端/mcp -
请选择
weegloo。终端MCP Servers Plugins (~/.gemini/config/plugins) > ✗ weegloo error: calling "initialize": sending "initialize": Unauthorized [Auth Needed] ✓ weegloo-upload Tools: CreateUpload Keyboard: ↑/↓ Navigate enter Actions -
请选择 Authenticate。
终端MCP Servers Plugins (~/.gemini/config/plugins) > ✗ weegloo error: calling "initialize": sending "initialize": Unauthorized [Auth Needed] Restart Disable [Authenticate] ✓ weegloo-upload Tools: CreateUpload Keyboard: ←/→ Navigate enter Actions -
在打开的认证页面的令牌输入框中粘贴下面的令牌。
-
复制 Google Antigravity 页面上显示的
Code,回到 Antigravity 粘贴,然后按Enter。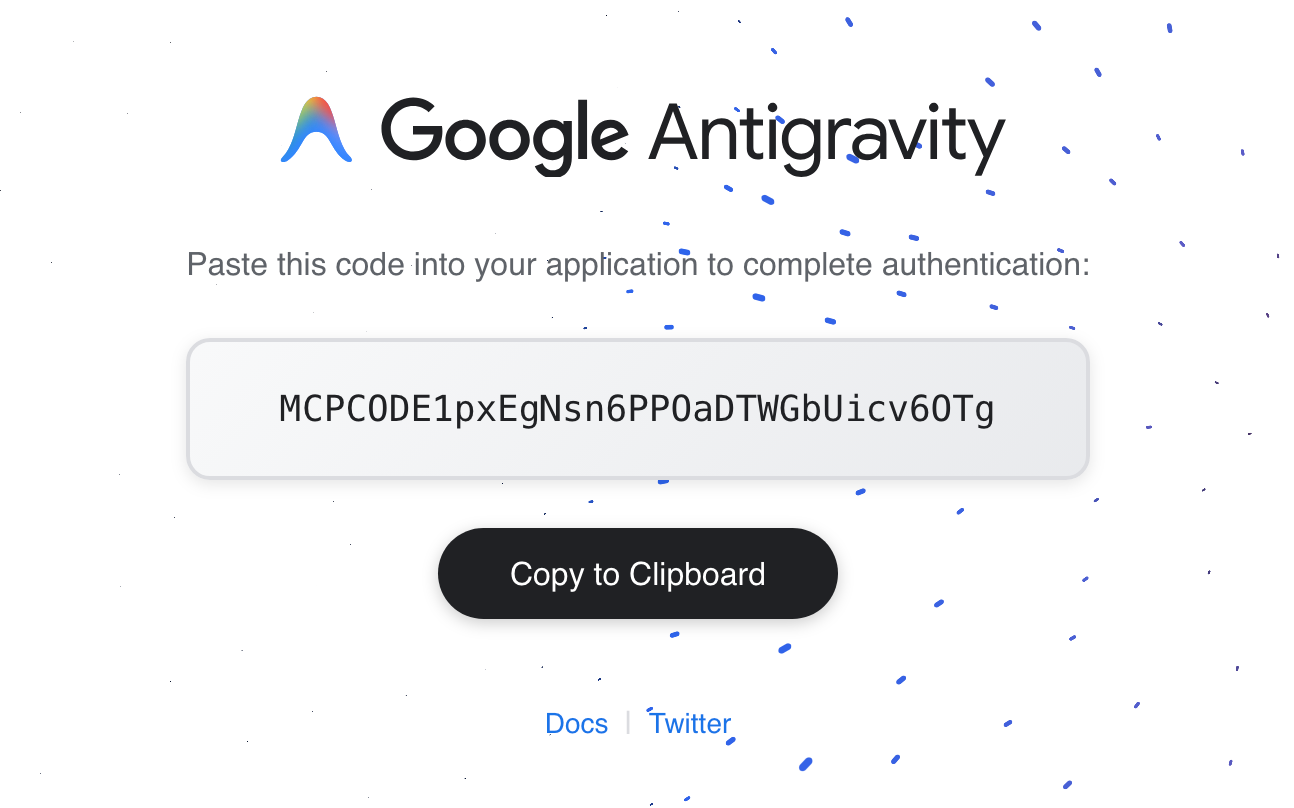
显示认证失败时
如果显示
Authentication failed: no pending auth state for server weegloo消息,可能是 Antigravity 一侧的临时问题。此现象主要在低于1.0.16的版本中出现,但在最新版本中也可能发生,可以按下面的步骤重新连接。- 按
Esc返回MCP Servers界面。 - 再按一次
Esc返回提示符输入界面。 - 再次输入
/mcp,会经过initializing阶段后完成连接。
- 按
以交互方式运行 npx weegloo,逐项选择进行安装。
运行安装工具
在终端中运行下面的命令,依次选择所问的项目。在询问令牌的地方,用下面的复制令牌按钮复制令牌并粘贴。
连接 MCP 认证
请按下面的顺序进行认证。
-
用
agy运行 Antigravity。终端agy -
在提示符中输入
/mcp。终端/mcp -
请选择
weegloo。终端MCP Servers Plugins (~/.gemini/config/plugins) > ✗ weegloo error: calling "initialize": sending "initialize": Unauthorized [Auth Needed] ✓ weegloo-upload Tools: CreateUpload Keyboard: ↑/↓ Navigate enter Actions -
请选择 Authenticate。
终端MCP Servers Plugins (~/.gemini/config/plugins) > ✗ weegloo error: calling "initialize": sending "initialize": Unauthorized [Auth Needed] Restart Disable [Authenticate] ✓ weegloo-upload Tools: CreateUpload Keyboard: ←/→ Navigate enter Actions -
在打开的认证页面的令牌输入框中粘贴下面的令牌。
-
复制 Google Antigravity 页面上显示的
Code,回到 Antigravity 粘贴,然后按Enter。显示认证失败时
如果显示
Authentication failed: no pending auth state for server weegloo消息,可能是 Antigravity 一侧的临时问题。此现象主要在低于1.0.16的版本中出现,但在最新版本中也可能发生,可以按下面的步骤重新连接。- 按
Esc返回MCP Servers界面。 - 再按一次
Esc返回提示符输入界面。 - 再次输入
/mcp,会经过initializing阶段后完成连接。
- 按
运行安装工具
先进入要对接的项目文件夹,然后在该文件夹中运行下面的命令,依次选择所问的项目。在询问令牌的地方,用下面的复制令牌按钮复制令牌并粘贴。务必在该项目文件夹内运行。
连接 MCP 认证
请按下面的顺序进行认证。
-
用
agy运行 Antigravity。终端agy -
在提示符中输入
/mcp。终端/mcp -
请选择
weegloo。终端MCP Servers Plugins (~/.gemini/config/plugins) > ✗ weegloo error: calling "initialize": sending "initialize": Unauthorized [Auth Needed] ✓ weegloo-upload Tools: CreateUpload Keyboard: ↑/↓ Navigate enter Actions -
请选择 Authenticate。
终端MCP Servers Plugins (~/.gemini/config/plugins) > ✗ weegloo error: calling "initialize": sending "initialize": Unauthorized [Auth Needed] Restart Disable [Authenticate] ✓ weegloo-upload Tools: CreateUpload Keyboard: ←/→ Navigate enter Actions -
在打开的认证页面的令牌输入框中粘贴下面的令牌。
-
复制 Google Antigravity 页面上显示的
Code,回到 Antigravity 粘贴,然后按Enter。显示认证失败时
如果显示
Authentication failed: no pending auth state for server weegloo消息,可能是 Antigravity 一侧的临时问题。此现象主要在低于1.0.16的版本中出现,但在最新版本中也可能发生,可以按下面的步骤重新连接。- 按
Esc返回MCP Servers界面。 - 再按一次
Esc返回提示符输入界面。 - 再次输入
/mcp,会经过initializing阶段后完成连接。
- 按
强烈不建议使用 Android Studio 进行 Weegloo 对接
Android Studio 内置的 AI 智能体(Gemini)可以用于 UI 工作。但在 Weegloo 对接这类代码工作中,由于 AI 性能问题非常不稳定,因此强烈建议使用 Claude Code 或 Codex 等其他 AI 智能体。此问题在 2026.1.1 Patch 2 及之前的版本中得到确认。
安装 MCP · Skills
复制安装命令,在终端中运行。务必在要对接的项目文件夹内运行。
连接 MCP 认证
安装完成后,需要在 Android Studio 中启用 MCP 服务器。
-
前往
Settings → Tools → AI → MCP Servers,然后点击 JSON View 标签页。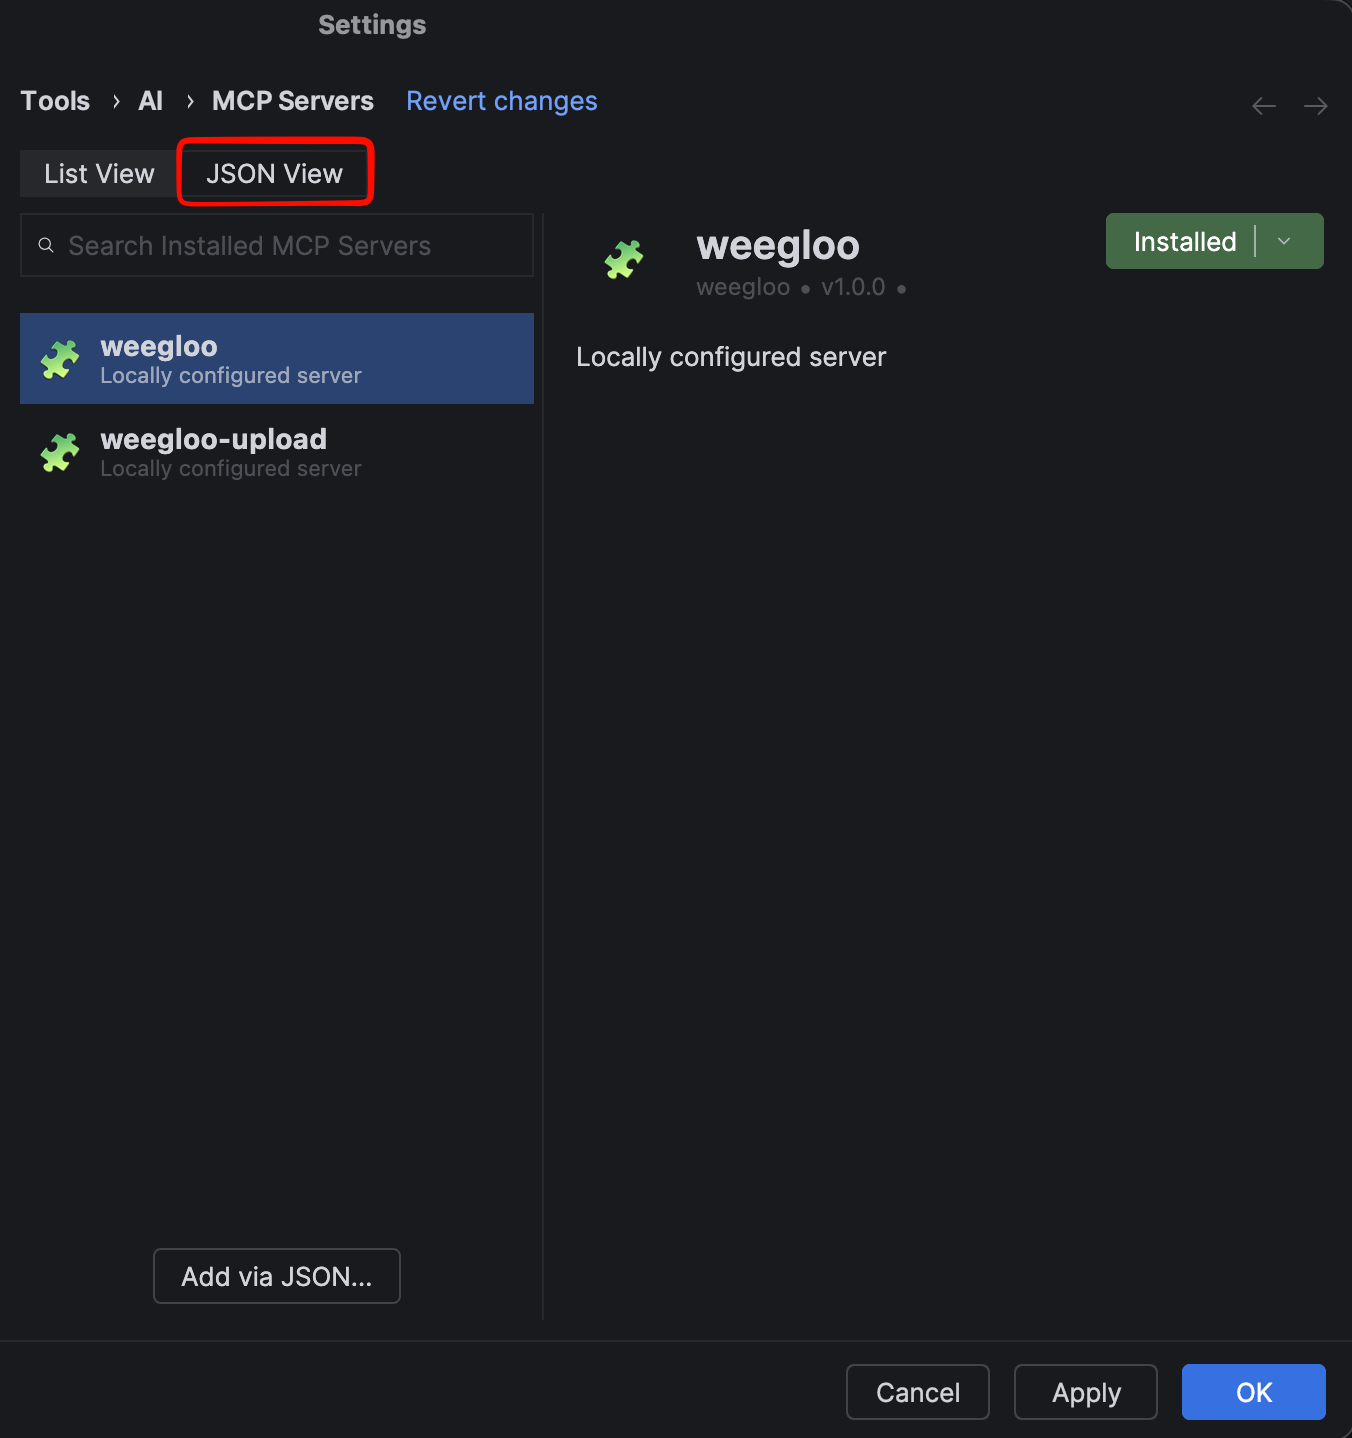
-
勾选 Enable MCP Servers。
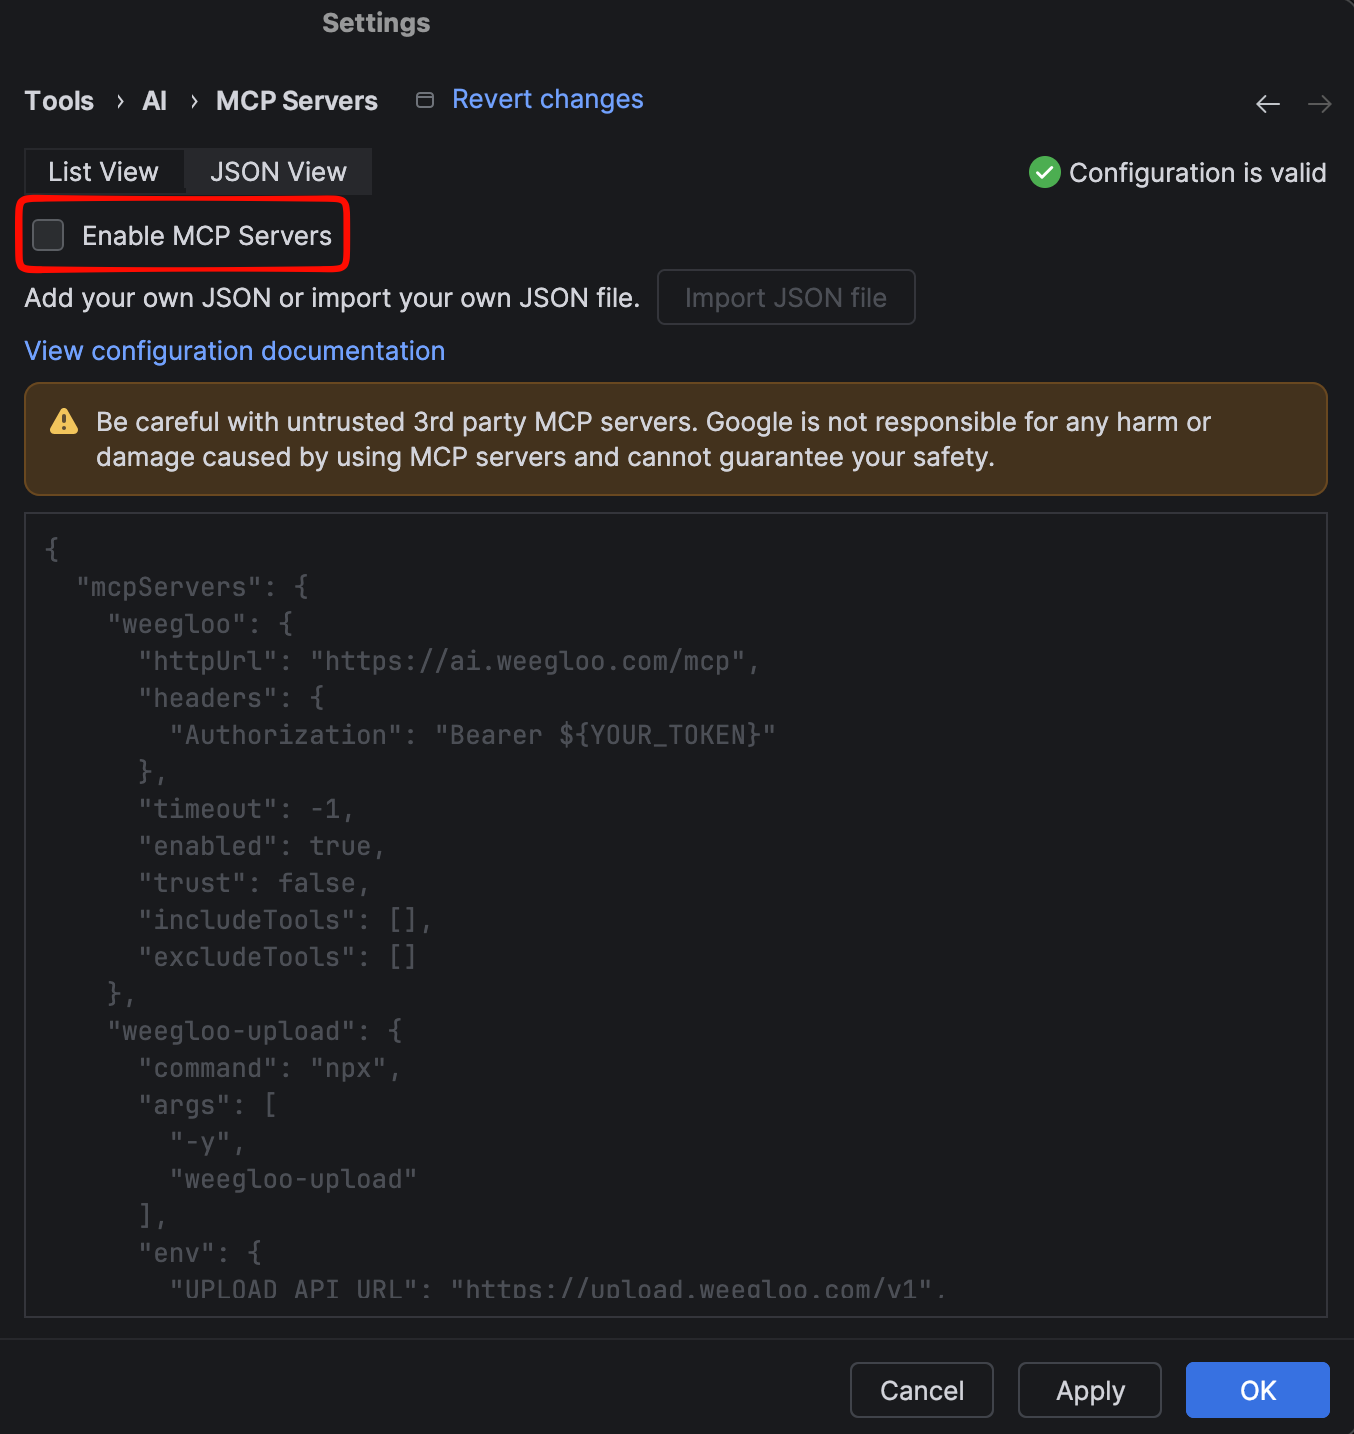
-
确认设置中包含
weegloo和weegloo-upload。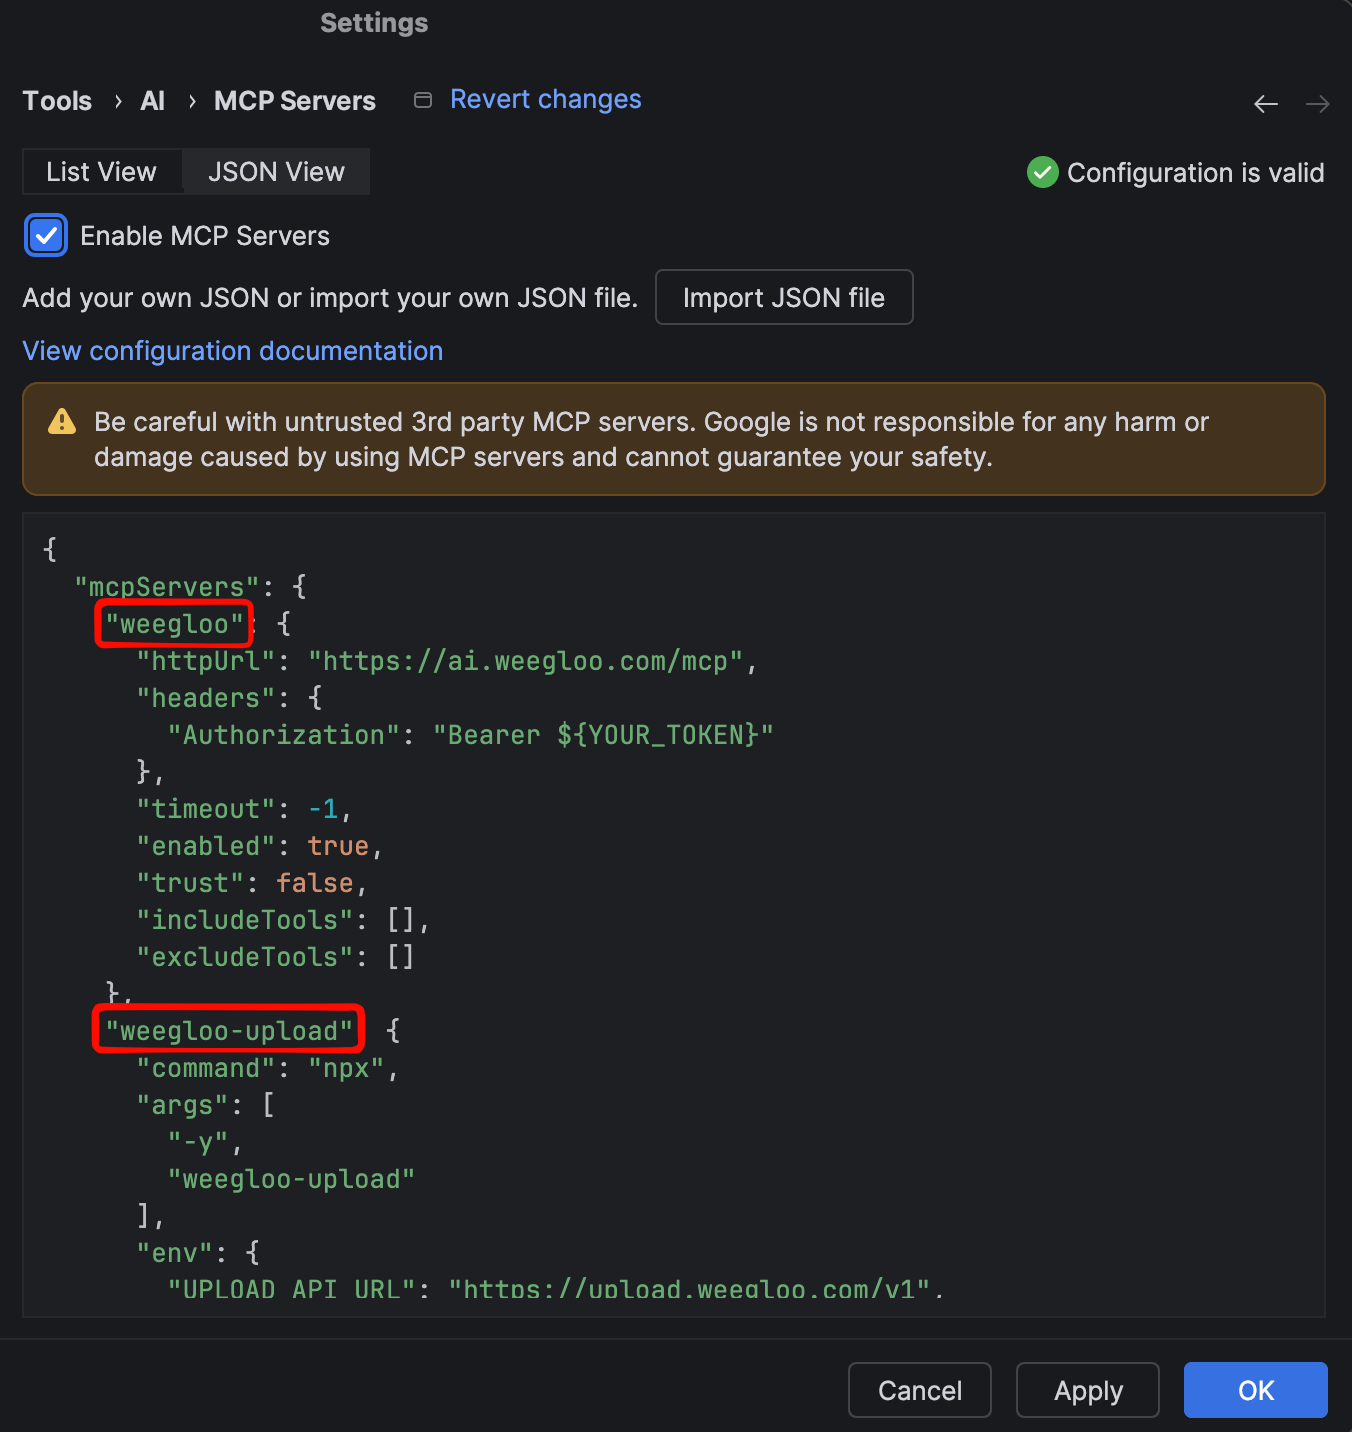
-
点击 Apply 应用设置。通过弹出的已连接到
weegloo和weegloo-upload的通知,可以确认连接成功。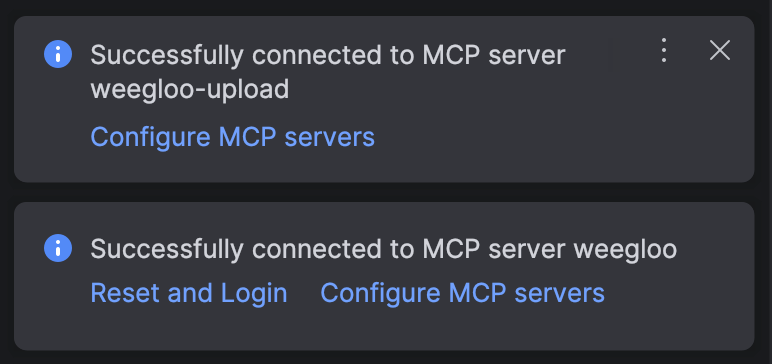
以交互方式运行 npx weegloo,逐项选择进行安装。
运行安装工具
先进入要对接的项目文件夹,然后在该文件夹中运行下面的命令,依次选择所问的项目。在询问令牌的地方,用下面的复制令牌按钮复制令牌并粘贴。务必在该项目文件夹内运行。
连接 MCP 认证
安装完成后,需要在 Android Studio 中启用 MCP 服务器。
-
前往
Settings → Tools → AI → MCP Servers,然后点击 JSON View 标签页。 -
勾选 Enable MCP Servers。
-
确认设置中包含
weegloo和weegloo-upload。 -
点击 Apply 应用设置。通过弹出的已连接到
weegloo和weegloo-upload的通知,可以确认连接成功。
在 Xcode 中使用的智能体
安装 MCP · Skills
复制安装命令,在终端中运行。务必在要对接的项目文件夹内运行。
连接 MCP 认证
请按下面的顺序进行认证。
-
在终端中运行 Claude Code。务必在要对接的项目文件夹内运行。
终端claude -
首次运行时,可能会询问是否启用新的 MCP 服务器。这种情况下,确认
weegloo和weegloo-upload处于已勾选状态,然后按Enter提交。终端New MCP servers found in .mcp.json Select any you wish to enable. > [√] weegloo [√] weegloo-upload -
输入
/mcp打开 MCP 服务器管理界面。终端/mcp -
在列表中选择
weegloo。它会显示为needs authentication状态。终端Manage MCP servers > weegloo · ∆ needs authentication weegloo-upload · √ connected如果列表中看不到服务器:如果在列表中看不到
weegloo和weegloo-upload,可能是在第 2 步的启用界面没有提交,或者处于已停用状态。请退出 Claude Code,在终端中输入下面的命令,然后重新运行claude。如果再次出现与第 2 步相同的界面,请在weegloo和weegloo-upload处于勾选状态下按Enter提交。终端claude mcp reset-project-choices -
确认连接地址是否为
https://ai.weegloo.com/mcp,然后选择 Authenticate。终端Weegloo MCP Server Status: ∆ needs authentication URL: https://ai.weegloo.com/mcp > 1. Authenticate 2. Disable -
选择 Authenticate 后,浏览器中会打开 WEEGLOO 认证页面。用下面的复制令牌按钮复制令牌并粘贴,然后点击连接服务器。当
weegloo变为connected时即完成。
安装后需要新开一个 Xcode Agent 会话,设置才会生效。
以交互方式运行 npx weegloo,逐项选择进行安装。
运行安装工具
先进入要对接的项目文件夹,然后在该文件夹中运行下面的命令,依次选择所问的项目。在询问令牌的地方,用下面的复制令牌按钮复制令牌并粘贴。务必在该项目文件夹内运行。
连接 MCP 认证
请按下面的顺序进行认证。
-
在终端中运行 Claude Code。务必在要对接的项目文件夹内运行。
终端claude -
首次运行时,可能会询问是否启用新的 MCP 服务器。这种情况下,确认
weegloo和weegloo-upload处于已勾选状态,然后按Enter提交。终端New MCP servers found in .mcp.json Select any you wish to enable. > [√] weegloo [√] weegloo-upload -
输入
/mcp打开 MCP 服务器管理界面。终端/mcp -
在列表中选择
weegloo。它会显示为needs authentication状态。终端Manage MCP servers > weegloo · ∆ needs authentication weegloo-upload · √ connected如果列表中看不到服务器:如果在列表中看不到
weegloo和weegloo-upload,可能是在第 2 步的启用界面没有提交,或者处于已停用状态。请退出 Claude Code,在终端中输入下面的命令,然后重新运行claude。如果再次出现与第 2 步相同的界面,请在weegloo和weegloo-upload处于勾选状态下按Enter提交。终端claude mcp reset-project-choices -
确认连接地址是否为
https://ai.weegloo.com/mcp,然后选择 Authenticate。终端Weegloo MCP Server Status: ∆ needs authentication URL: https://ai.weegloo.com/mcp > 1. Authenticate 2. Disable -
选择 Authenticate 后,浏览器中会打开 WEEGLOO 认证页面。用下面的复制令牌按钮复制令牌并粘贴,然后点击连接服务器。当
weegloo变为connected时即完成。
安装后需要新开一个 Xcode Agent 会话,设置才会生效。
安装 MCP · Skills
复制安装命令,在终端中运行。务必在要对接的项目文件夹内运行。
连接 MCP 认证
请按下面的顺序进行认证。
-
在终端中运行下面的命令后,浏览器中会打开 WEEGLOO 认证页面。
终端codex mcp login weegloo -
在打开的 WEEGLOO 认证页面中,用下面的复制令牌按钮复制令牌并粘贴,然后点击连接服务器。已经在运行的智能体需要在认证完成后重启才会生效。
安装后需要新开一个 Xcode Agent 会话,设置才会生效。
以交互方式运行 npx weegloo,逐项选择进行安装。
运行安装工具
先进入要对接的项目文件夹,然后在该文件夹中运行下面的命令,依次选择所问的项目。在询问令牌的地方,用下面的复制令牌按钮复制令牌并粘贴。务必在该项目文件夹内运行。
连接 MCP 认证
请按下面的顺序进行认证。
-
在终端中运行下面的命令后,浏览器中会打开 WEEGLOO 认证页面。
终端codex mcp login weegloo -
在打开的 WEEGLOO 认证页面中,用下面的复制令牌按钮复制令牌并粘贴,然后点击连接服务器。已经在运行的智能体需要在认证完成后重启才会生效。
安装后需要新开一个 Xcode Agent 会话,设置才会生效。
3. 一句话就够了
你甚至不必说明要做什么。这一句话就够了。
帮我对接 WEEGLOO。
智能体会查看你做好的页面,自己弄清这是什么服务。然后把会员、权限、搜索等所需的功能做好。如果是网页服务,连部署也会自动完成。
接下来
- 用一句话完成对接:详细讲解如何用"帮我对接 WEEGLOO"一句话把所需的全部功能一次性搭起来。
- 存储数据并随时取用:像数据、搜索、会员这样把功能一个一个单独交代的各项用法示例。
- 什么是 WEEGLOO?:介绍 WEEGLOO 是什么、为什么要用它。
- 开始之前:介绍亲手在内容工作室操作时所需的整体蓝图。
- 保持最新状态:介绍如何让已安装的 Skills 和 Rules 保持最新。