

Managing service members
Imagine you opened member login on "Cozy Closet," your online clothing store, and shoppers started signing up one by one with their social accounts. From here on, you have members to keep an eye on. That means checking the roster of who signed up, approving sign-ups one at a time, giving your premium members broader permissions, and keeping out members who only post nonsense.
This page covers, situation by situation, how to run and manage members who have already signed up (ServiceUser, a shopper who signed up for your service directly). It walks through checking the roster, approving new sign-ups, blocking a login, giving a specific member different permissions, entrusting a member with the job of cleaning up other members' posts, and removing a member from the roster, in that order.
Two boundaries are worth drawing. First, the members covered here are the shoppers who signed up for your service, not the operators (the team) who register products and manage the site. Inviting and managing that team is covered in Inviting Members and Granting Permissions. Second, this page is about running a member login you have already turned on. Turning on member login for the first time and connecting social login is covered in Service Member Login, and creating the permission bundle to grant members is covered in Member Roles and Permissions.
Where the member roster lives
You view signed-up members by expanding Services in the left menu, going into ServiceLogin, and then opening Users. Every time a shopper signs up, one more entry piles up in this list.
The list shows one member per row across four columns.
- User: the name and email. A member whose Login allowed toggle is off gets an Inactive badge next to their name.
- Provider: the kind of social login the member used to sign up. It shows as an icon, such as Google or GitLab.
- Role: the permissions (Role) applied to that member.
- Joined: the date and time the member signed up.
- In the left menu, expand Services and click ServiceLogin.
- Click Users.
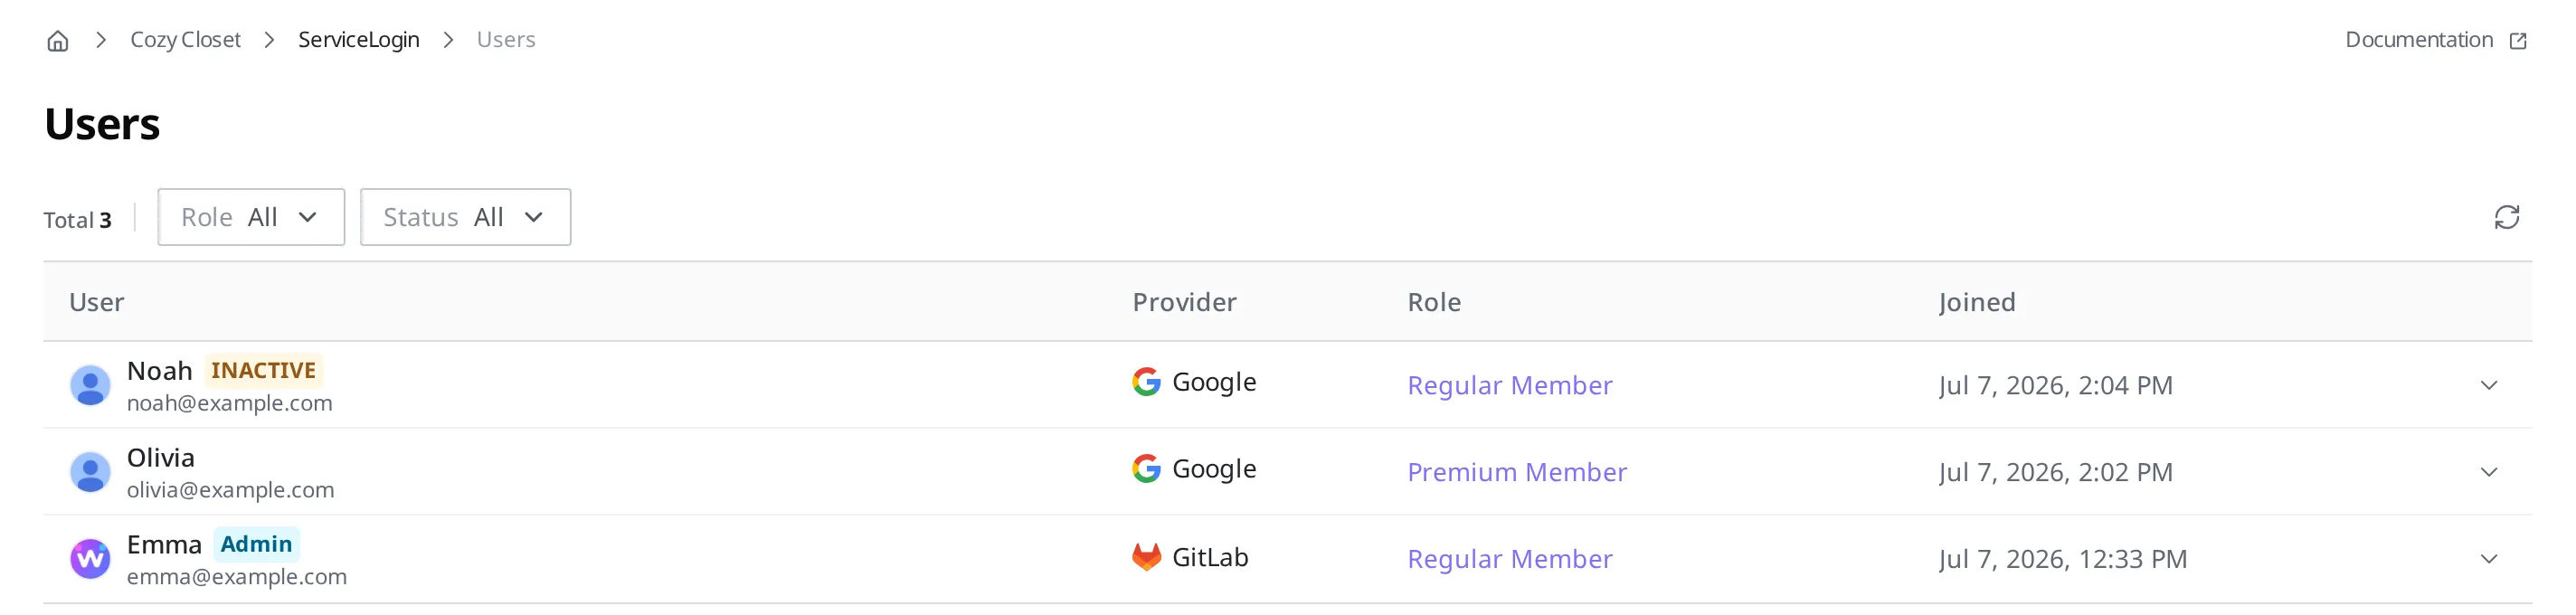
To see a member's details or change their settings, click the expand icon at the far-right end of that row. Instead of moving to another screen, the Permissions and Account details expand right below that row.
As members grow and the list gets long, you can narrow it down to just the members you want with the Role filter and the Status filter above the list.
Approving new sign-ups
If you turned on Require admin approval for new sign-ups in the member login settings, a newly signed-up member cannot log in right away and waits for an operator's approval. This is the approach to use when you do not want to let just anyone in immediately, but would rather check once and then accept them.
In that case, the new member appears in the list with an Inactive badge. When you expand that member's row, turn on Login allowed in the Account section, and save, the member can log in with their own account from that point on, and the Inactive badge disappears from the list.
- In the Users list, click the expand icon at the far-right end of the row of the member waiting for approval (the one with the Inactive badge).
- In the Account section, turn on Login allowed.
- Click Save.
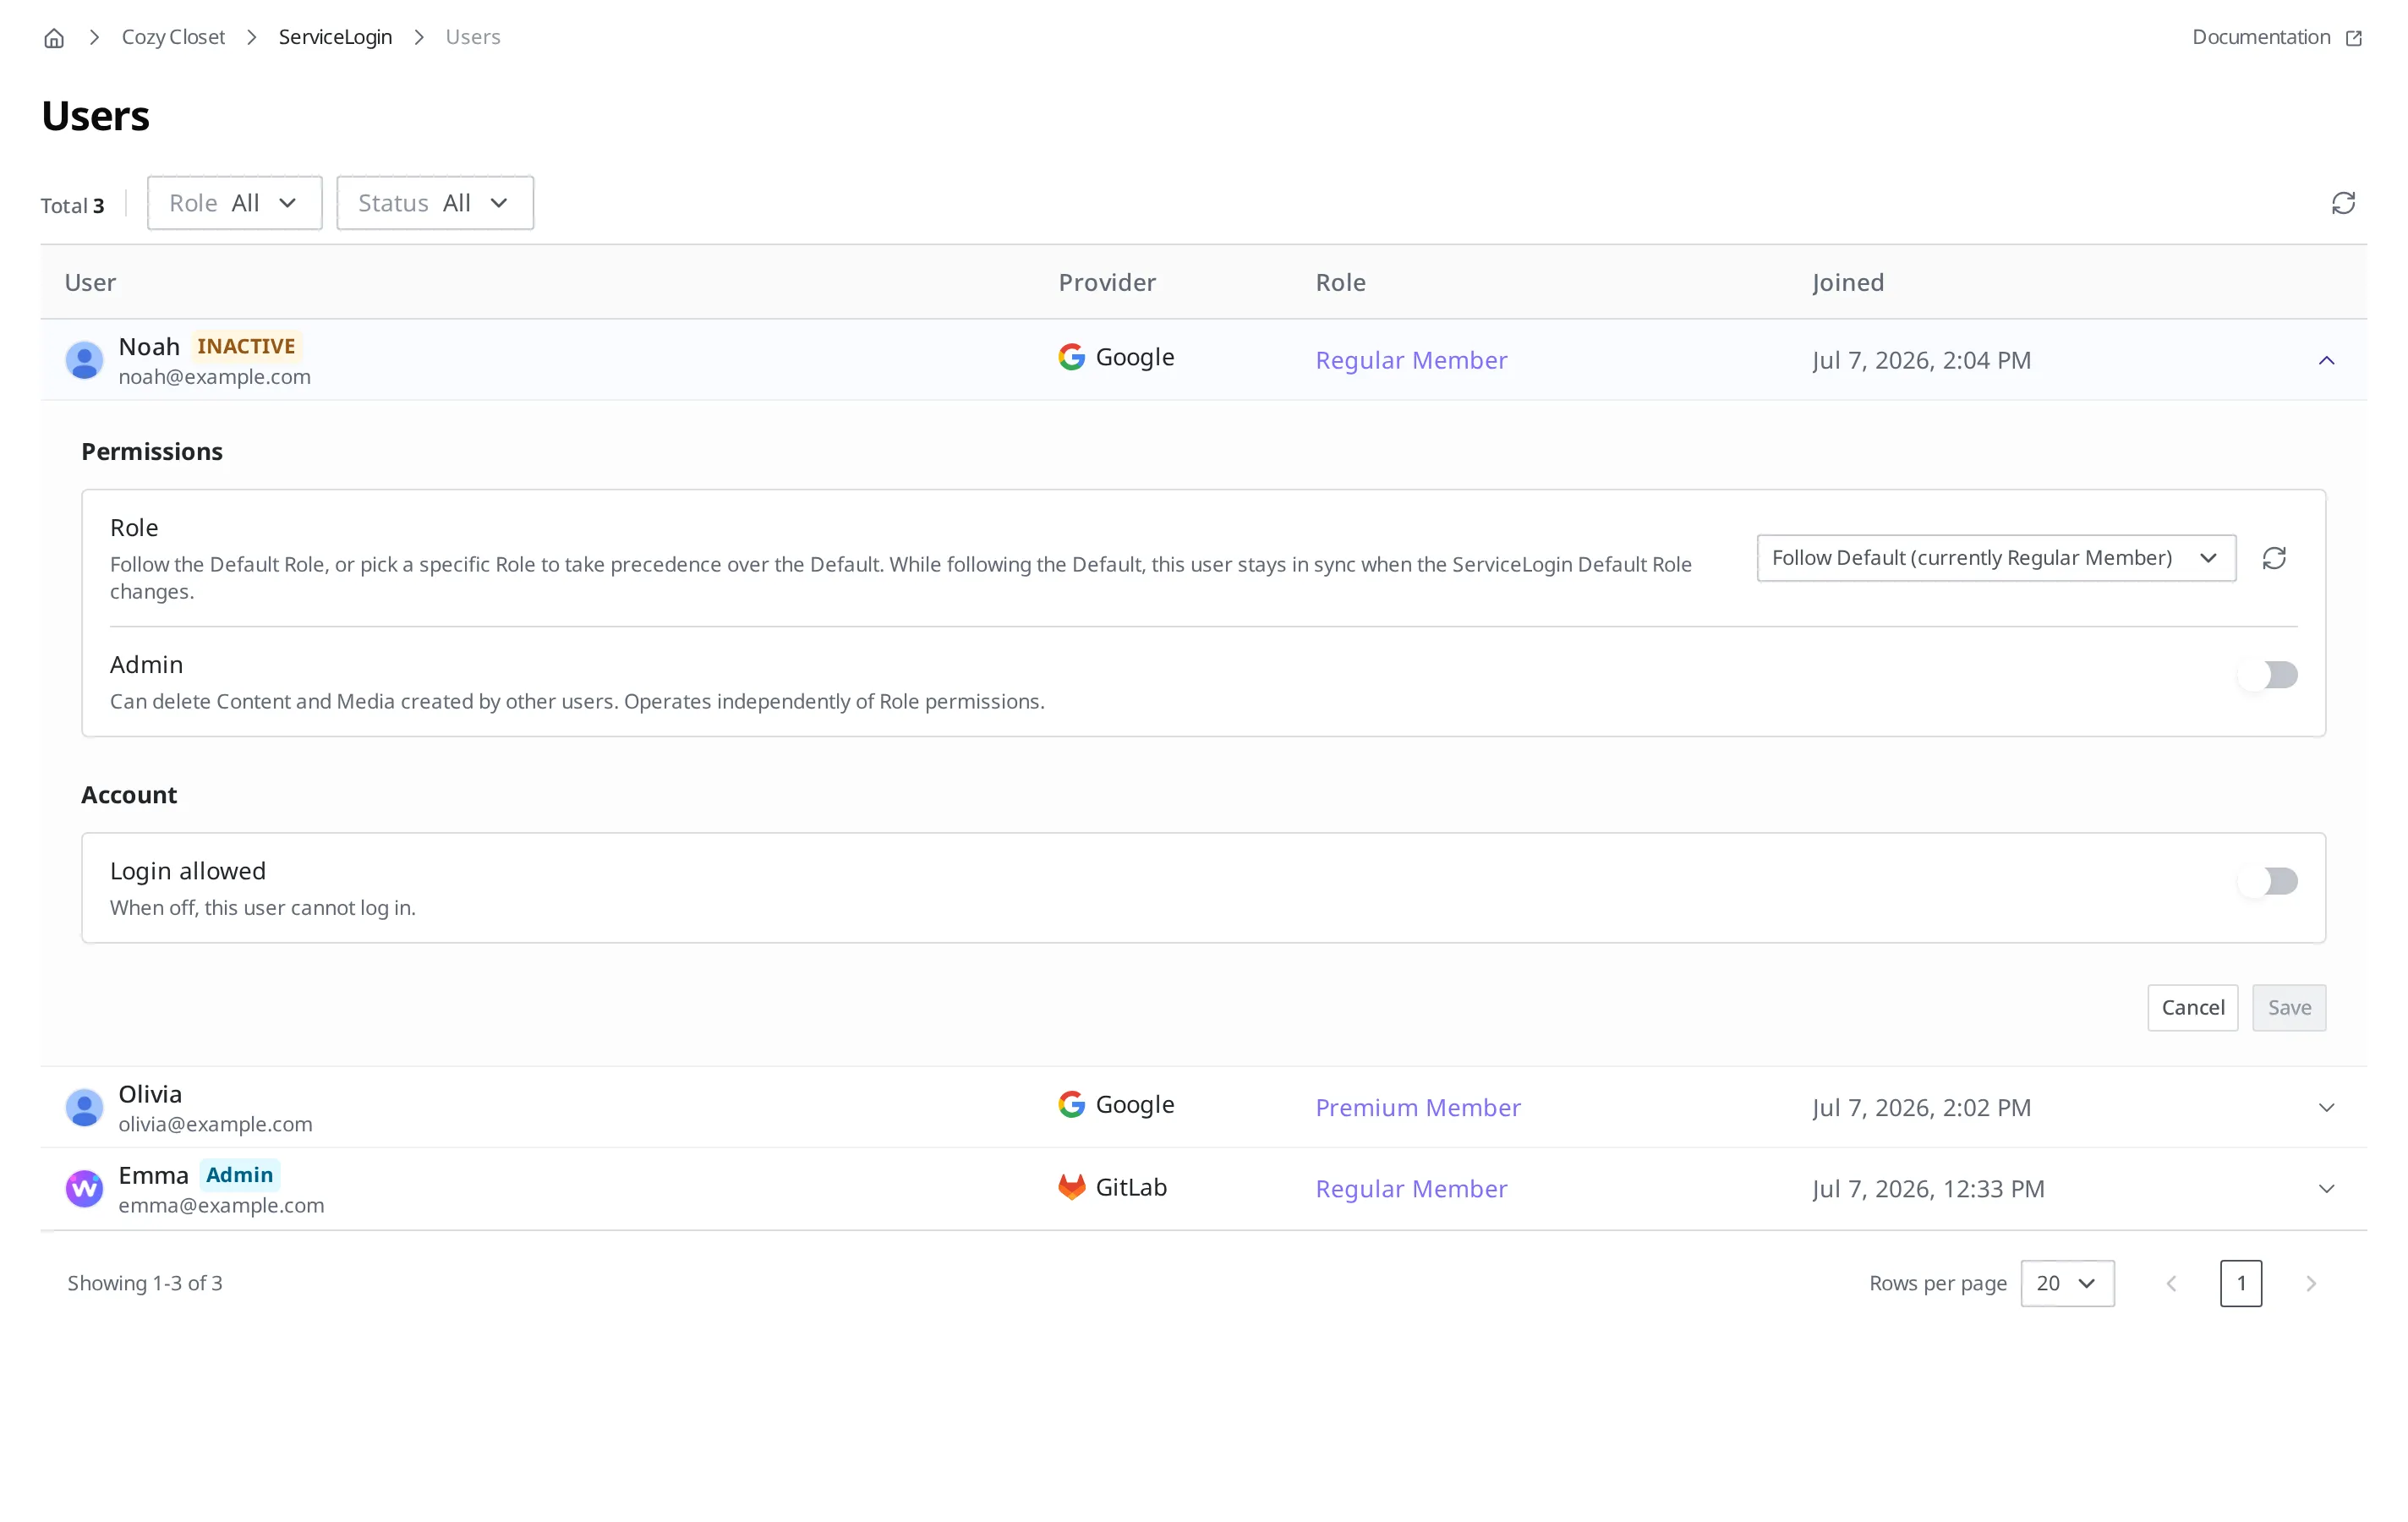
To accept new shoppers right away without checking them one by one, leave Require admin approval for new sign-ups off. How to turn this option on and off is covered in Service Member Login. Turning the option off does not automatically pass members who were already waiting for approval, so allow each waiting member with the method above.
Blocking a problem member's login
If a member only posts nonsense or harms other shoppers, you can block that member's login. You do this by turning off the Login allowed you switched on when you approved them. Once you block the login, that member can no longer get in with their own account, and they show in the list with an Inactive badge.
- In the Users list, click the expand icon at the far-right end of the row of the member you want to block.
- In the Account section, turn off Login allowed.
- Click Save.
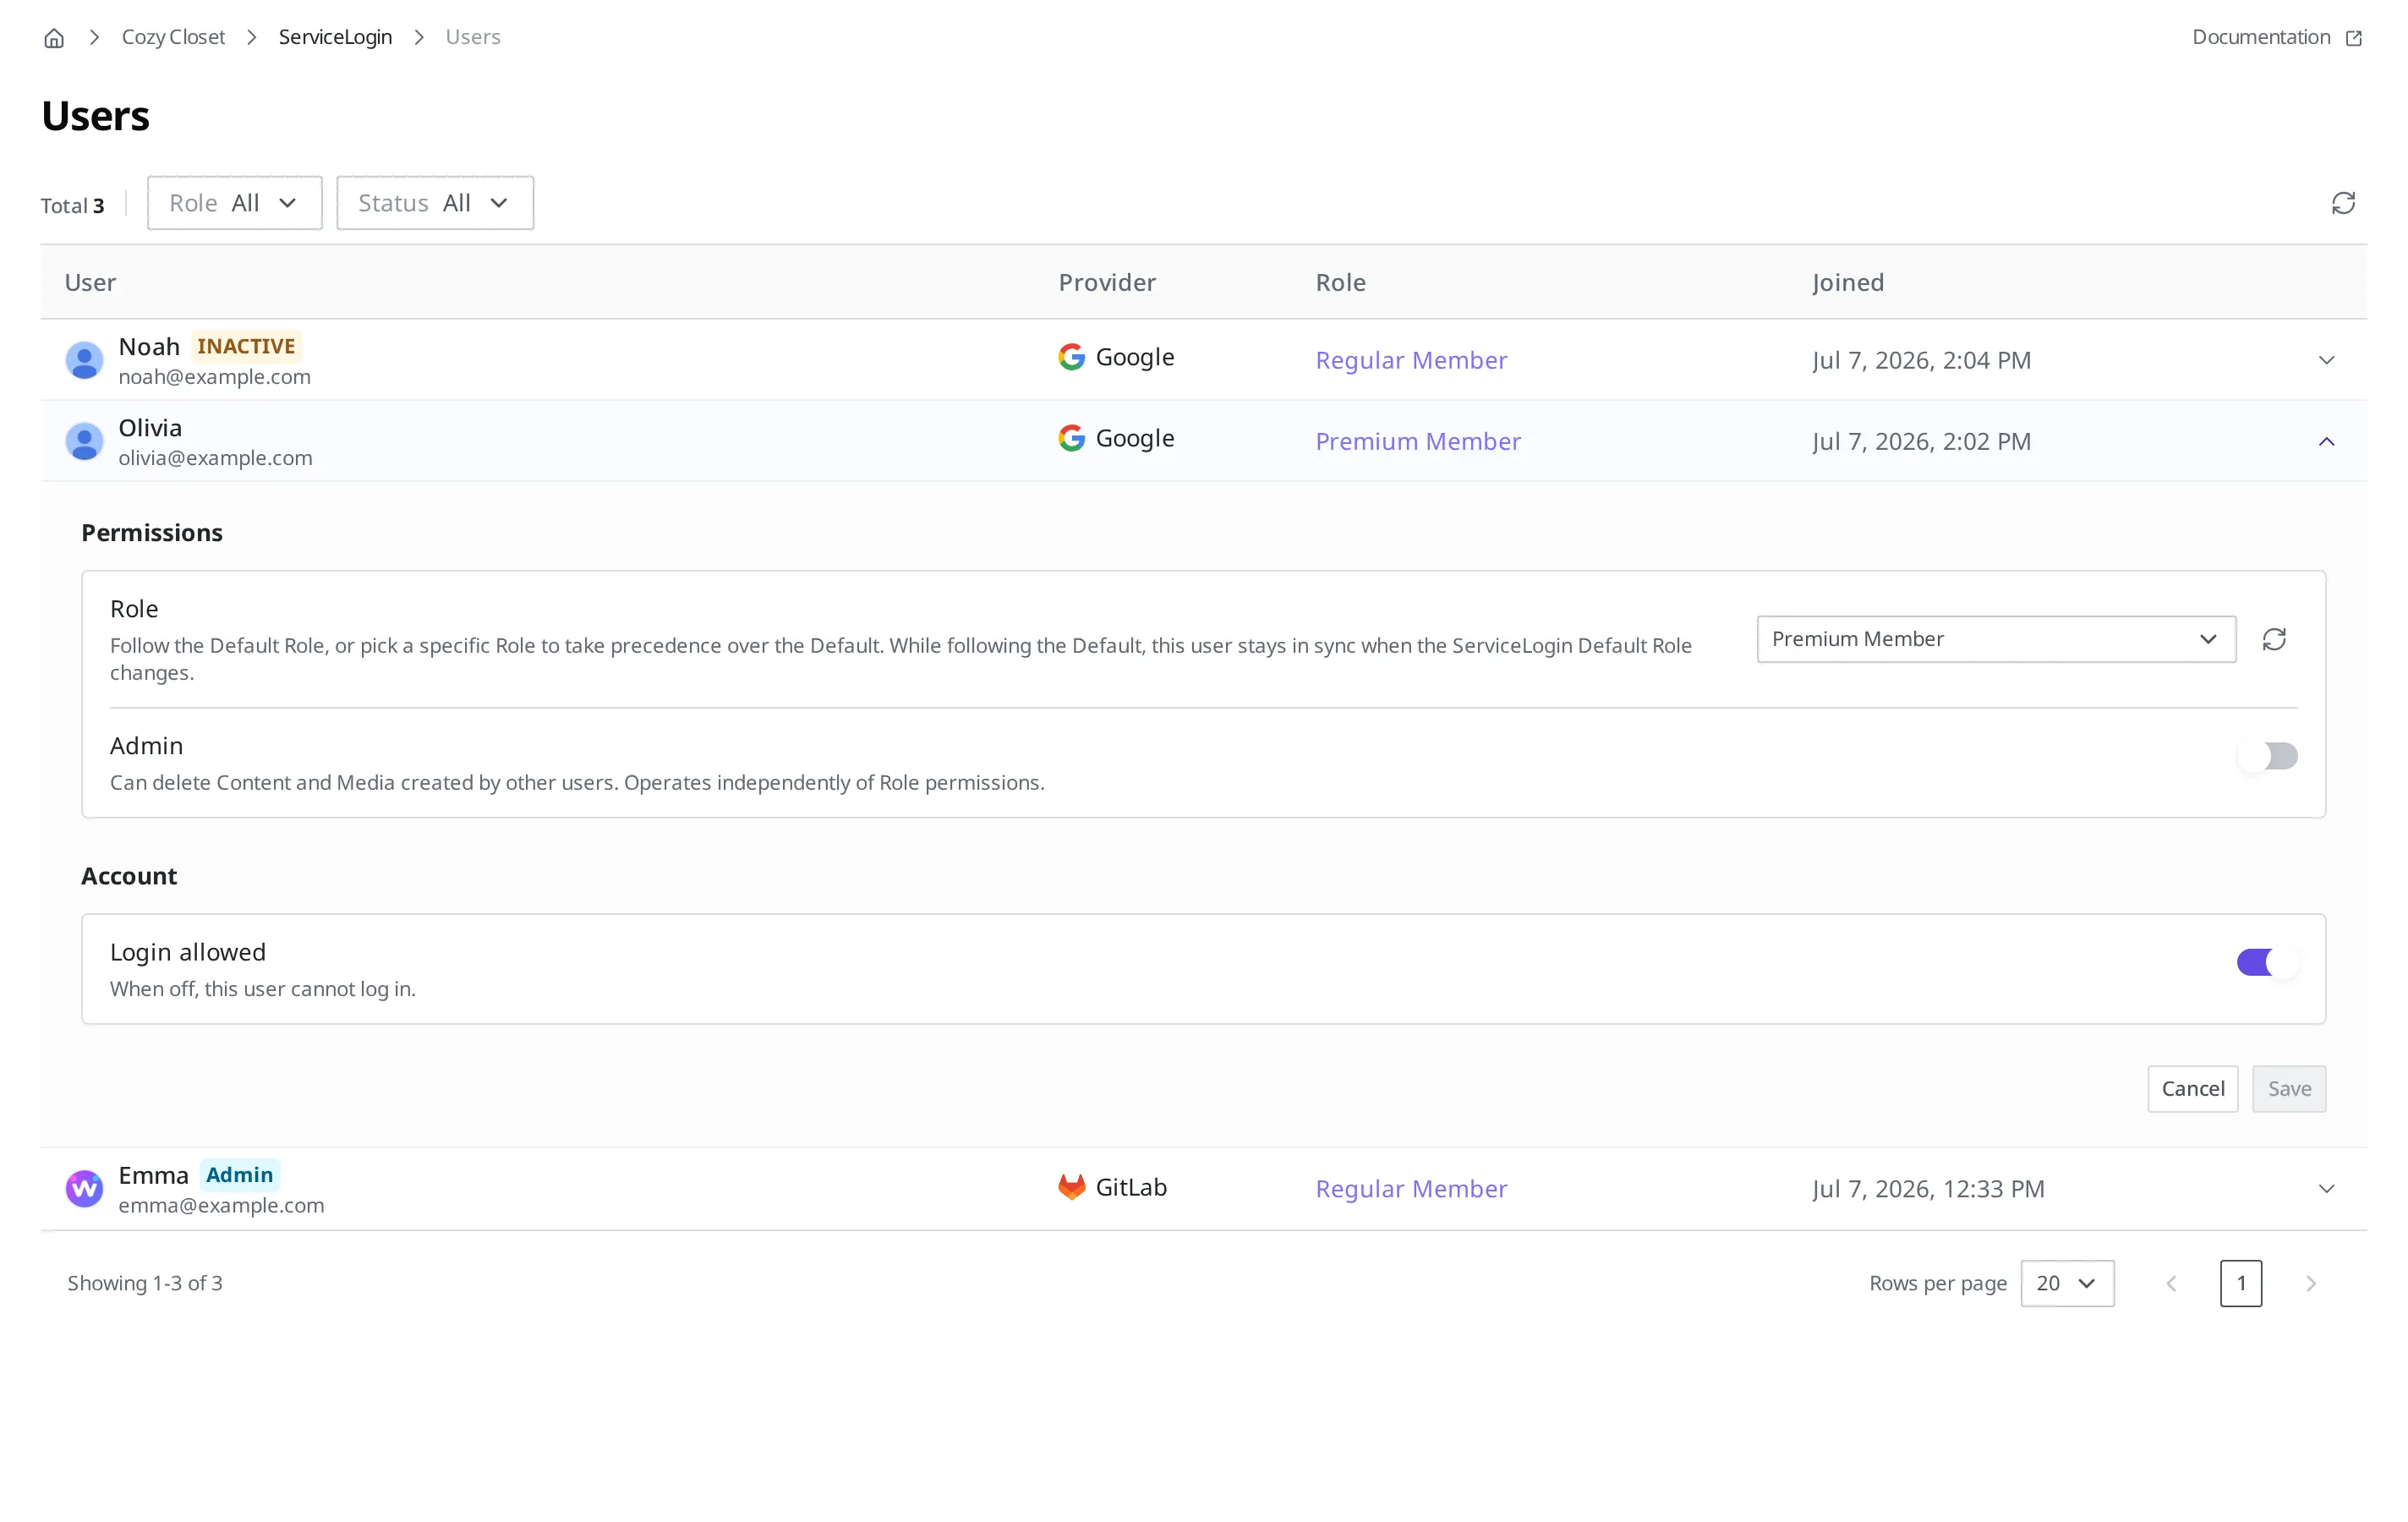
Blocking the login leaves that member's record and everything they left behind untouched. Turn the login back on and the member can get in again as before. So this setting is what you use to hold a member out for a while and then let them back in. When there is no reason to let them back in, use removing them from the roster.
Giving a specific member different permissions
Every newly signed-up member gets the same permissions, namely the Default Role from the member login settings. But there are times when you want to give only some members different permissions. Maybe you want to give a long-standing premium member broader permissions, or let a specific member use a new feature ahead of everyone else. In that case, you assign a different Role to that one member alone. Permissions assigned this way, per member, take priority over the Default Role.
Here is how it plays out for the clothing store.
- Starting point: every member gets "Regular Member" as their Default Role. This Role lets them read reviews, write new ones, and edit only their own reviews.
- What you do in the content studio: for just one premium member, "Olivia," you assign the "Premium Member" Role separately.
- Result: "Olivia" now operates with "Premium Member" permissions, while everyone else stays on "Regular Member" permissions. Within the same service, you can give each member different permissions.
- In the Users list, click the expand icon at the far-right end of the row of the member you want to give different permissions.
- Open the Role dropdown in the Permissions section.
- Choose "Premium Member" from the list.
- Click Save.
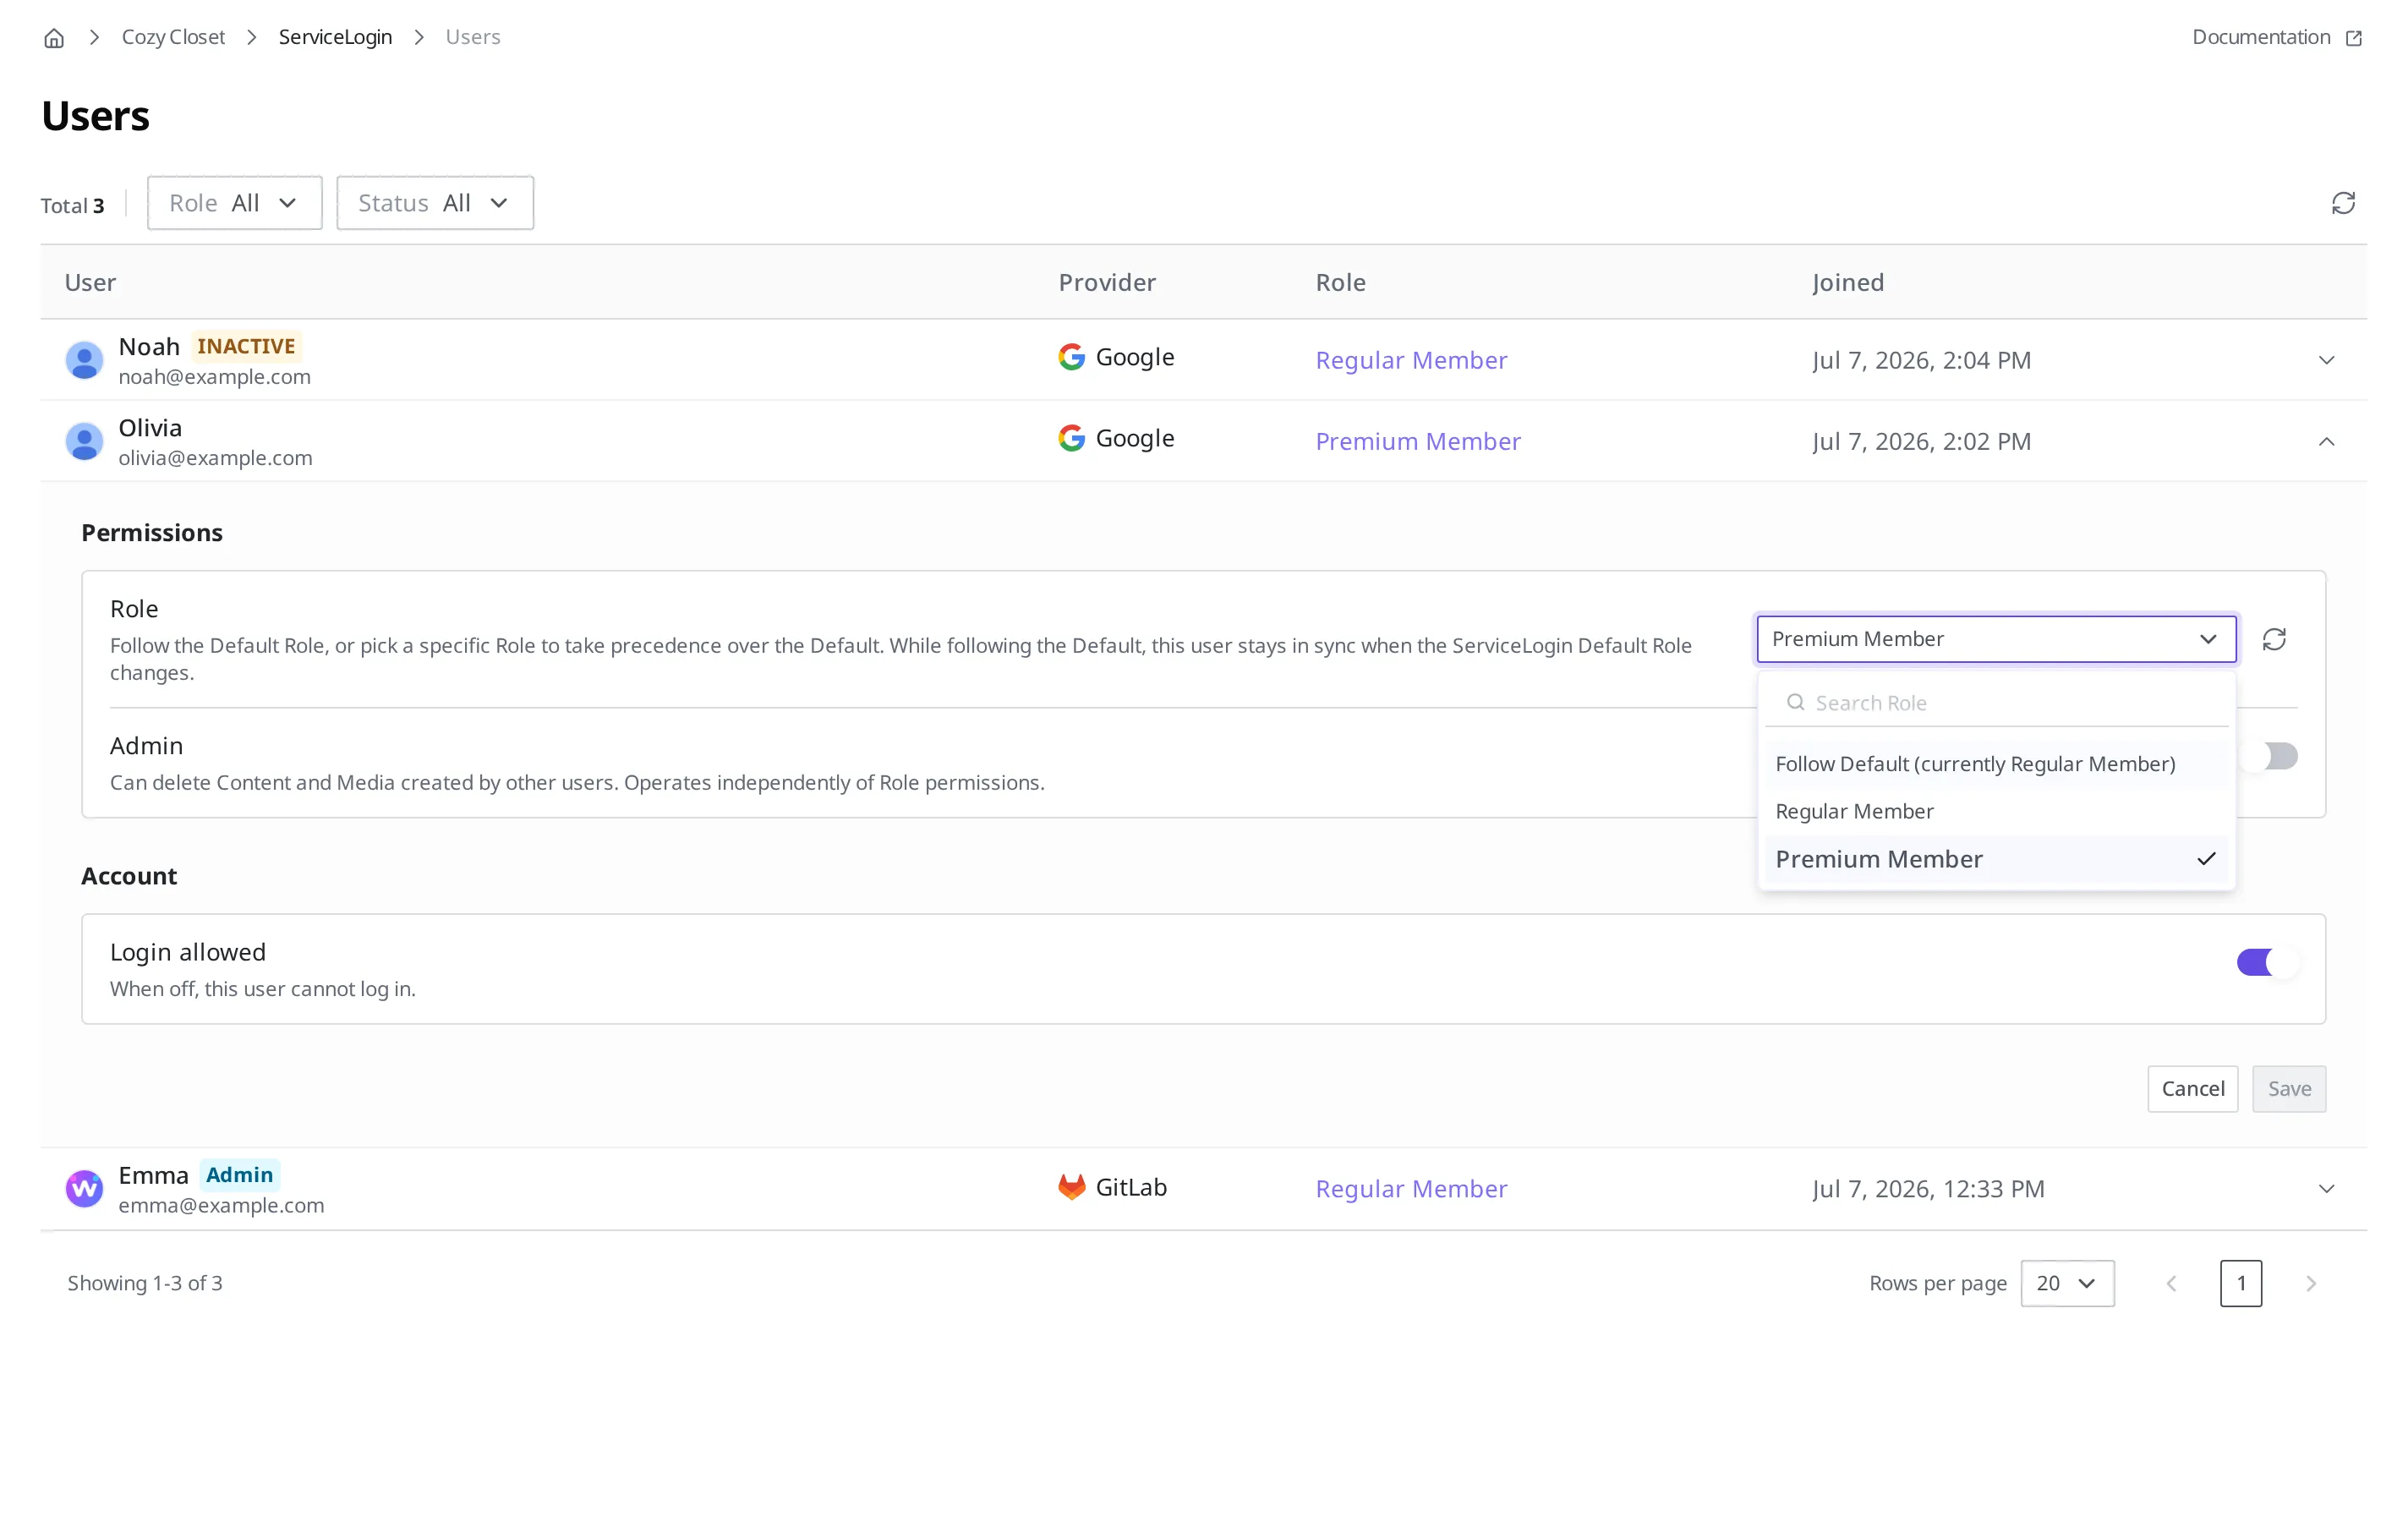
If you have created a lot of Roles, you can type a name in the Search Role box at the top of the dropdown to find one.
To take back the permissions you assigned separately and put the member back in line with everyone else, choose Follow Default (currently Regular Member) in that member's Role dropdown and click Save. How to create and edit the permission bundle you grant members (ServiceUserRole) itself is covered in Member Roles and Permissions.
Letting a member clean up other people's posts
Sometimes you want another member to clean up the inappropriate things members have left behind. Something like picking out and deleting advertising reviews on the review board. The method here is the same as in the previous section. You create a separate Role that can do that job and assign it to that member.
What differs is what goes into the Role. Permission to handle what members left behind can be limited to what the member wrote themselves, or that limit can be lifted so it reaches what other members wrote as well. To the member you put in charge of the cleanup, you give a Role that lifts the limit for deletion only.
Here is how it plays out for the clothing store.
- Starting point: every member gets "Regular Member" as their Default Role. This Role lets them read reviews, write new ones, and edit only the reviews they wrote.
- What you do in the content studio: you create a separate "Review Moderator" Role. Editing stays limited to what the member wrote, and only deletion is opened up to other members' reviews. Then you assign this Role to "Emma."
- Result: "Emma" can delete advertising reviews. She cannot rewrite reviews other people wrote, because deletion is the only thing that was opened up.
- Create the Role for the cleanup first, in Member Roles and Permissions.
- In the Users list, click the expand icon at the far-right end of the row of the member you want to give that Role.
- In the Permissions section, choose the Role you created from the Role dropdown.
- Click Save.
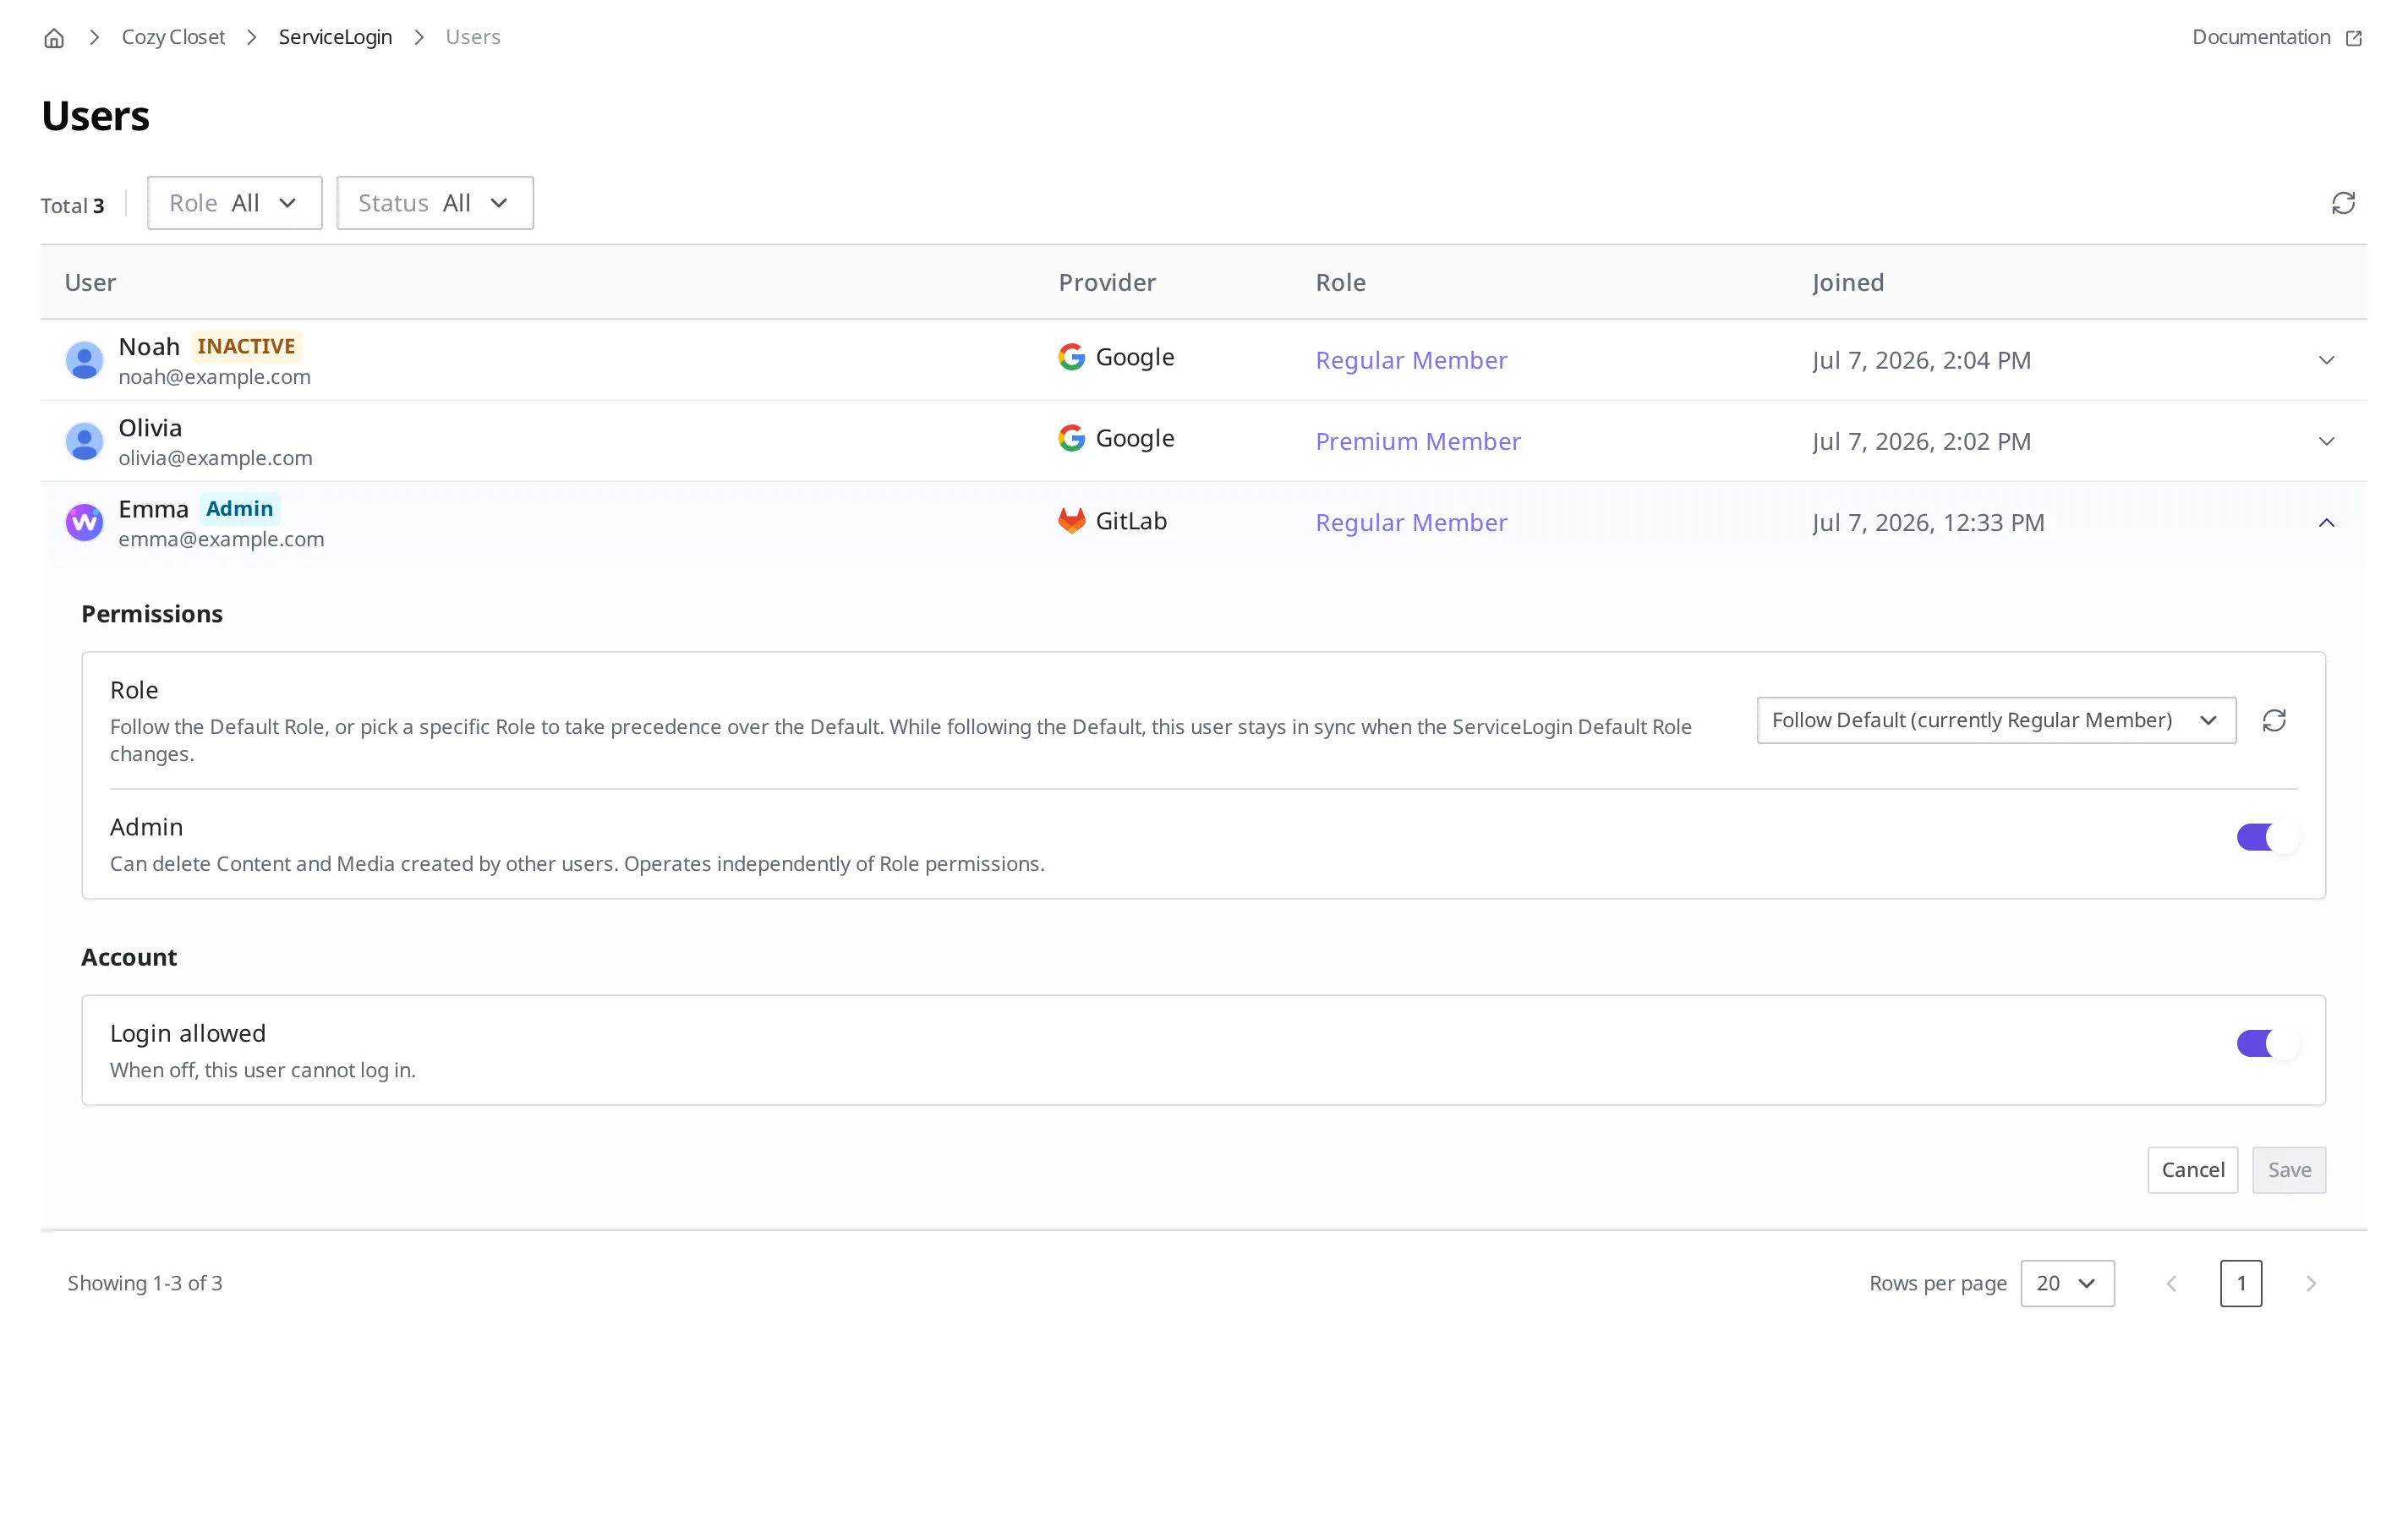
When the Role column in the list changes to that Role's name, it worked.
Sharing out this cleanup permission lets you leave it to your shoppers to clean up inappropriate posts themselves. Operators do not have to delete everything by hand. Still, since this widens what a member can do, it is best to give a Role like this only to members you trust.
Removing a member from the roster
When a member asks to leave, or there is no reason for them to come back, you can remove them from the roster. Unlike blocking a login, this cannot be undone.
- In the Users list, click the expand icon at the far right of the member's row.
- In the expanded panel, click Remove user at the bottom left. It sits opposite Save.
- When the window opens, type that member's email address exactly. The Remove user button only becomes available once the address matches.
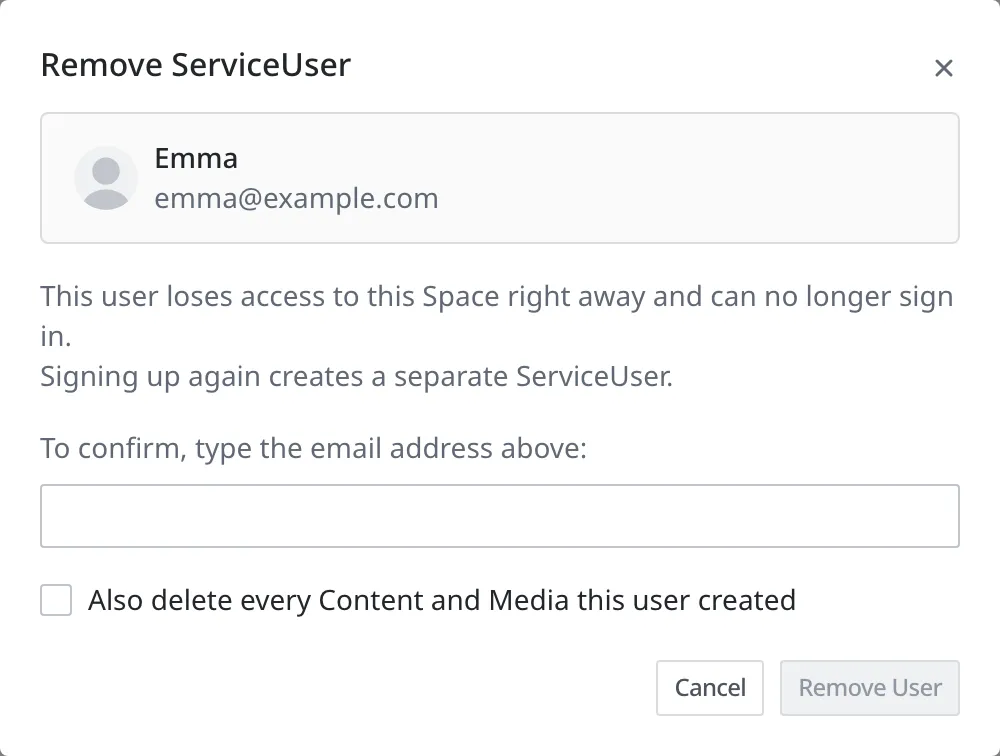
Asking for the email is not about getting consent. It makes you read the row you picked one more time. If you clicked a row below the one you meant, this step stops you.
A removed member immediately loses access to this Space and can no longer sign in. If they later sign up again with the same social account, they are registered as a separate member with no link to the old record.
If you select Also delete every Content and Media this user created and then click Remove user, the resources that member created are deleted along with them. Deleting those resources can take some additional time after the removal itself is finished.
What to do next
- Service Member Login: Covers how to turn on member login for the first time, connect social login, and decide whether new sign-ups need approval and what the Default Role is.
- Member Roles and Permissions: Covers how to create the permission bundle you grant members (ServiceUserRole) and how to let members handle only what they wrote.
- Inviting Members and Granting Permissions: Covers how to invite and grant permissions to the operators (the team) you work with, rather than to signed-up members.
- API Reference: Covers technical specifications such as request formats for working directly, from a program, with the content that signed-up members read and write.