

Changing forms on a live service
Last updated: July 4, 2026
Imagine you run "Cozy Closet," an online clothing store, with 300 products registered under the "Product" Content Type. Ahead of the summer sale, you want to add a new "Sale price" field. On the other hand, you want to remove the "Inventory note" field, which you set up early on but no one uses anymore. But if you change the form now, what happens to the 300 products already piled up?
This page covers what happens to your existing Content when you add, change, or delete a Field on a Content Type that already holds content, and the safe order for making those changes. What a Content Type and a Field are and how to create them for the first time are covered in Content Modeling.
Before you begin, there is one thing to know. Changes to a form take effect the moment you save. Unlike Content, a form does not go through a separate publishing step. That is why, before you change a form that is live, it matters to first know "what happens when you change it."
What happens to existing products when you change the form
First, the big picture. Depending on what you change in the form, different things happen to the 300 products already piled up.
| What you change | What happens to your 300 existing products |
|---|---|
| Adding a Field | Nothing breaks. The new field stays empty |
| Changing a Field's name (the name shown on screen) | The values are kept as they are |
| Making a Field required, or adding a value rule (validation) | Nothing happens right away. Instead, from the next time you save or publish that product, it is checked against the new rule |
| Deleting a Field | The value stored in that field disappears from every product along with it. This cannot be undone |
| Deleting a Content Type | If even one Content made from that form remains, the deletion itself will not go through |
You only need to remember two rows from this table. Adding is safe, and deleting cannot be undone. And rules like required and validation do not apply retroactively to the products you already have; they take effect from the next time you touch each one. The sections below cover these three cases in order.
Let me also draw one boundary that is easy to confuse. Editing a Content Type is like editing the printing plate for a blank form, while editing a Content is like editing one sheet you have already filled in. Editing the sheet (Content) means it must be republished before it reaches visitors, but for the printing plate (Content Type), the new form takes effect the moment you save.
Adding the "Sale price" Field
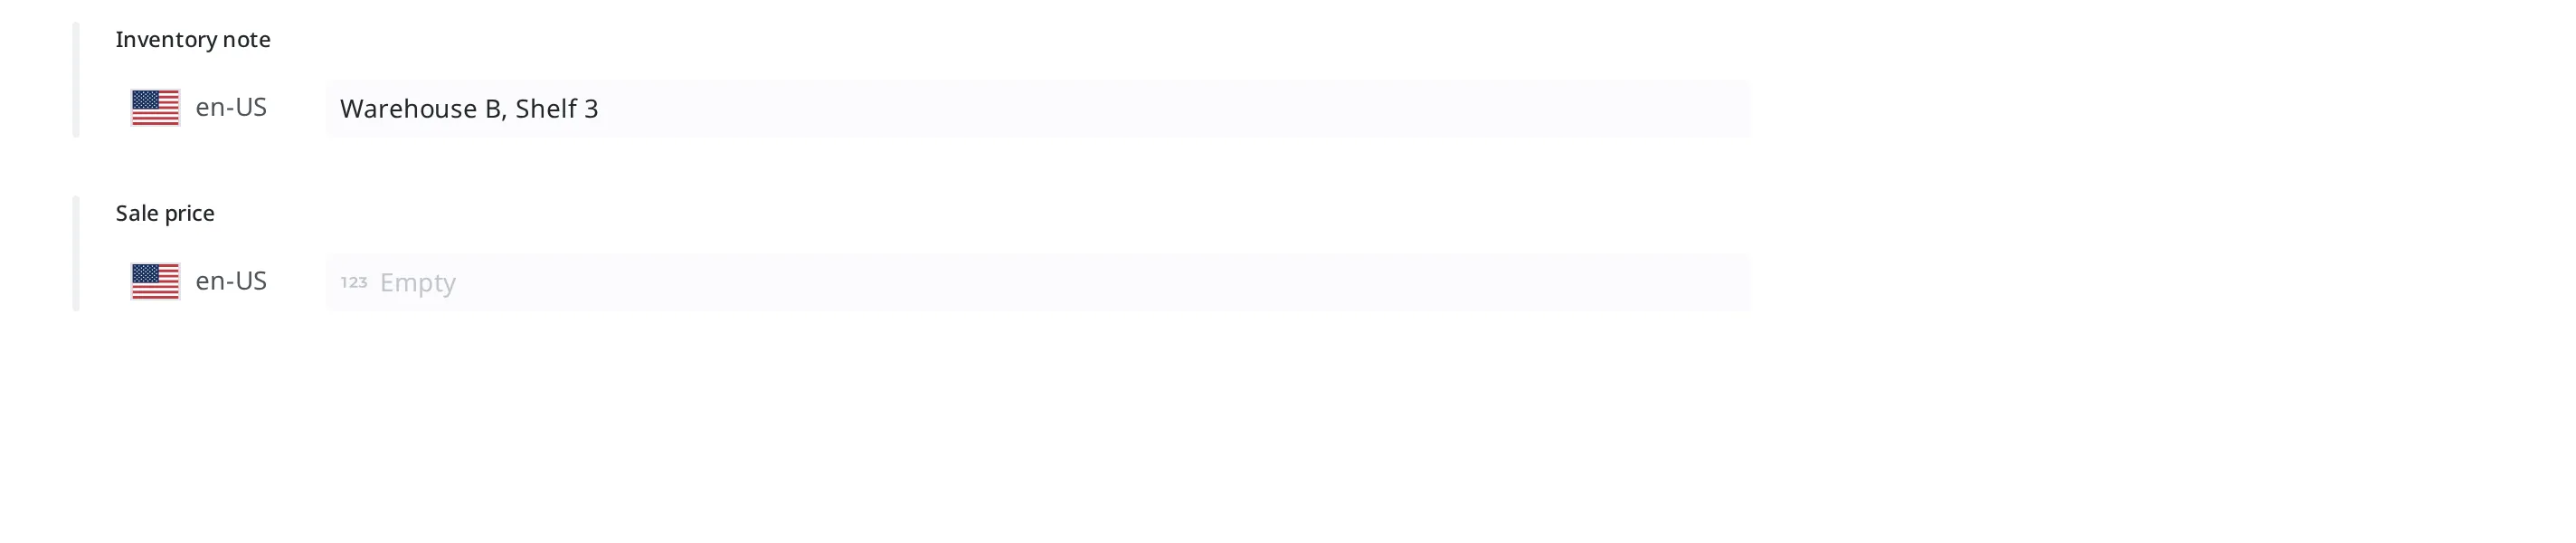
Adding a new Field is a safe change. Your existing products are kept as they are, and only the newly added field stays empty. For example, right after you add the "Sale price" Field, the product list looks like this.
| Product name | Price | Sale price |
|---|---|---|
| Stainless Tumbler 500ml | 18,000 | (empty) |
| Oatmeal Linen Shirt | 42,000 | (empty) |
| Brown Corduroy Pants | 39,000 | (empty) |
Here is how to add the "Sale price" Field to the "Product" Content Type.
- In the left menu, click Content Type.
- In the list, click "Product." The Content Type edit screen opens right away.
- Click Create New Field.
- On the Field type selection screen, choose the Integer card. A sale price is a number with no decimal point.
- Click the Next button.
- In the Field name box, enter
Sale price. - In the Field ID box, enter
discountPrice. - Click the Save button.
- Click the Save button at the top right of the Content Type edit screen. When there are no changes to save, this button is disabled; you have to click it after adding the Field for the change to actually take effect.
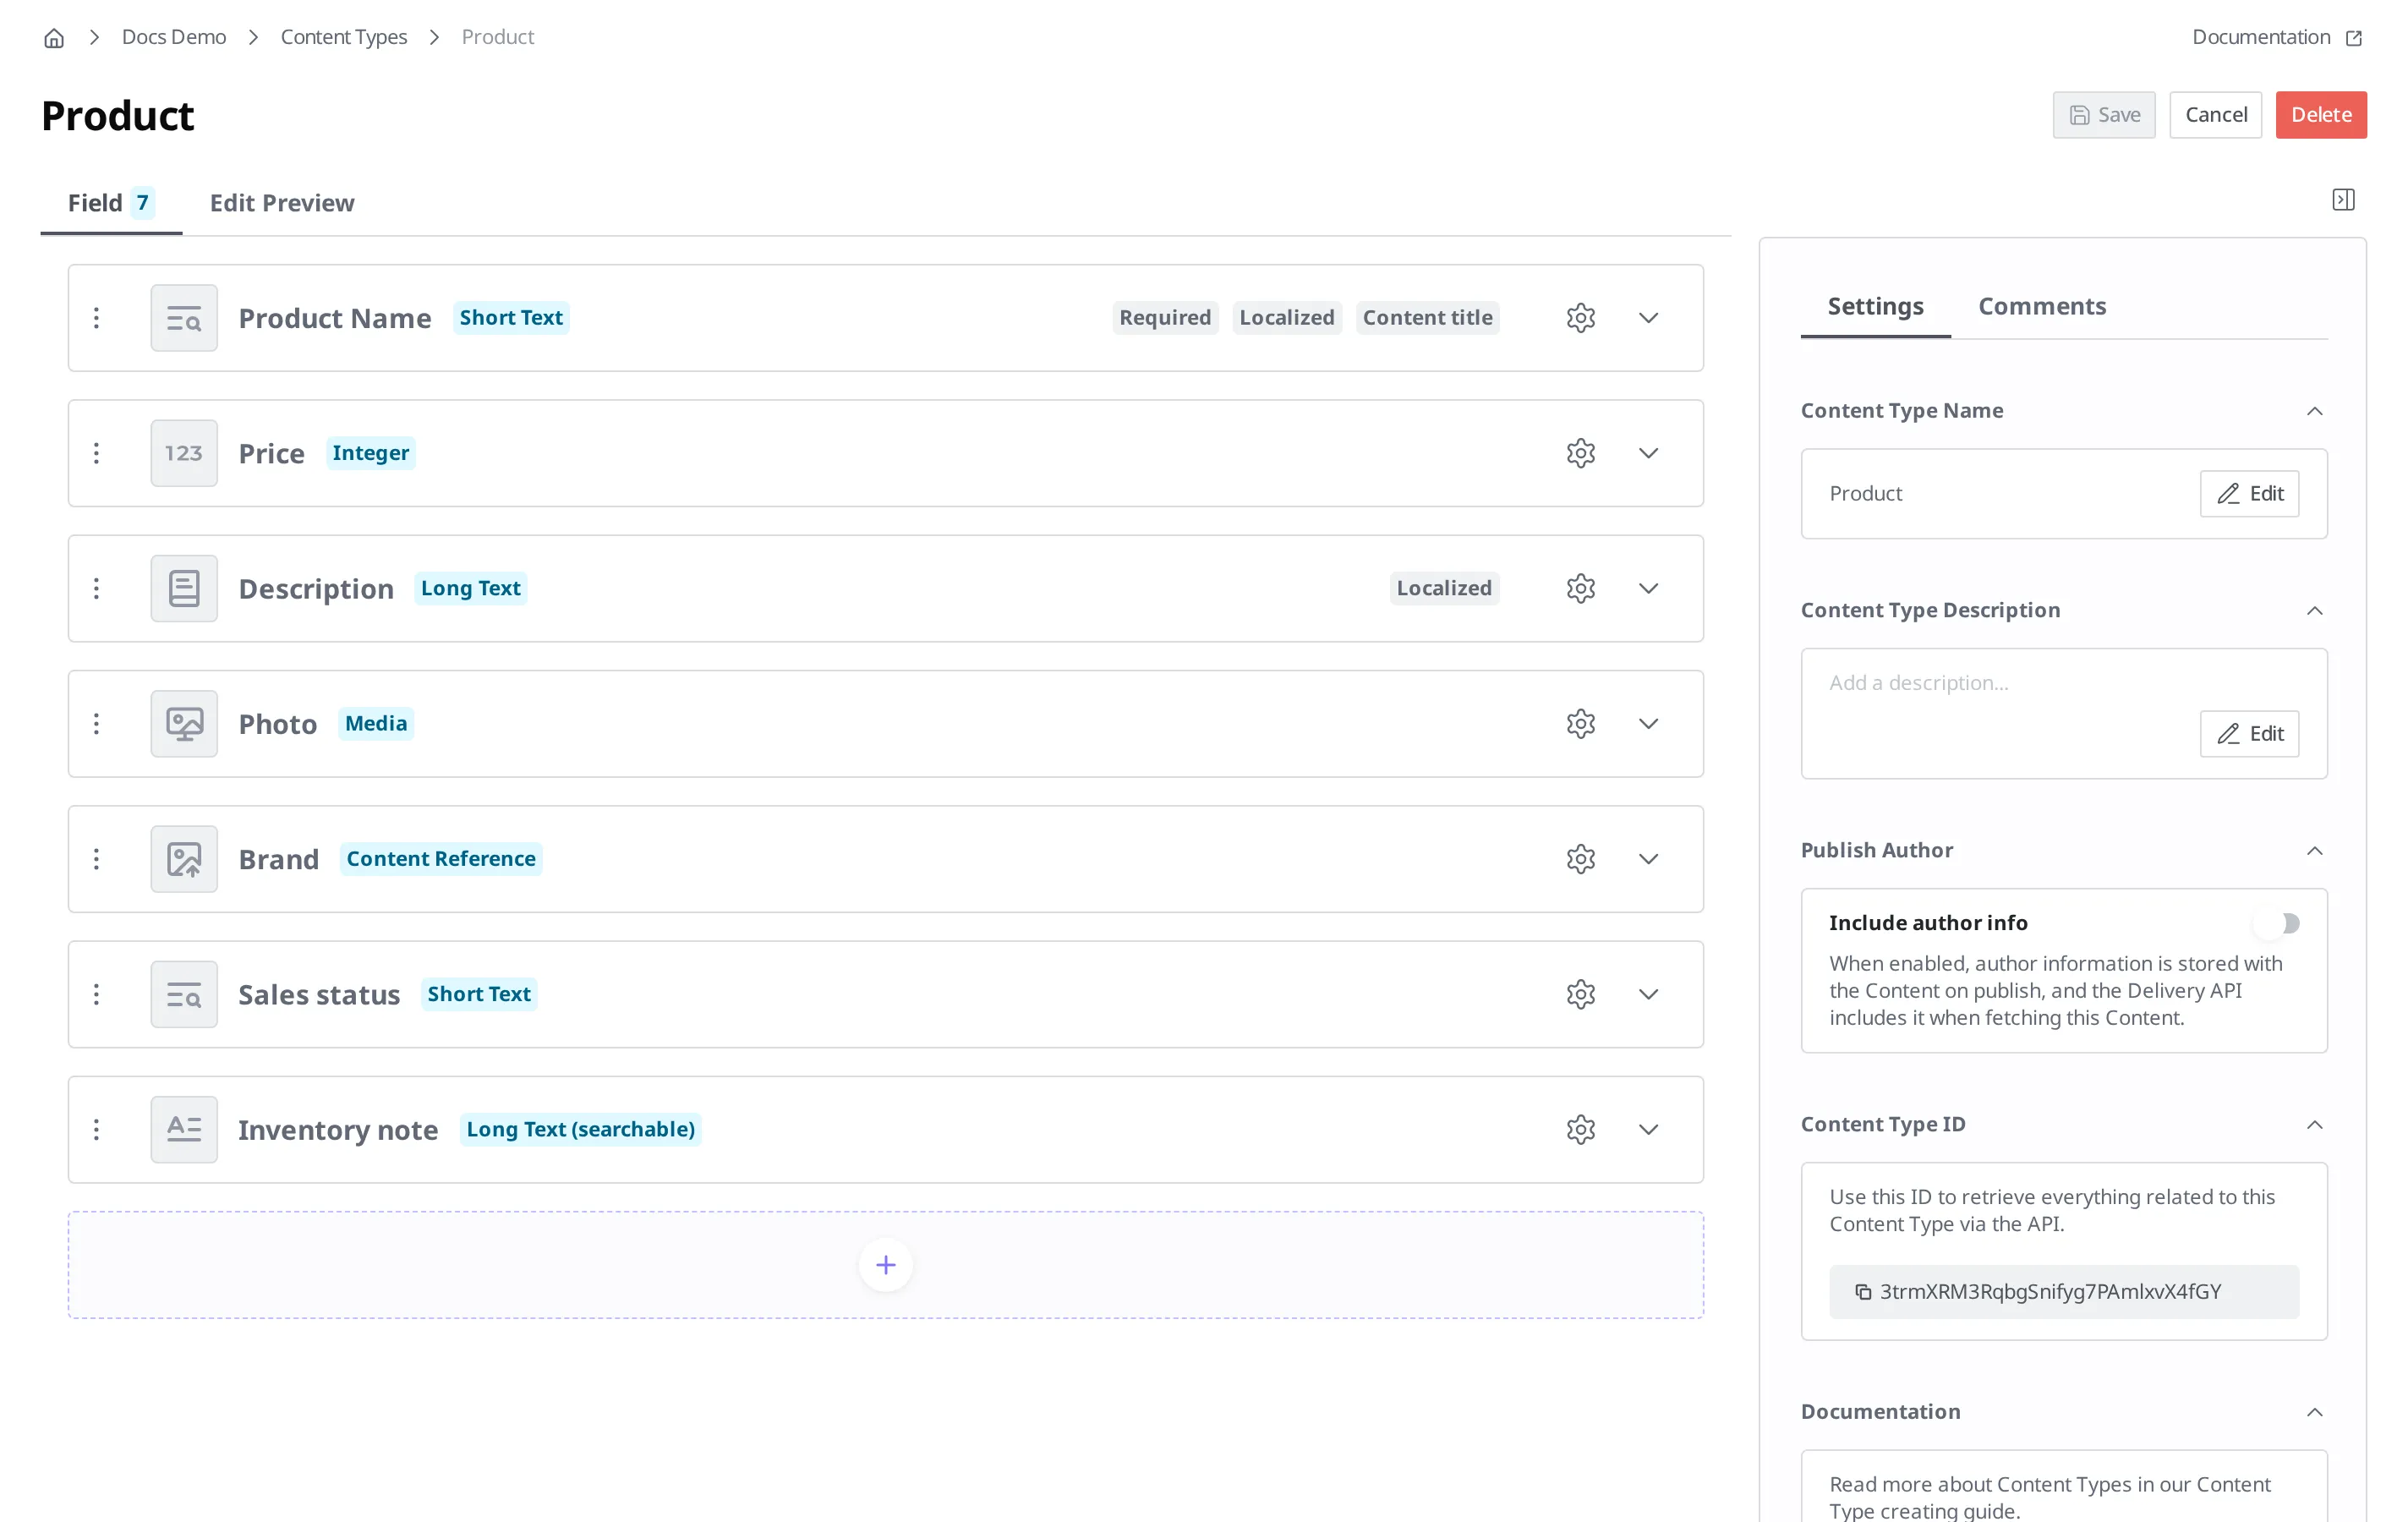
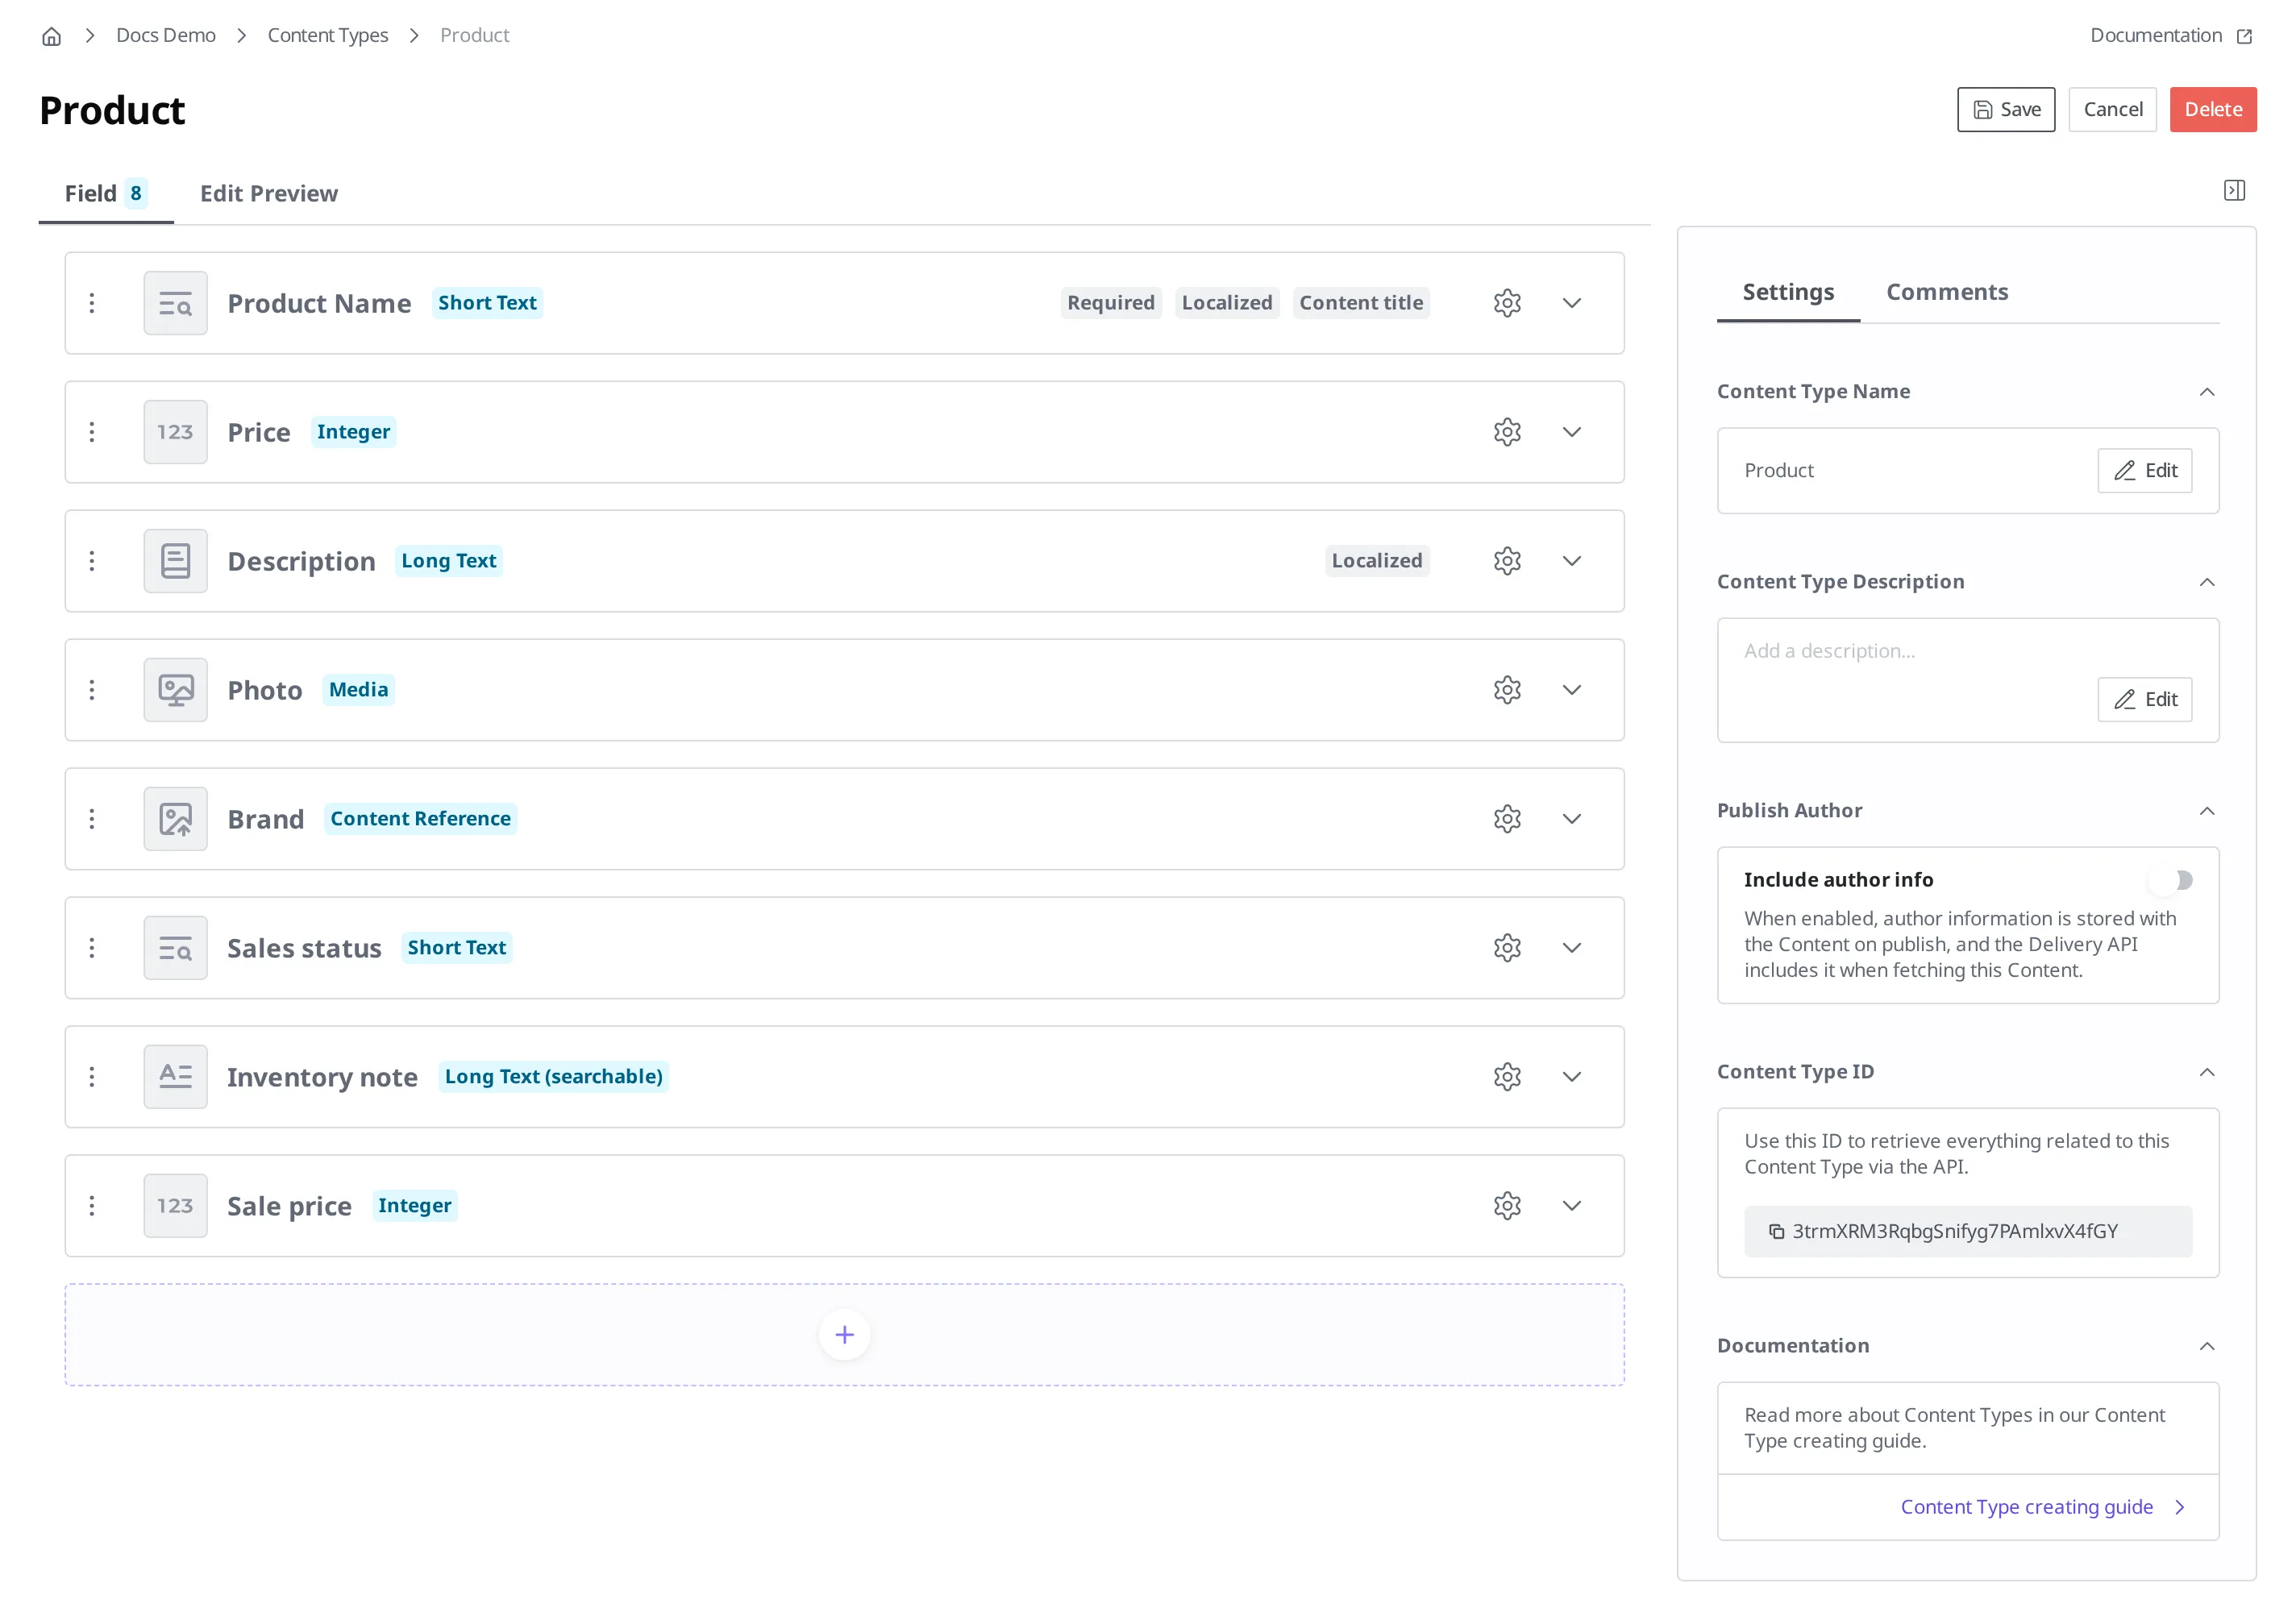
Once you save, the new form takes effect from that moment. Now, when you open the existing product "Stainless Tumbler 500ml," the Sale price field appears empty, and you can fill in the value starting with the products that need it.
Add a required Field in two steps
If you have decided that "from now on, every product must have a sale price," you will want to turn on the Required Field rule on the Field. This is where the most important principle on this page comes in.
The required rule does not apply retroactively to products that have already been saved or published. The moment you turn the rule on, your 300 existing products do not all become errors at once, and products that are currently published keep being delivered to visitors. Instead, the next time you save or publish that product, it is checked against the new rule. In other words, a product with an empty sale price cannot be saved or published until you fill in the empty field.
In practice, this shows up as follows. If you add the sale price as required right away while you have 300 products, then afterward, even if you open any product just to fix a single price typo, you have to fill in the sale price first before it will save. An urgent fix ends up blocked by an unrelated field. That is why it is safer to add a required Field in two steps.
- First, add the Field as not required. The steps are the same as Adding the "Sale price" Field above.
- Fill in the sale price value on your existing products. If there are many, use the filters in Finding the content you need and the column settings to bring the sale price column into the list, so you can spot the products that are still empty at a glance.
- Once every value is filled in, turn on the required rule then.
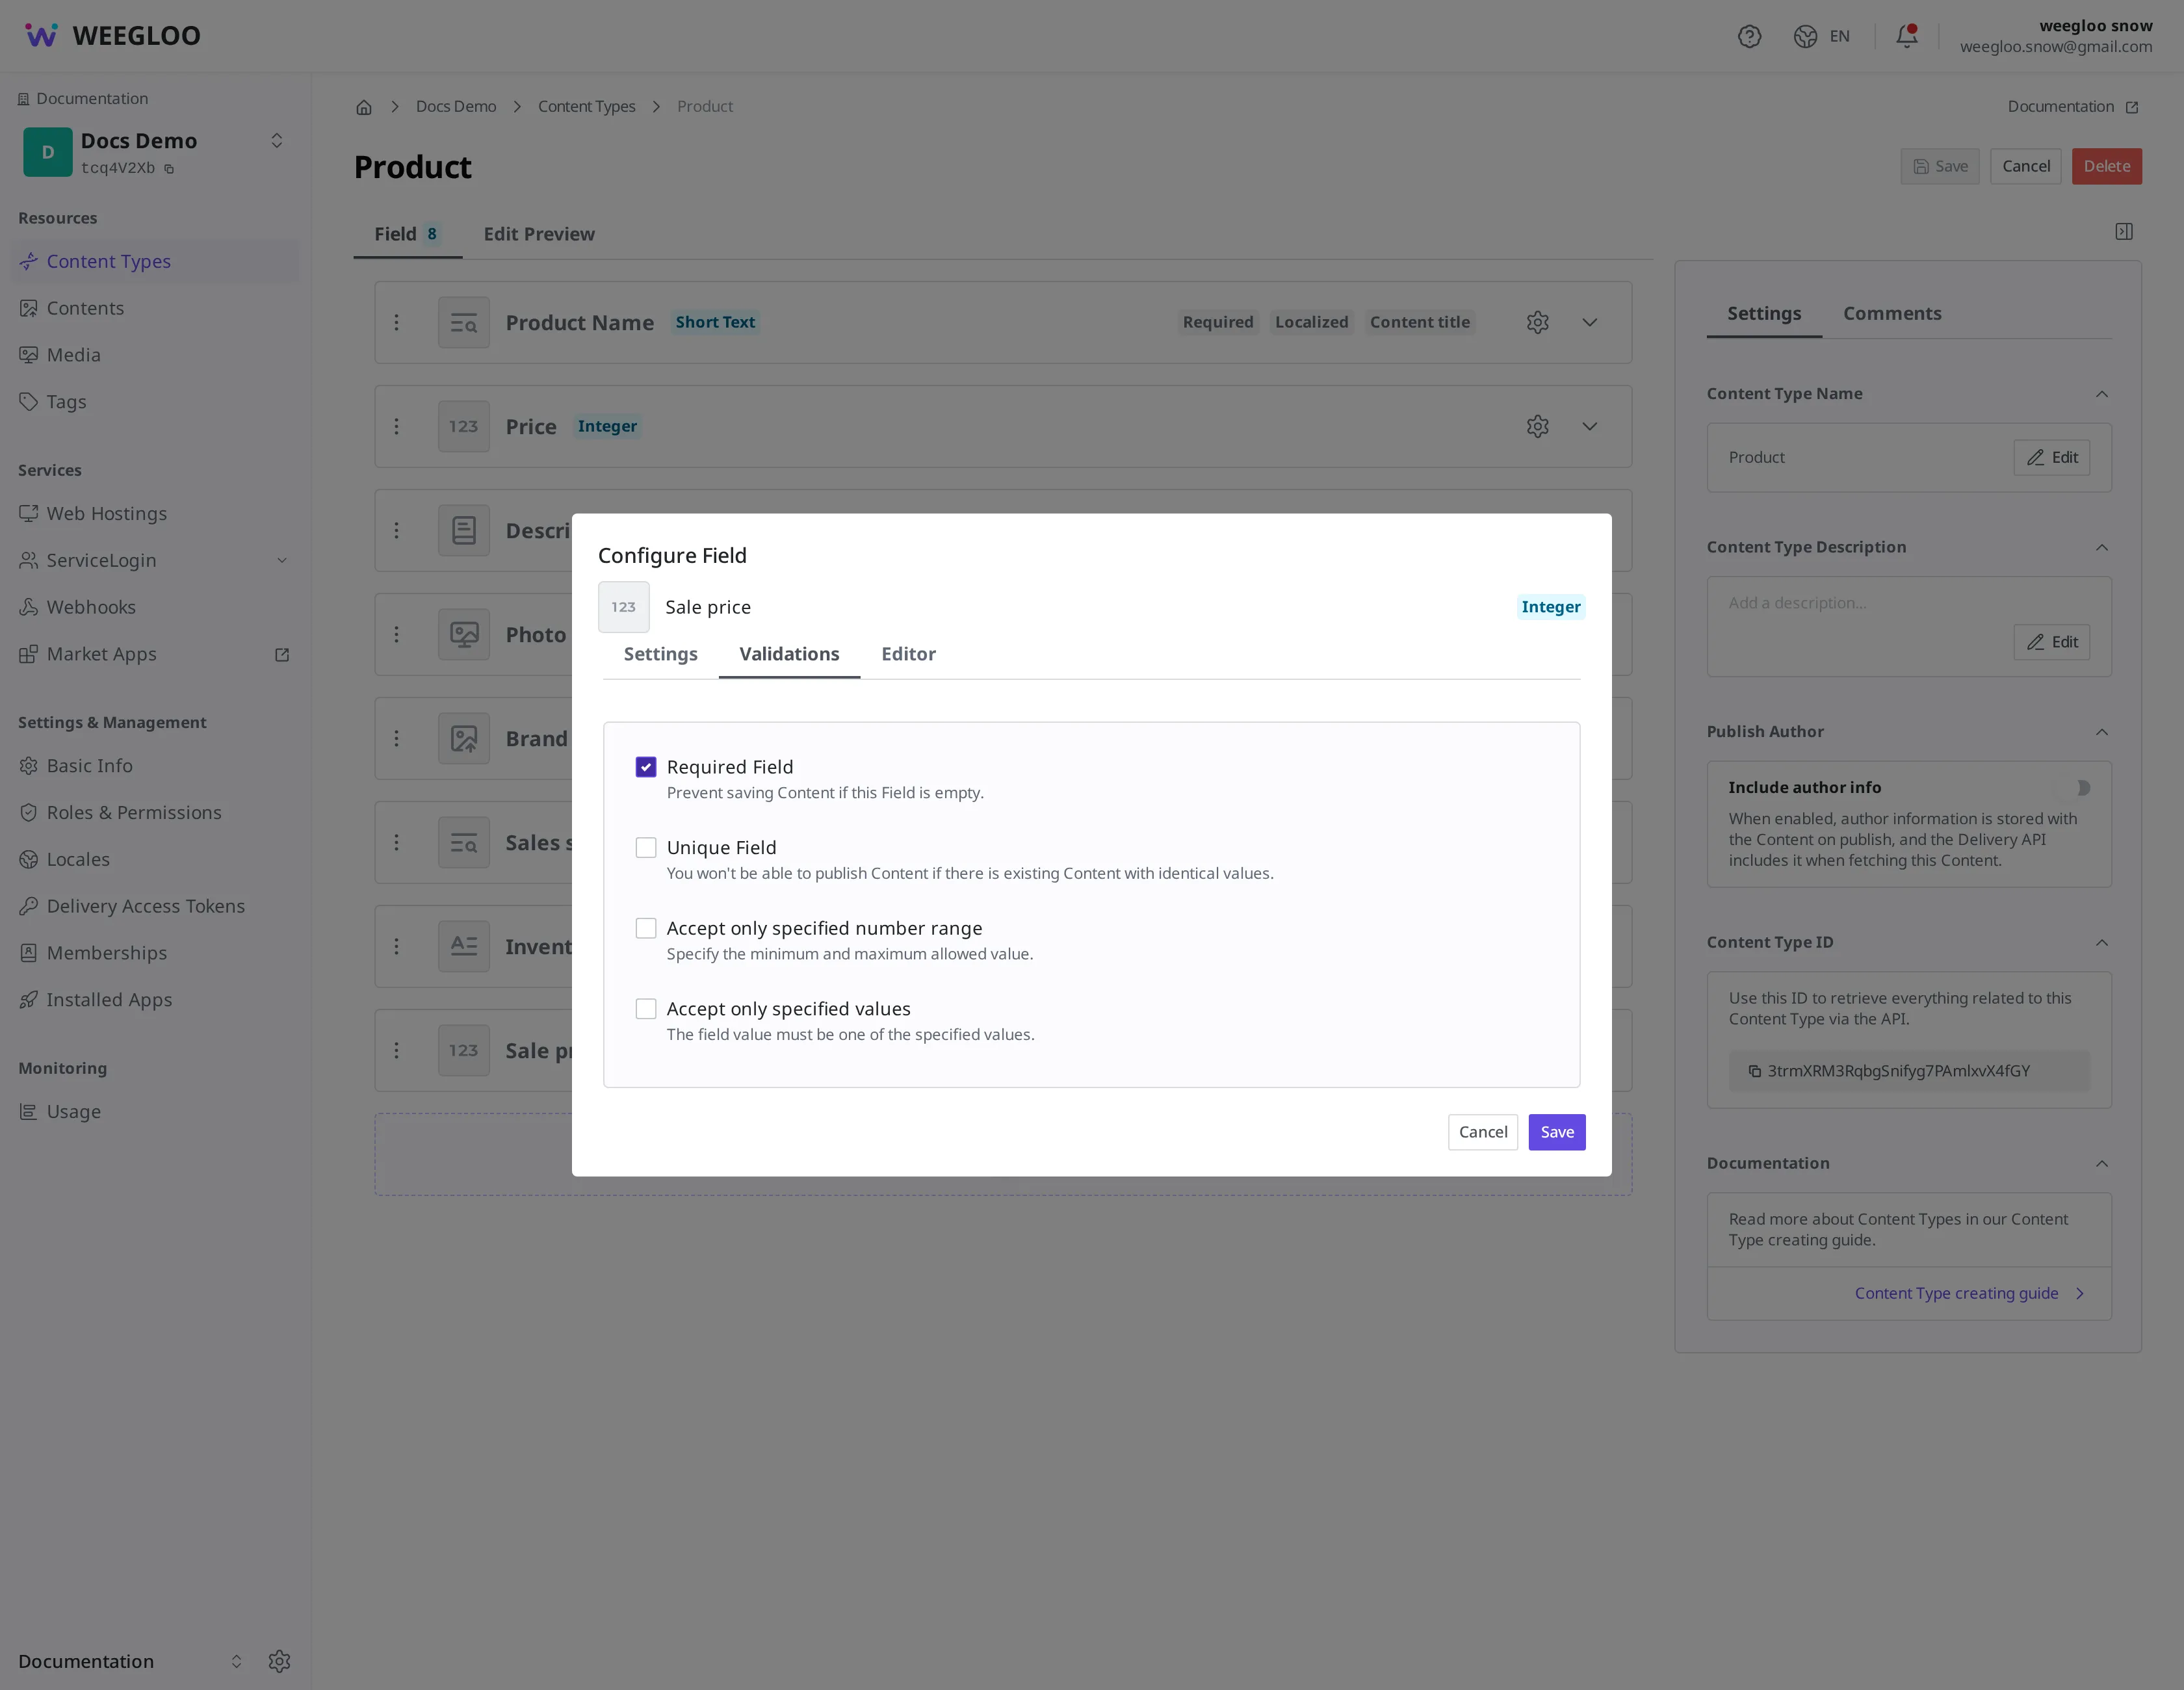
Here is how to turn on the required rule in step 3.
- On the Content Type edit screen, click the gear icon on the Sale price Field. The "Configure Field" panel opens.
- Click the Validations tab.
- Turn on Required Field.
- Click the Save button.
- Click the Save button at the top right of the Content Type edit screen to apply it.
The rule is the same when you change an existing Field to required. Before turning it on, fill in the products where that Field's value is empty, and turn it on once they are all filled.
Adding or tightening a value rule (validation) works exactly like required. For example, even if you newly set a value-range condition on the sale price, it does not apply retroactively to existing products; they are checked from the next time you save or publish them. The order (first check that no product has a value that breaks the condition, then apply the rule) is the same as for a required Field. The kinds of conditions you can set are covered in Content Modeling.
If you try to save without filling in the sale price, a notice reading This Field is required appears in red below the Sale price Field, and at the same time a Couldn't save toast and a notice reading "There are invalid Fields on the Editor tab." appear on the right side of the screen. Until you fill in the value, it can be neither saved nor published.

Removing the "Inventory note" Field: what to check before you delete
Now it is time to clean up the "Inventory note" Field that no one uses anymore. Before that, there is something you must know.
When you delete a Field, the value stored in that field also disappears from every product, and it cannot be undone. It looks like removing one field from the form, but in reality it is an action that erases the 300 inventory notes written across your 300 products along with it.
So before you delete, you need the habit of checking for yourself.
- Check that nothing still uses that Field's value. If the value is shown on your site, or a colleague you work with refers to that field, you should not delete it. Bringing the inventory note column into the list with column settings lets you scan which products still hold a value.
- If you are not sure, do not delete it. Instead, you can rename the Field to "Inventory note (unused)," or leave it as is. Renaming does not touch the values (see the section below), so deleting it later, once you are certain it is truly unused, is not too late.
Once you have checked, delete it in the following order.
- In the Content Type list, open "Product."
- Click the expand icon on the "Inventory note" Field row.
- In the expanded area, click Delete Field. It drops out of the Field list right away with no confirmation dialog, and saving the Content Type in this state actually deletes it.
- Click the Save button at the top right of the Content Type edit screen to confirm the deletion.

Once you save, the Inventory note field disappears from the product screen, and the stored value disappears with it.
Renaming is safe, but the Field ID can't be changed
A Field has two names: the Field name shown on screen (e.g. Sale price), and the Field ID (e.g. discountPrice), the identifier used to refer to this field from a program.
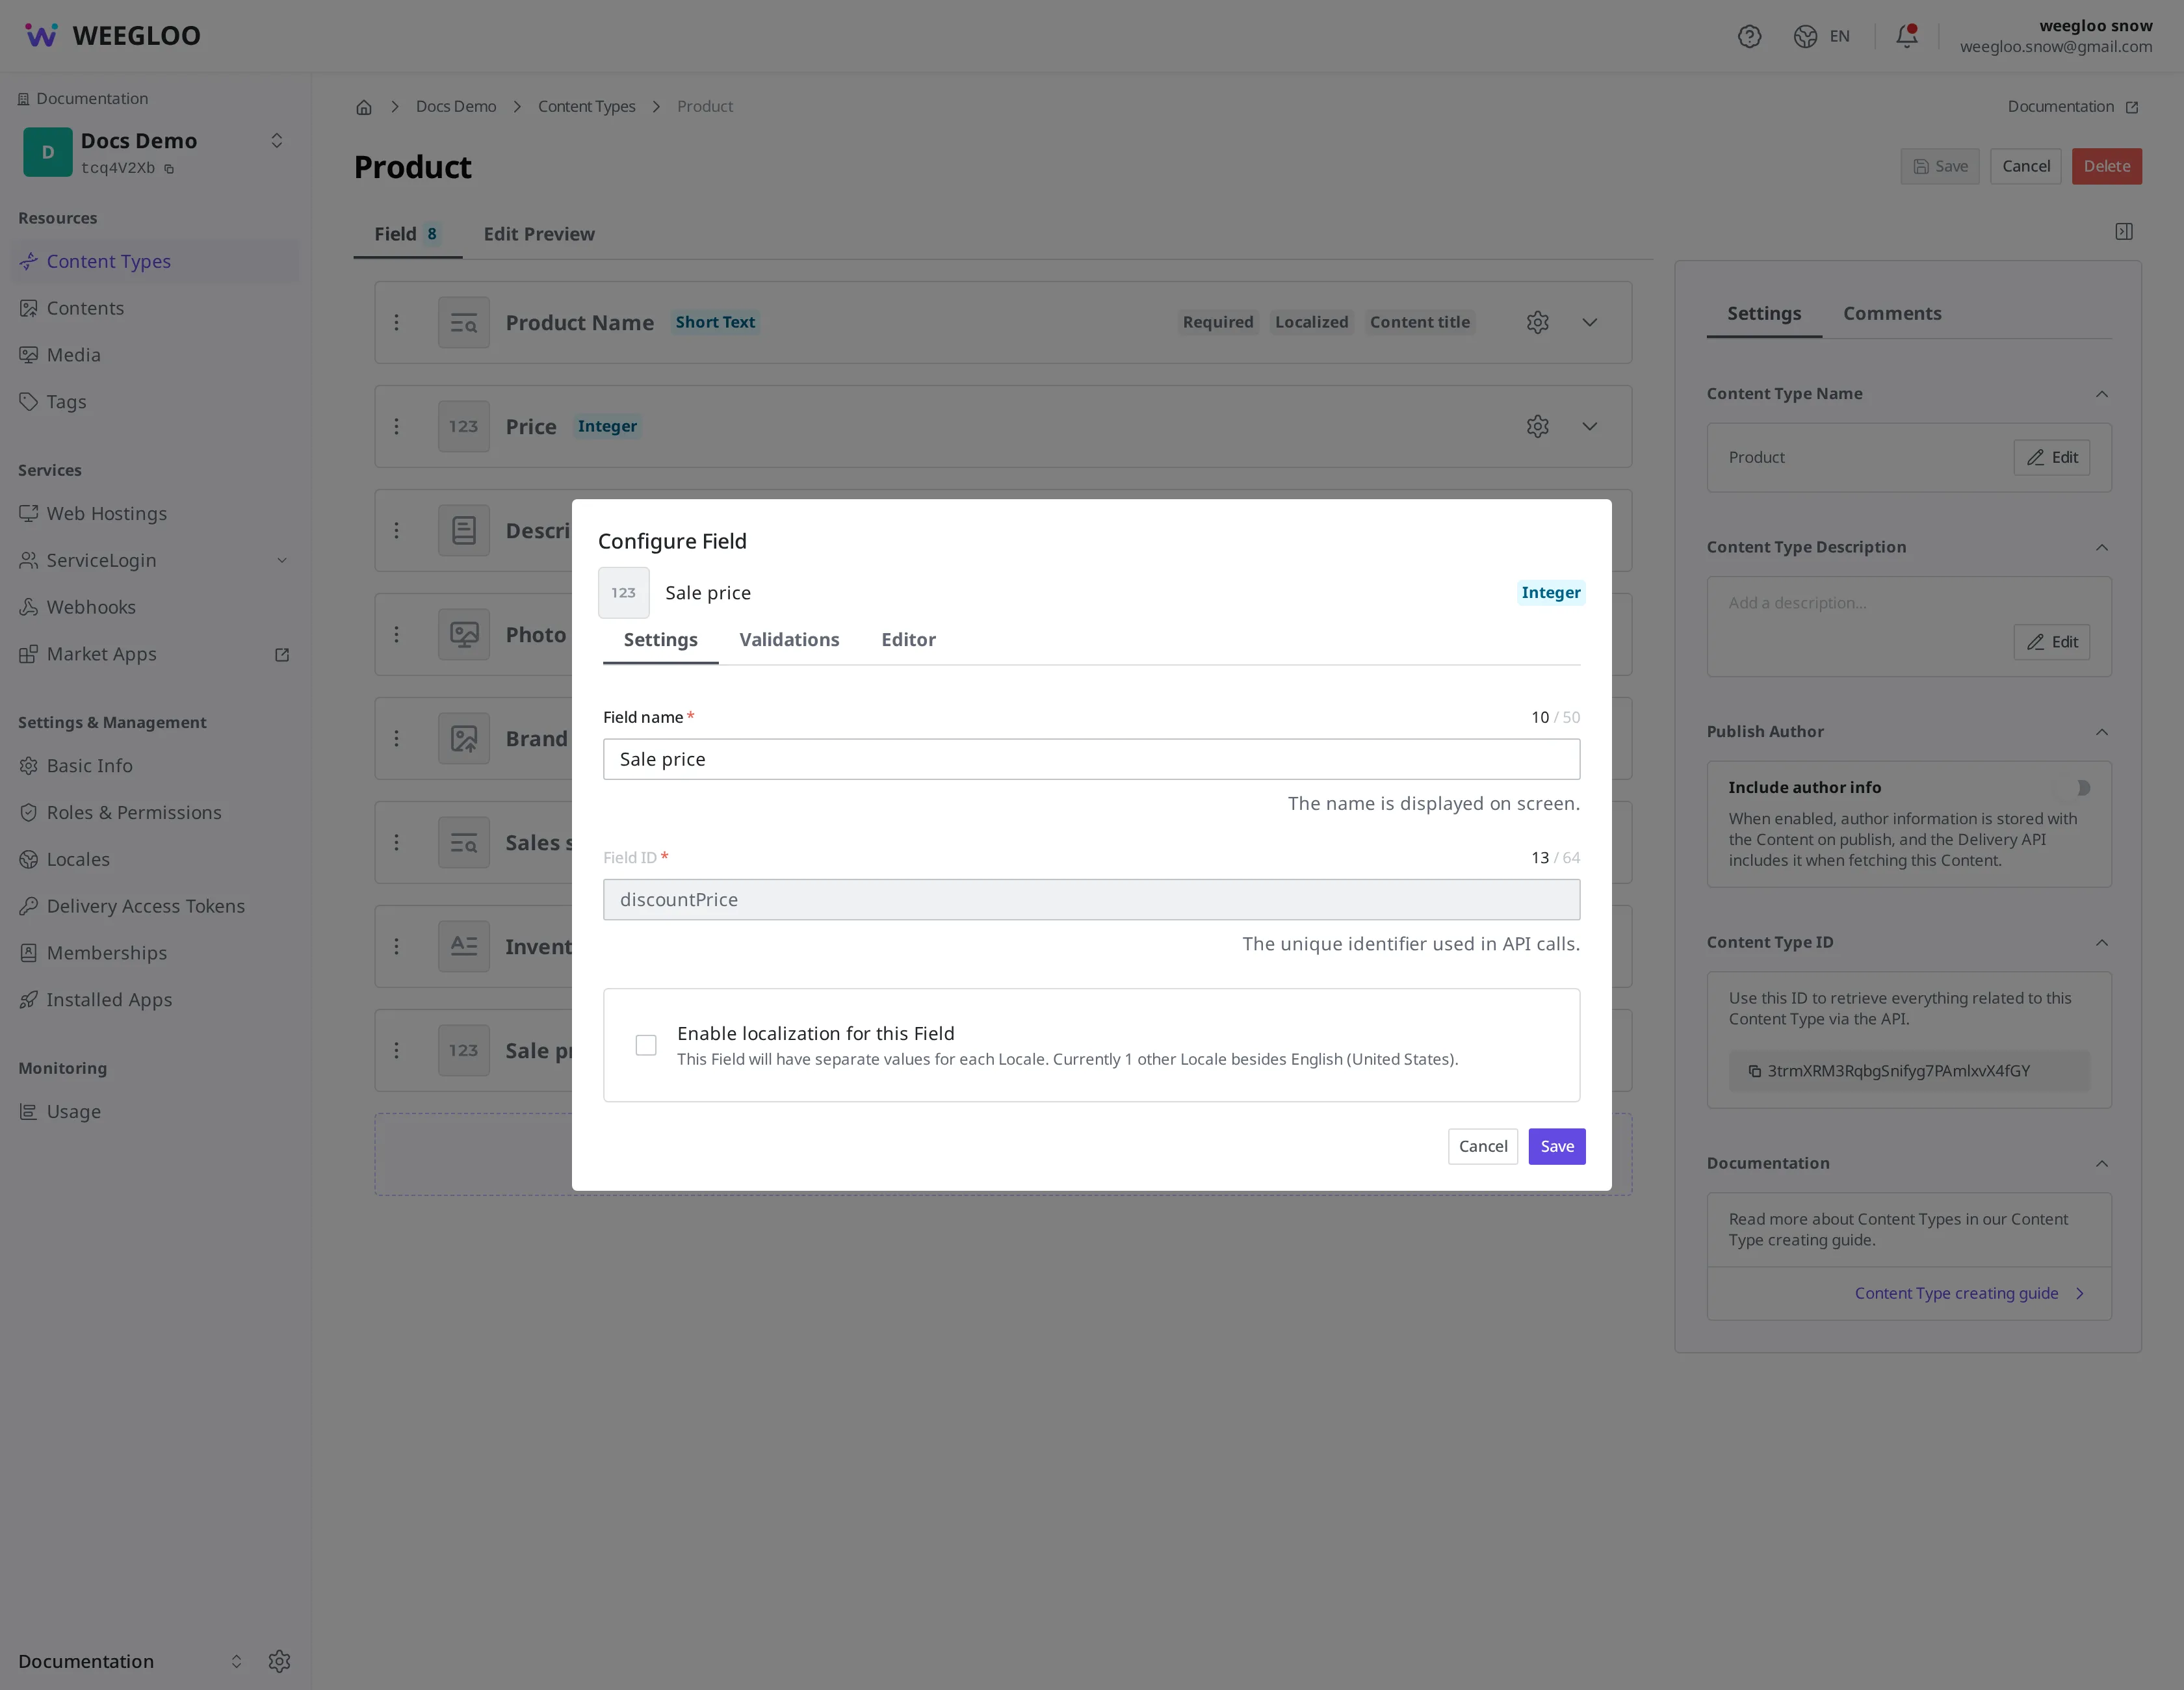
You can change the name shown on screen at any time. Click the gear icon on the Field row to open the "Configure Field" panel, edit the Field name box on the Settings tab, click Save, and then click Save on the Content Type edit screen too for it to take effect. Even if you change "Inventory note" to "Inventory note (unused)," the value stored on the products is kept as is.
The Field ID, on the other hand, cannot be changed once it is created. As you can see in the screen above, the Field ID box is grayed out and disabled, so it cannot be edited. If you "want to change the Field ID," the only path left is to delete the old Field and create a new one, which is not renaming but deleting and adding. The old field's value disappears with the deletion, as you saw in the section above, and the new field starts out empty. That means the values do not carry over. So it is best to decide the Field ID carefully when you first create it.
To remove the form itself, empty out its content first
Sometimes you want to remove not just one Field but the Content Type itself. In that case, the order is fixed. If even one Content made from that form remains, you cannot delete the Content Type. It is a rule that keeps you from accidentally deleting a form and leaving its content with nowhere to go.
So to remove a Content Type, you first have to delete all the Content made from that form. How to clean up Content (the difference between unpublishing, archiving, and deleting, and the order among them) is covered in Publishing Operations. Deleting content also cannot be undone, so before you decide to remove a form, first make sure that content is truly no longer needed.
What to do next
- Content Modeling: Covers what a Content Type and a Field are, the order for creating them for the first time, and Field types and validation.
- Finding the content you need: Covers how to gather up, all at once, the products you need to fill in and the products that still hold a value, using filters and column settings.
- Publishing Operations: Covers the order for unpublishing, archiving, and deleting Content before you clean up a form.