Member Roles and Permissions
Last updated: June 22, 2026
Imagine you run a clothing shop called "Cozy Closet." You want signed-up shoppers to write reviews directly on your products. At the same time, you want shoppers to be able to edit or delete their own reviews, but not touch reviews written by others. A bundle of permissions that decides "what each signed-up member can see and what they can write" is a ServiceUserRole (a permission bundle granted to signed-up members).
A ServiceUserRole applies to signed-up members, that is, to a ServiceUser (a shopper who signed up directly for your service). Instead of assigning permissions to each member one by one, you create a permission bundle such as "can write reviews" once and attach it to members.
This page first looks at what a ServiceUserRole is and how it differs from staff permissions, then walks through creating a role in "Cozy Closet" that lets members write reviews and edit only their own reviews.
Member roles are different from staff roles
WEEGLOO has two kinds of permission bundles. They are easy to confuse, so let's draw the line first.
- SpaceRole is the permission granted to staff and the team. It is the permission of the people who register products and manage the site, and it is covered in Roles and Permissions.
- ServiceUserRole is the permission granted to signed-up members. It decides what shoppers who signed up directly on the clothing shop site with a social account can see and write.
In short, SpaceRole is the permission of "the people who run the shop," and ServiceUserRole is the permission of "the shoppers who visit the shop." The two are entirely different roles, so a role created on one side does not apply to the other. This page covers only the ServiceUserRole granted to members.
The way you build rules is the same as for staff roles
The screen for creating a member role works exactly the same way as the screen for creating a staff role. The role creation screen is split into tabs (Role detail , Content Type , Content , Media), and in each resource tab you add rules one line at a time to an Allowed list and a Denied list. A single rule is a combination of "which action , on which Content Type , created by whom , with which Tag attached" it applies to. And anything you do not put in the allow list is automatically denied.
How the rule builder works (allow and deny, the kinds of actions, narrowing the scope) is covered in detail in Roles and Permissions. This page focuses on the most important part of member permissions: how to let members handle only what they created themselves.
The key is "only what you created yourself"
When you let members write reviews, the most common need is to let a member edit and delete only their own reviews. They must not be able to edit other people's reviews.
A single rule has a field for choosing the Author. There are three values you can choose here.
| Author value | Applies to |
|---|---|
| Any Users | Everything, no matter who created it |
| The role holder | Only what the member the rule applies to created themselves |
| Specific user | Only what one designated person created |
If you choose The role holder here, the rule applies to "what I created" for each member individually. Even when many members hold the same role, each one only targets what they themselves created.
To put it in the clothing shop example, if you allow Edit and Delete on reviews (Content) but set the Author to The role holder, members can edit and delete only their own reviews. Reviews written by others appear in the list but cannot be touched.
Note that, regardless of role, a signed-up member can by default already edit or delete only what they created. The role adds, on top of that, "what they can newly create" and "what they can read."
Creating the "Regular Member" role
Now let's create the "Regular Member" role to grant to newly signed-up members in "Cozy Closet." This role will be able to read all reviews (Content) (Read), write new ones (Create), and edit the reviews they wrote (Edit, author = themselves).
Member roles are created under Roles within ServiceLogin (the login setting that lets shoppers sign up and use the service directly).
- In the left menu, expand Services and click ServiceLogin.
- Click Roles.
- Click the Create button at the top right to open the role creation screen.
Once the role creation screen ("Create ServiceUserRole") opens, first set the name.
- In the name field of the Role detail tab, enter
Regular Member. You can leave the description field empty.

Next, set the actions members can take on reviews (Content). Reviews must be created as a separate Content Type (the review form template) so that rules can pick that kind and apply to it.
- Go to the Content tab. Along with the guidance "Set the Content access scope by combining action, Content Type, author, and Tag," you will see the Allowed and Denied lists.
- Use the + button under Allowed to add one rule. Set the action to Read, choose "Reviews" as the Content Type, and leave the Author as Any Users. This lets members read all reviews.
- Add one more rule the same way. Set the action to Create, choose "Reviews" as the Content Type, and leave the Author as Any Users. This lets members write new reviews.
- Add one more rule. Set the action to Edit, choose "Reviews" as the Content Type, then change the Author to The role holder. This lets members edit only the reviews they wrote.
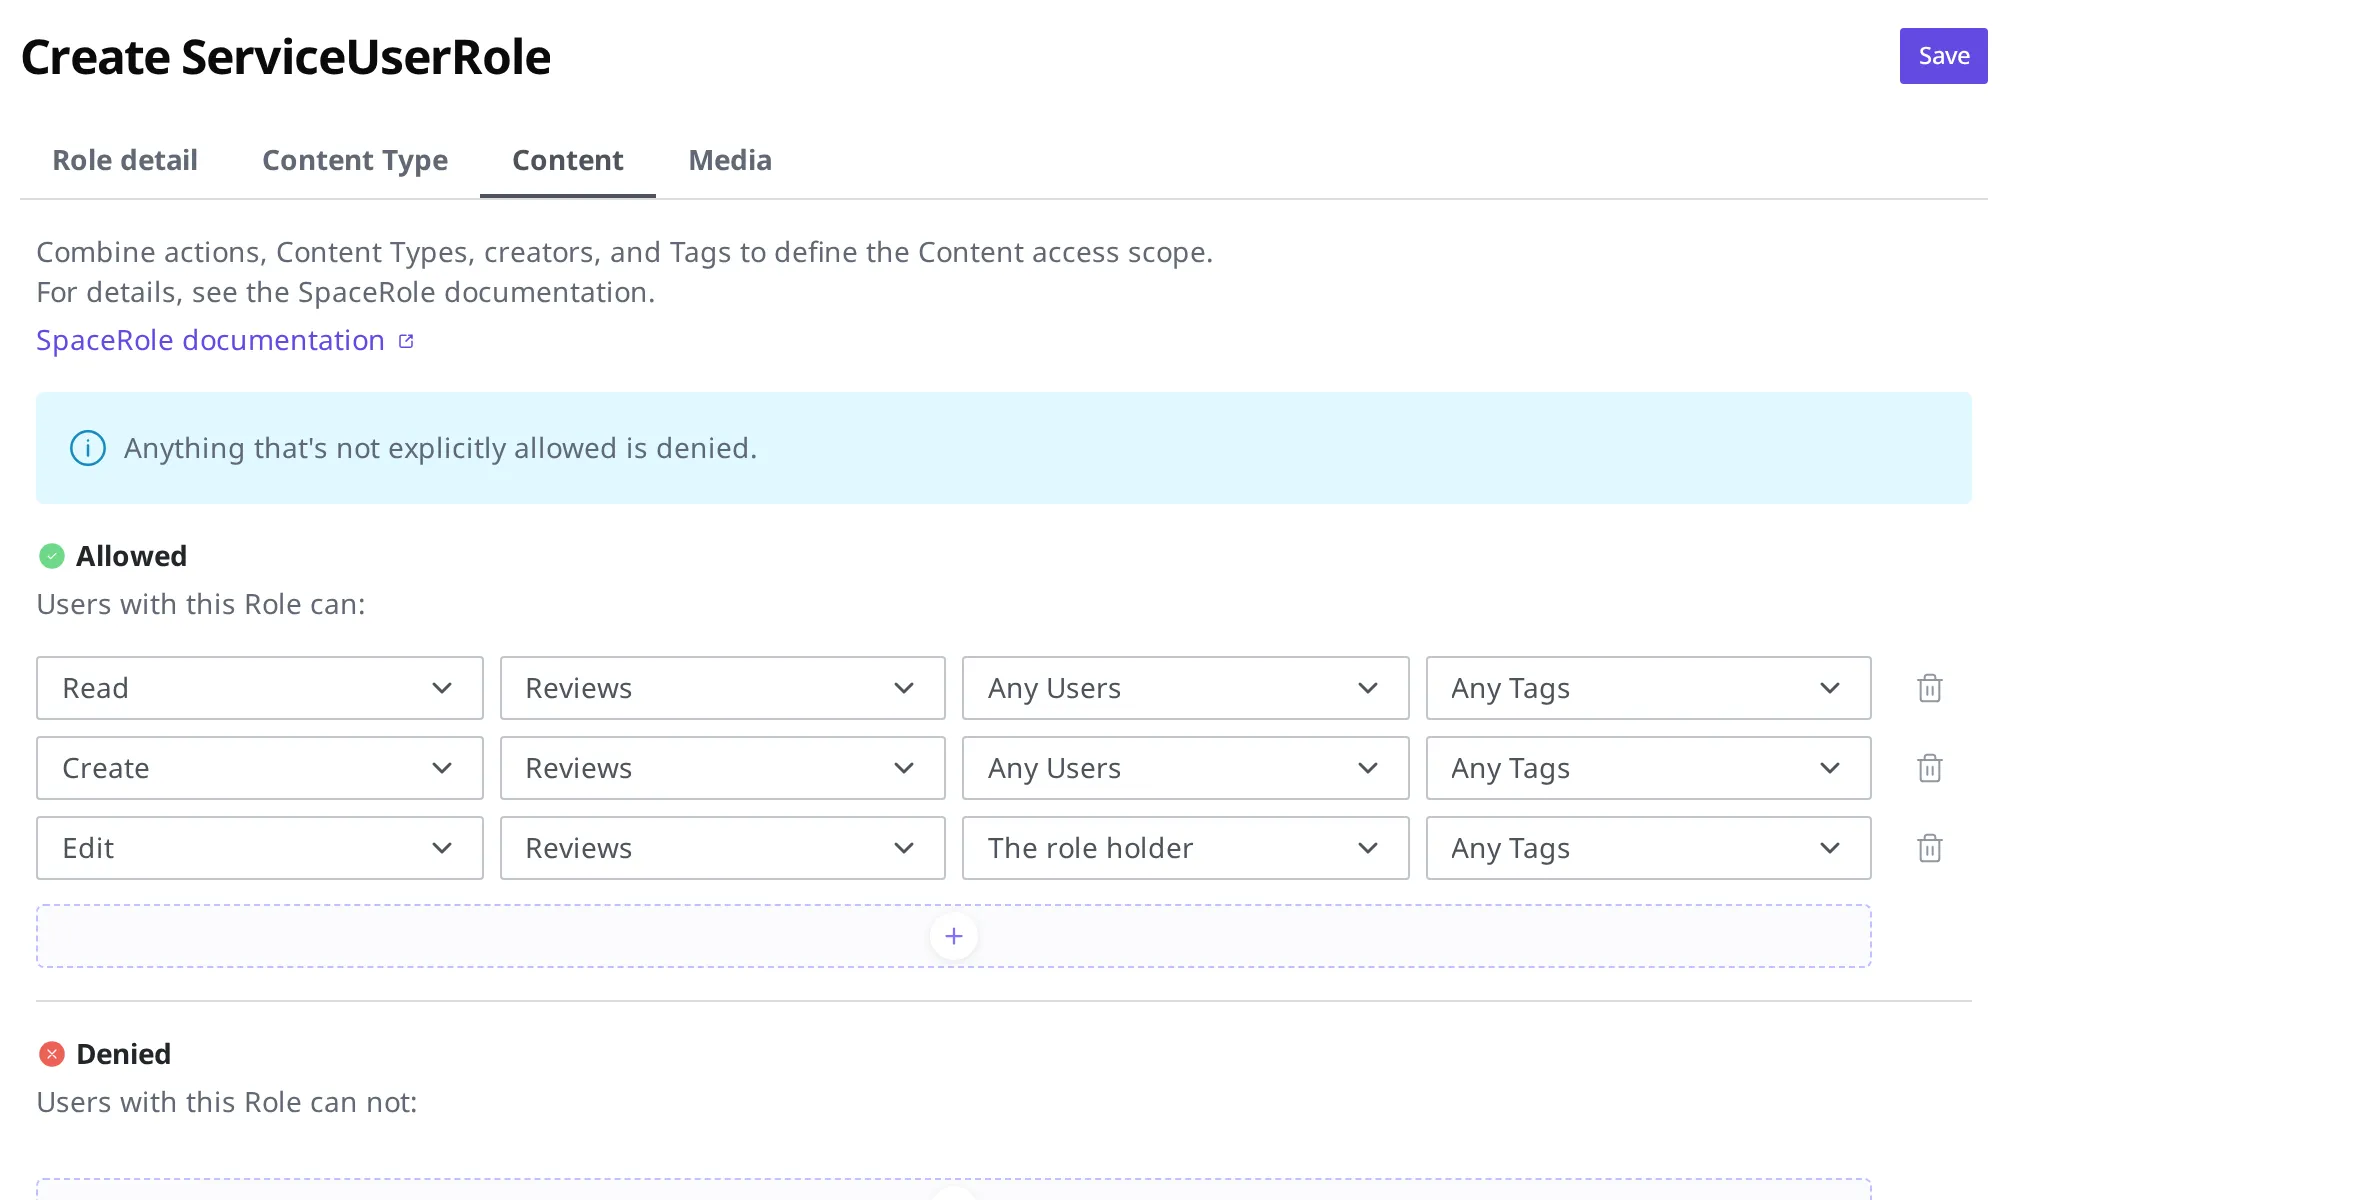
- Click the Save button at the top right.
When Regular Member appears in the list, the role has been created.
To also let members delete reviews, add one more rule the same way, with the action set to Delete, the Content Type set to "Reviews," and the Author set to The role holder.
Applying the role you created to members
Creating a role does not automatically apply it to members. A role you create takes effect only after you connect it to members.
The most common way is to set the Regular Member role you just created as the default Role in Service Member Login. Then this role is automatically attached to every newly signed-up member.
There are also times when you want to give only a specific member different permissions. For example, if you want to give a VIP member broader permissions, you can assign a different role to that one member separately (per-member override). You can also make some members moderators, who can then delete what other members wrote. This moderator permission is a narrow permission that applies to deletion only.
What to do next
- Service Member Login: Connect the role you created as the default Role and turn on social login.
- Roles and Permissions: Covers how to set permissions for staff (the team) with the same rule builder.
- API Reference: Covers technical specifications such as request formats for working directly with the content members read and write from a program.