Service Member Login
Last updated: July 3, 2026
Imagine you run a clothing shop website. Sometimes you want shoppers to sign up on their own, and you want only members to write reviews or receive tier-based benefits. For that, you need a "membership system where shoppers sign up and log in by themselves." The Space feature that adds this membership system to your site is ServiceLogin (the login configuration that lets shoppers sign up and use your service directly).
When you turn on ServiceLogin, anyone can sign up directly with a social account such as Google. Each shopper who signs up becomes a ServiceUser (a member who has signed up for your service). WEEGLOO handles the login process and keeps the login session for you, so you do not have to store passwords yourself or build social login from scratch.
This page first looks at what ServiceLogin is and how it differs from operator accounts, then walks through turning on and configuring ServiceLogin in your clothing shop Space.
Members are not the same as operators
There are two kinds of people who log in to WEEGLOO. They are easy to confuse, so let us draw the line first.
- Operators/team are the people who register products and manage the site. Rather than signing up like a shopper through ServiceLogin, they come in with a WEEGLOO account by becoming a member of this Space (through an invitation and role assignment from someone already inside). Operator permissions are covered in Roles and Permissions.
- A ServiceUser is a shopper/member who uses the site. This is someone who signed up directly with a social account on the clothing shop site you run. It is a completely separate login from operators.
In short, operators are "the people who run the shop," and a ServiceUser is "a shopper who visits the shop." ServiceLogin is the work of building the door these shoppers come and go through.
The three pieces that work together
The membership system runs on three pieces working together.
- ServiceLogin: the login configuration itself. This is where you decide things like which social login to use and what permissions to grant by default to a member who signs up.
- ServiceUserRole: the bundle of permissions to give to a member. It defines what a member can see and what they can write.
- ServiceUser: each individual member who has signed up. One is created every time a shopper signs up.
This page focuses on the ServiceLogin configuration that opens the door. The ServiceUserRole that defines what a member can actually see and use (permissions) is covered separately in Member Roles and Permissions. The Default Role you choose in the configuration below is exactly the role you create on that page.
Turning on ServiceLogin
Let us turn on member login in the clothing shop Space.
A Space has only one member login setting. You do not create several of them; you keep this one turned on and edit it as needed.
ServiceLogin is off at first. When you open the configuration screen, you see a notice saying "ServiceLogin is disabled" along with an Activate button. The notice reads: "When you enable ServiceLogin, you can use social login such as Google on your live site. Weegloo handles OAuth and sessions."
- In the left menu, expand Services and click ServiceLogin.
- On the Basic Info screen, click the Activate button.
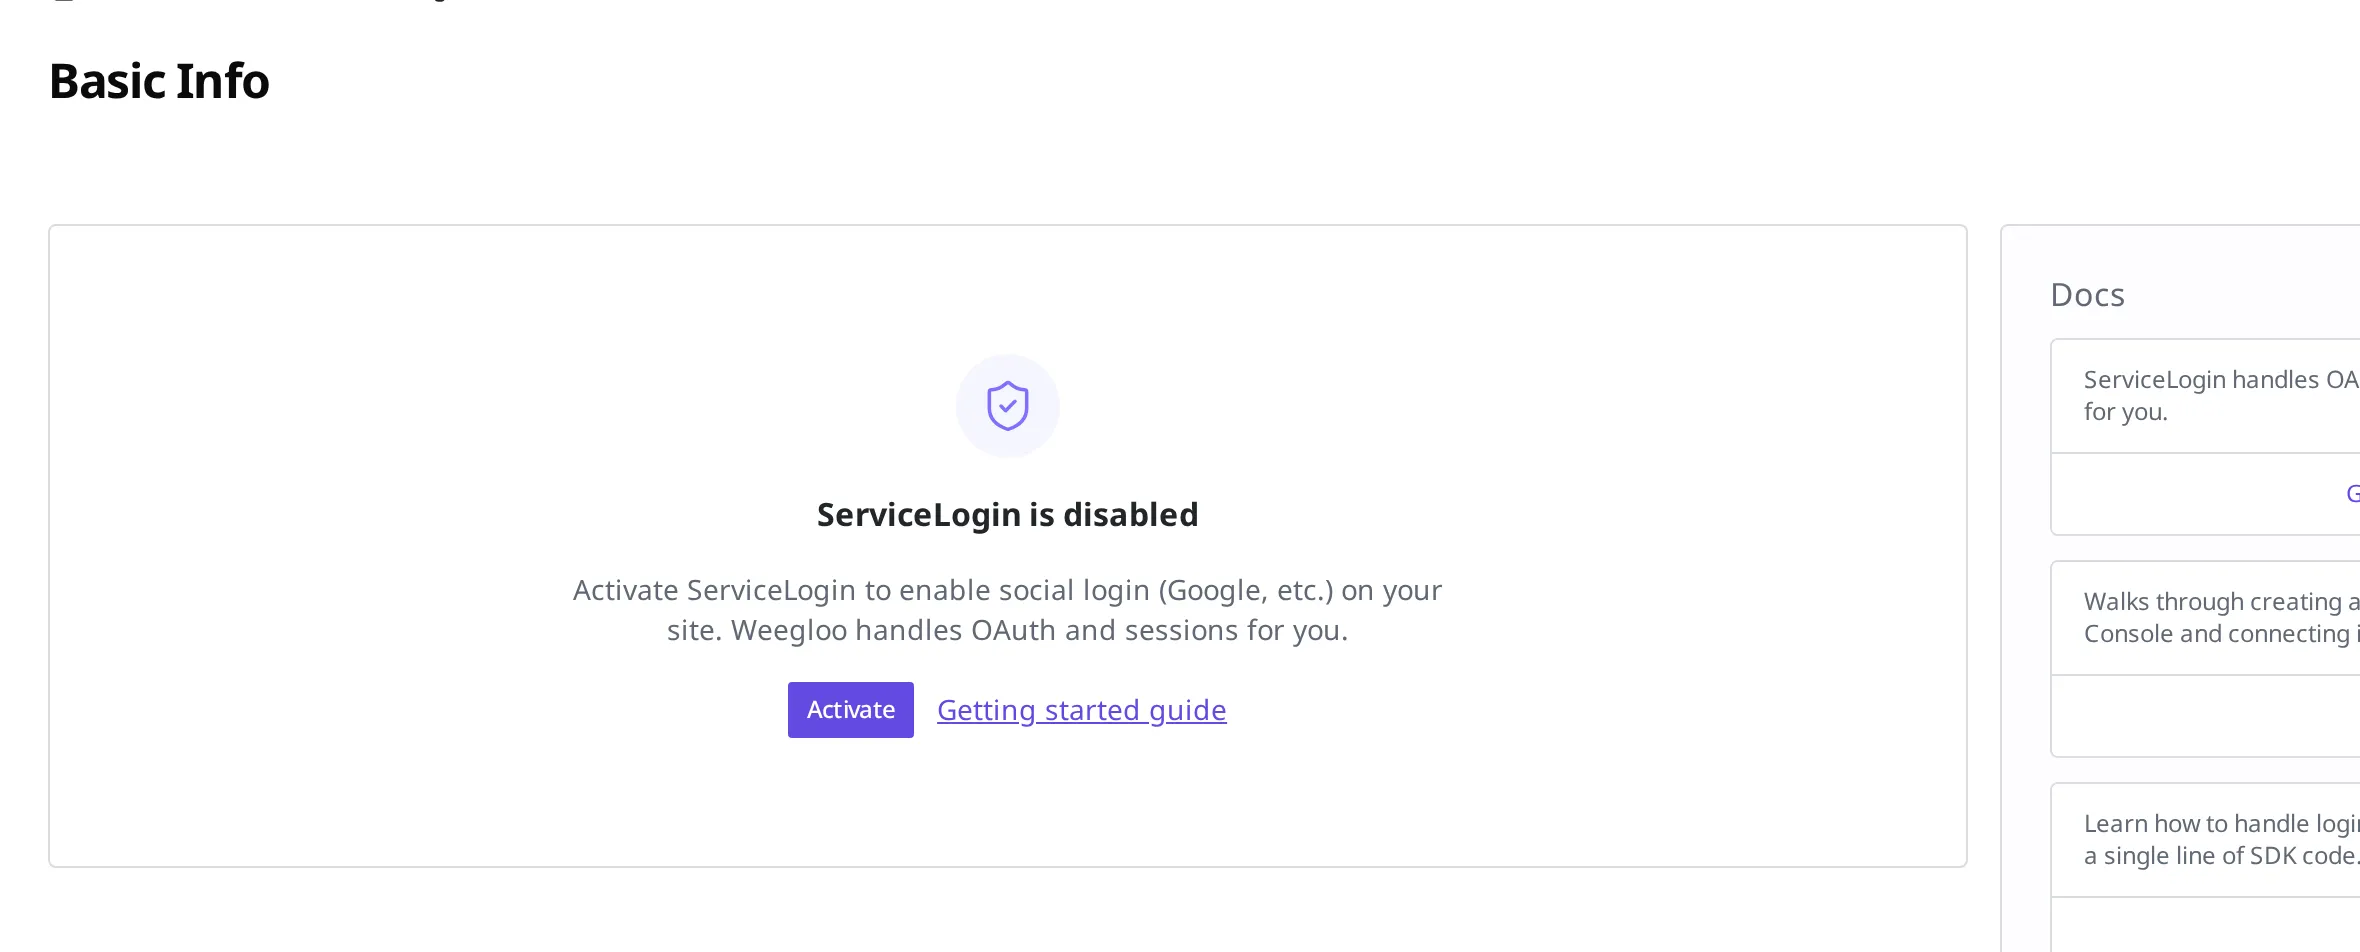
After you click Activate, the configuration form opens. In this form, you must turn on at least one social login and Save for member login to actually work.
Filling in the configuration form
The configuration form is split into basic info and social login settings. Fill in the basic info first.
| Item | What to enter |
|---|---|
| Service name | The service name shown to shoppers when they log in. For a clothing shop, enter the shop name. |
| Contact email | A contact to show shoppers when there is a problem with login (for example, when the sign-up capacity is full). |
| Callback URI | The address on your site that shoppers return to after they finish logging in. |
| Default Role | The bundle of permissions automatically granted to a newly signed-up shopper. Clicking Manage Roles next to it takes you to the screen for creating permissions. |
- In Service name, enter the name shoppers will see. For a clothing shop, enter the shop name, such as
Cozy Closet. - In Contact email, enter the address that will receive inquiries. For example,
help@cozy-closet.com. - In Callback URI, enter the address on your site that shoppers return to after login. For example,
https://cozy-closet.com/auth/callback. - In Default Role, choose the permissions to give new members. If you have not created any permissions yet, create one first in Manage Roles next to it and come back.
What to choose for Default Role and which permissions to give members are covered in Member Roles and Permissions.
If operators want to review members once before accepting sign-ups, you can turn on Require admin approval for new sign-ups. When this option is on, a newly signed-up shopper cannot log in right away and waits until an operator approves them. Members who have already signed up are not affected.
- To let anyone log in immediately on sign-up, leave Require admin approval for new sign-ups off. To review each sign-up yourself, leave it on.
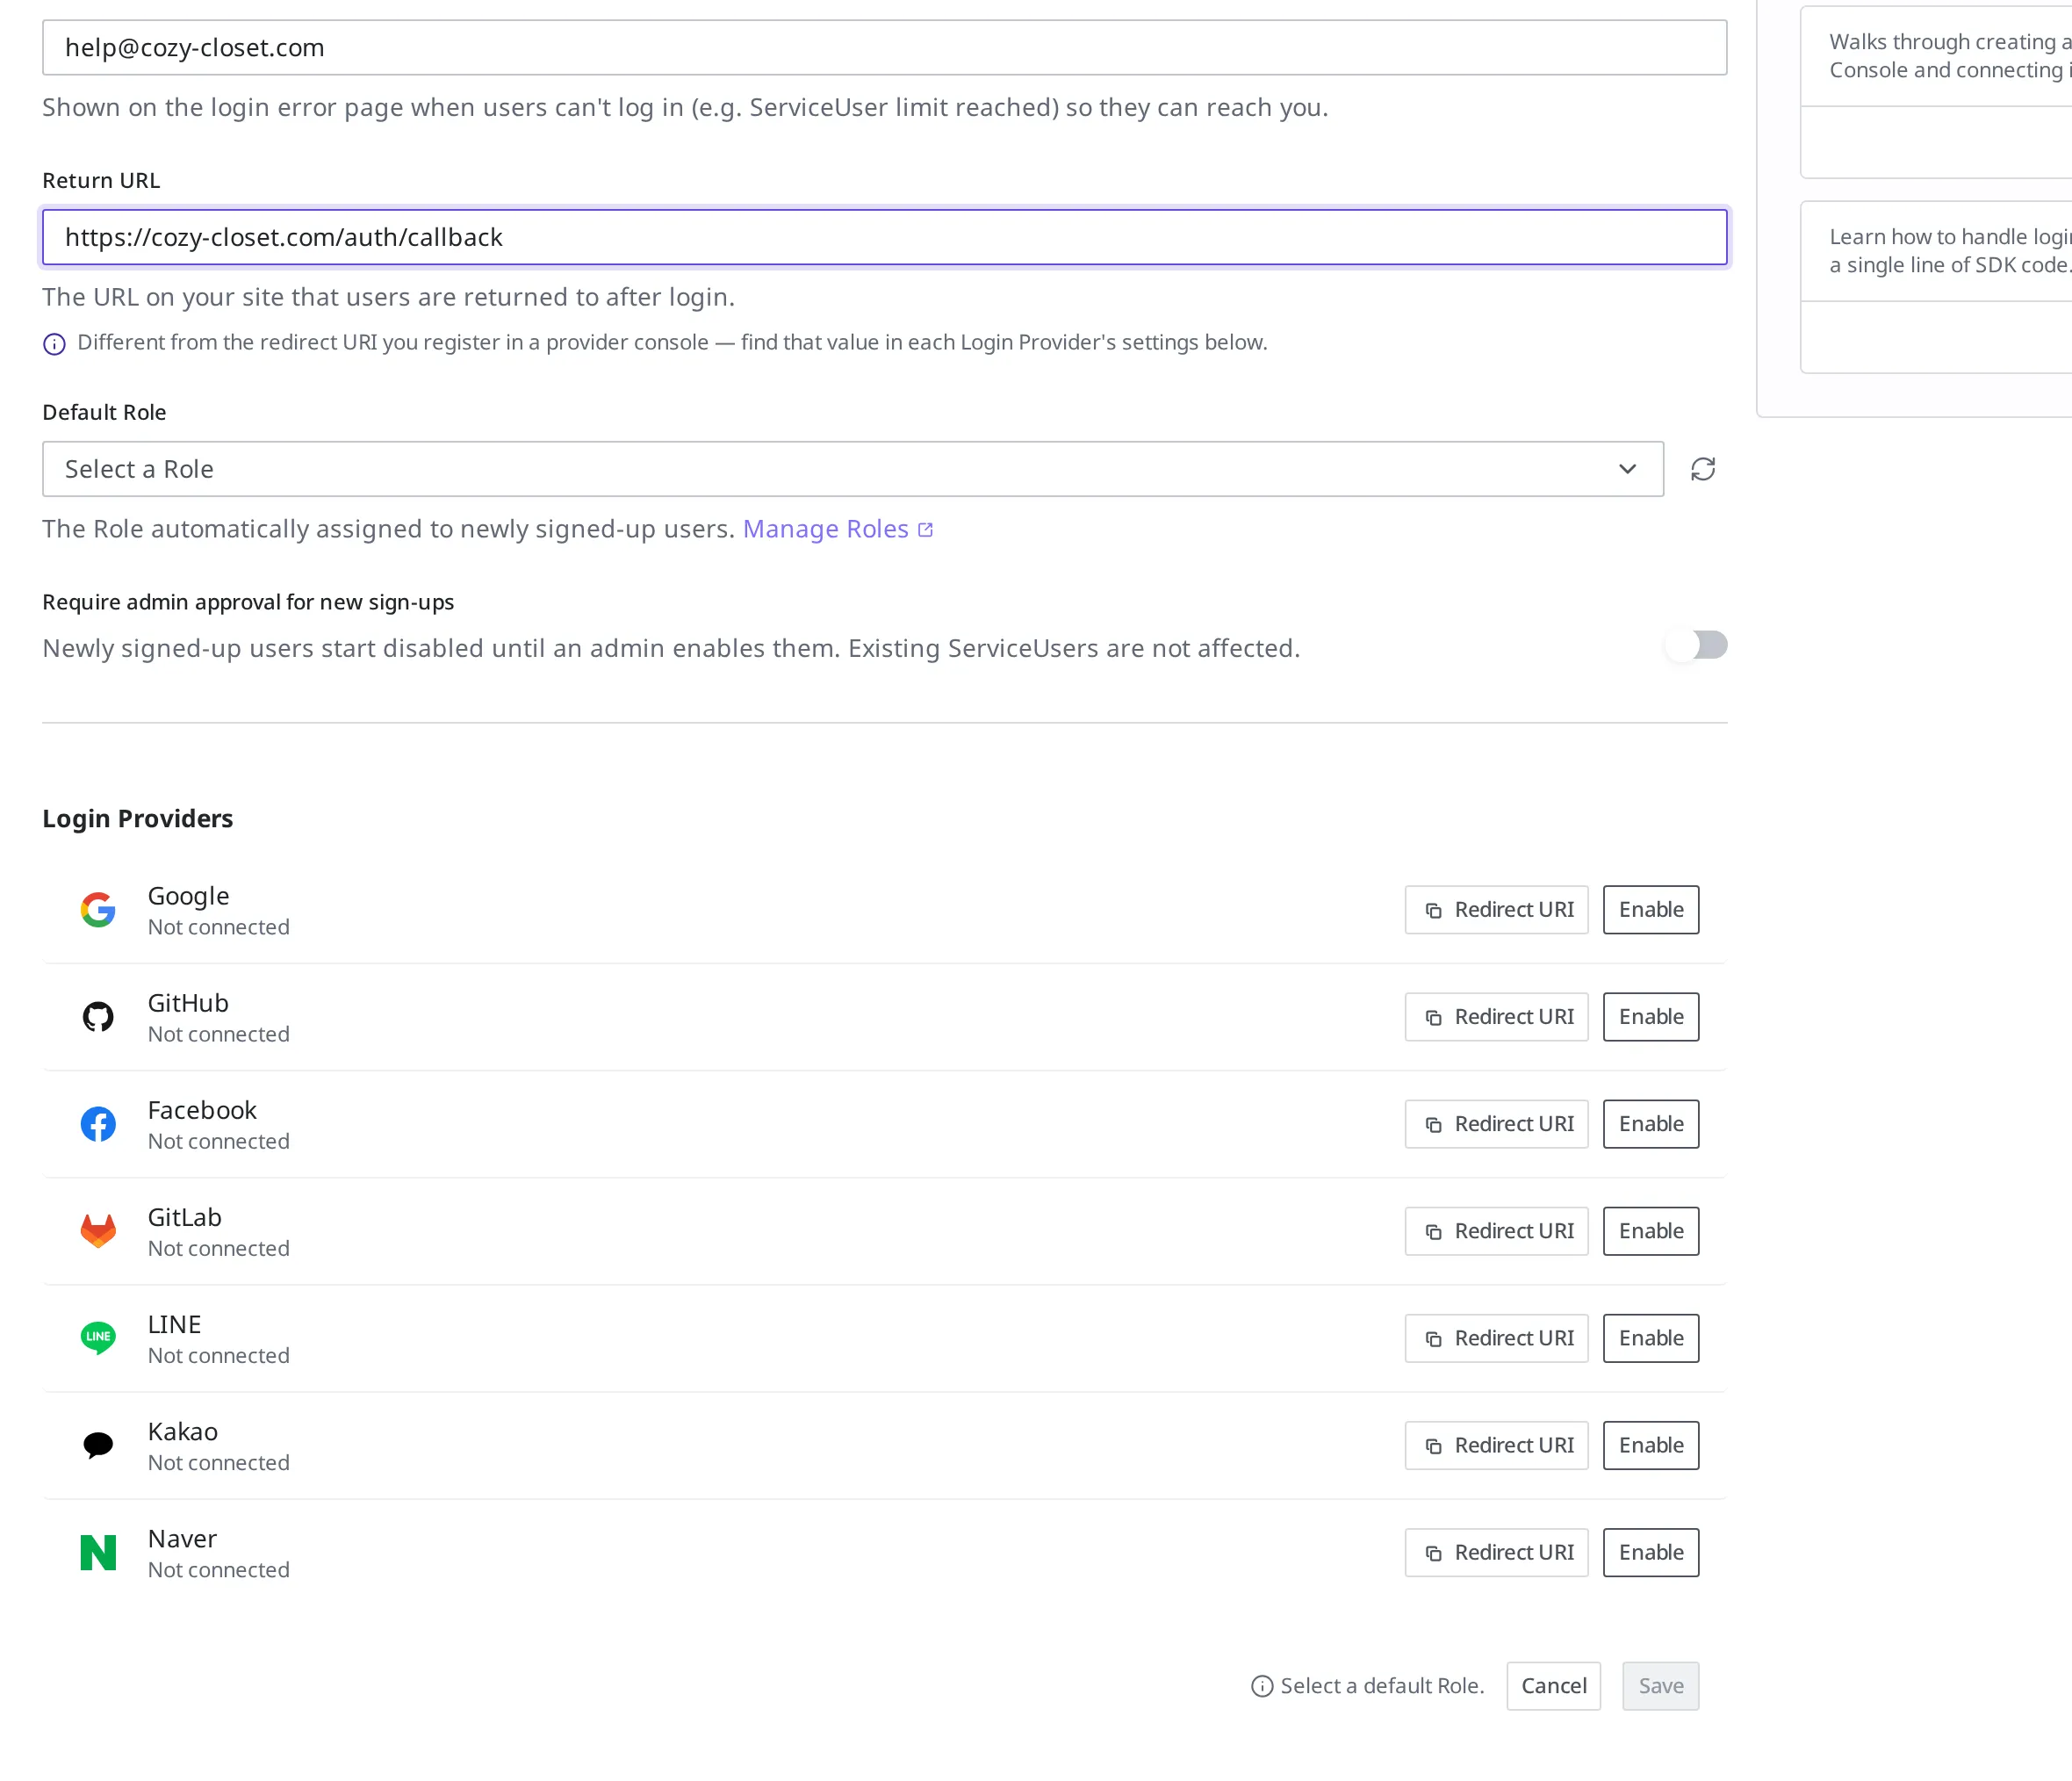
Turning on social login
You decide which account shoppers can sign up with in Login Providers. You can turn on Google, GitHub, Facebook, GitLab, LINE, Kakao, and Naver individually.
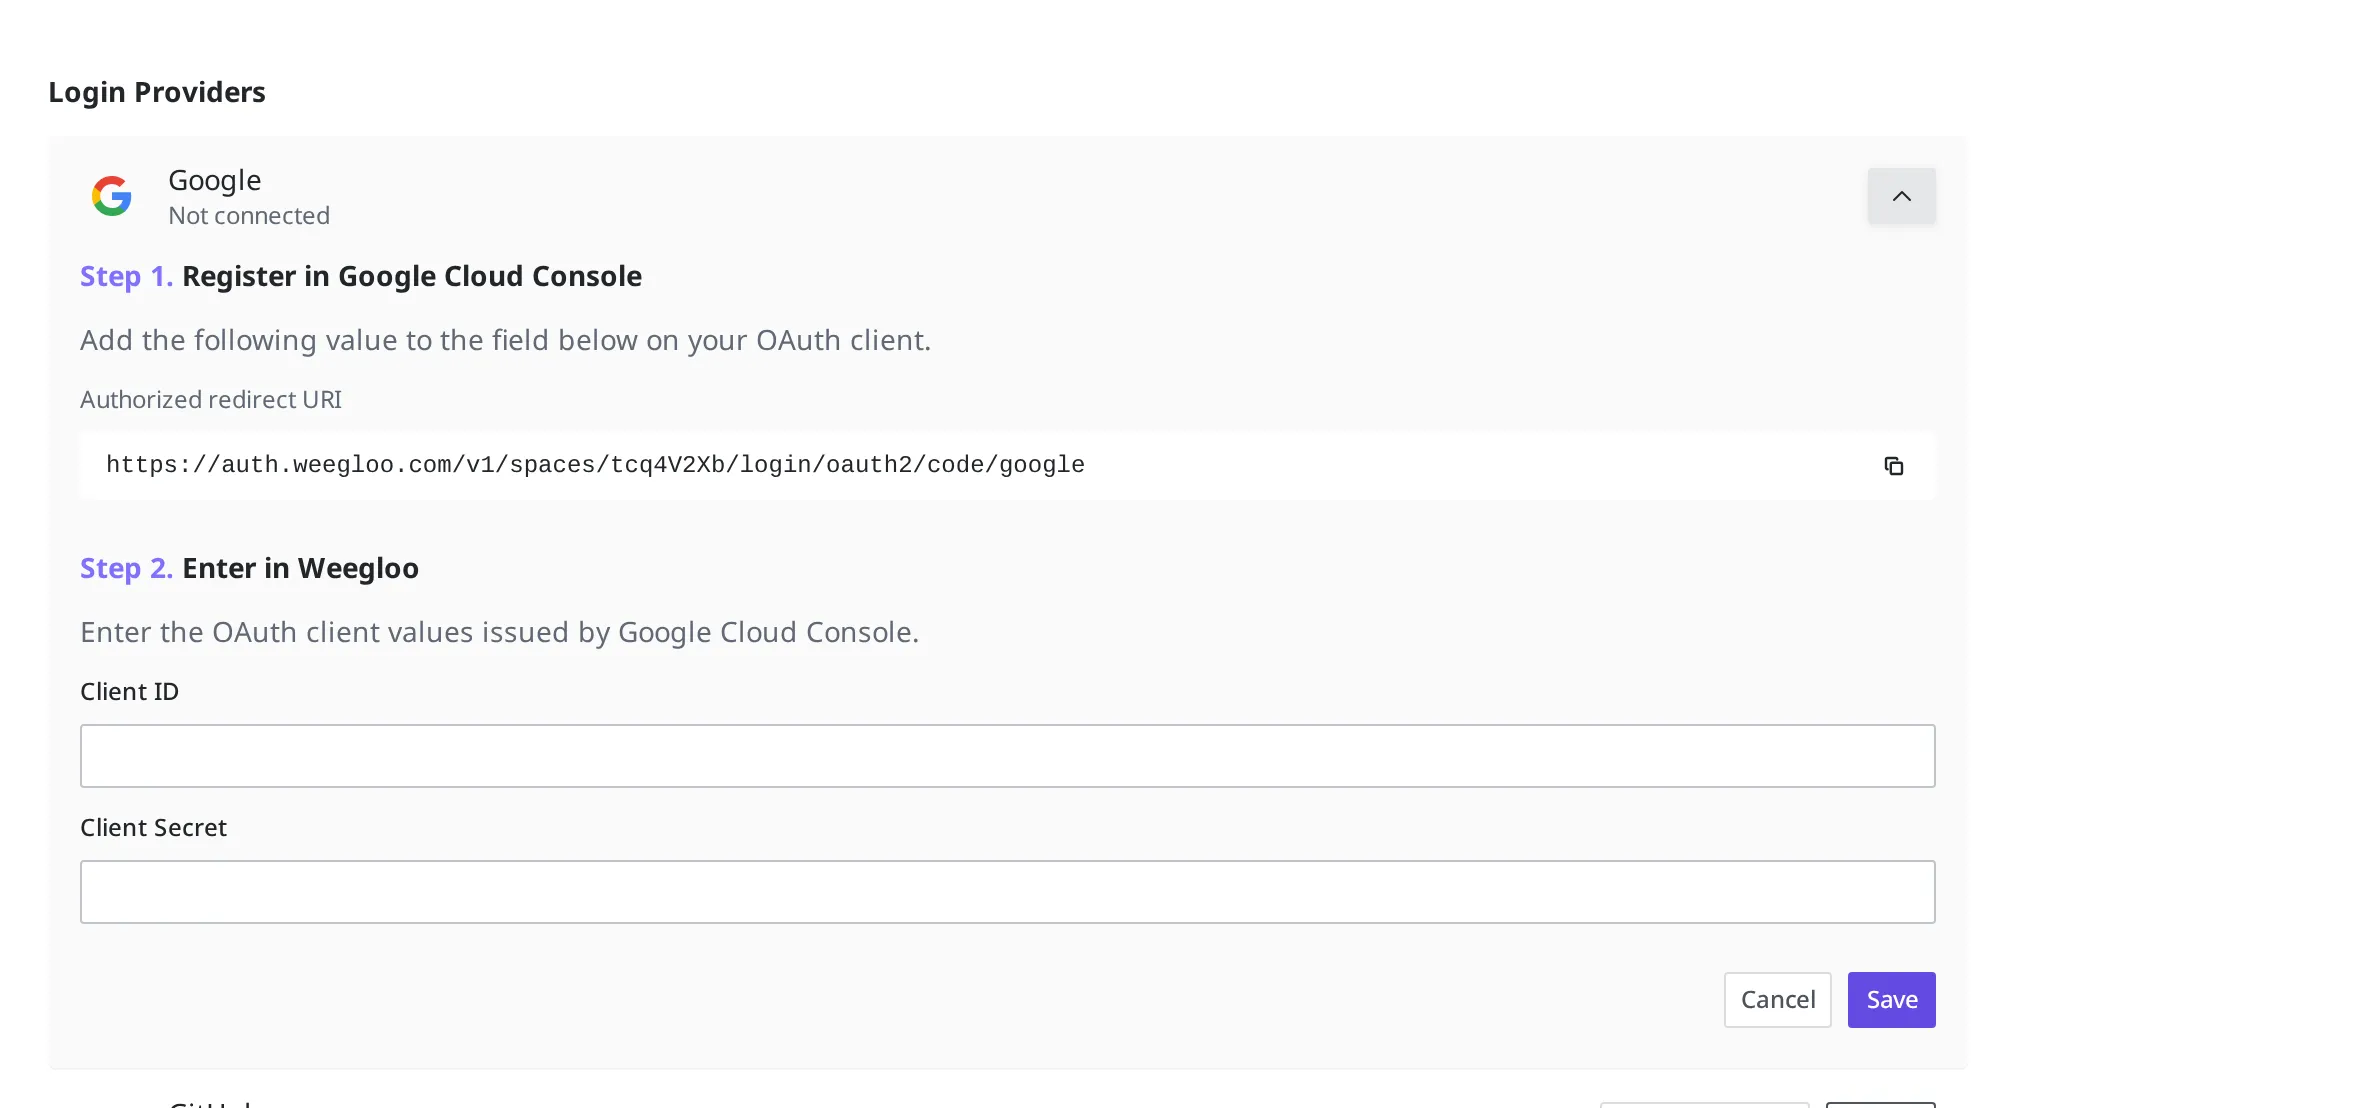
Social login connects two places. You register your site with that provider (for Google, that means the Google Cloud Console), and you enter the values you receive there into WEEGLOO. When you turn on Google, the screen walks you through these two steps directly.
- Turn on Google. A two-step guide appears.
- Copy the Authorized redirect URI shown in Step 1 and register it with the OAuth client in the Google Cloud Console. This address tells Google where to send the login result.
- Enter the values issued by the Google Cloud Console into the Client ID and Client Secret boxes in Step 2.
- To use other social logins as well, turn on GitHub or Facebook the same way, enter the values, and then click Save.
Once the social logins you turned on appear enabled in the list and you finish with Save, shoppers can log in with those accounts.
What differs per provider: scopes and email
The connection procedure is the same as above for every provider. The name of the box where you register the redirect address varies slightly per provider (Authorized redirect URI, Callback URL, Redirect URI, and so on). Even when the name differs, the value is the same: paste the address shown in Step 1 of the guide that appears when you turn the provider on, exactly as it is.
The scopes in the table below (the range of information requested from the shopper at login) are the values WEEGLOO requests from the provider at login time. For Google, GitHub, and Facebook there is nothing to set up in the console beforehand; the shopper consents when they log in. The remaining providers have settings you must turn on in the console beforehand, so check the table.
WEEGLOO tells signed-up members apart by email. So if the provider does not pass the email along, that account cannot log in. For the detailed steps to create an OAuth app, follow each provider's official documentation.
| Provider | Scopes WEEGLOO requests | What to turn on in the provider console beforehand | Official docs |
|---|---|---|---|
email, profile | None | Google docs | |
| GitHub | read:user, user:email | None | GitHub docs |
email, public_profile | None | Facebook docs | |
| GitLab | read_user | Check read_user under scopes when you create the app | GitLab docs |
| Kakao | profile_nickname, profile_image, account_email | You must switch the app to a Biz App and get approval to use the email consent item | Kakao docs |
| Naver | email, profile, nickname | You must include the email address in the provided information when registering the app | Naver docs |
| LINE | profile, email | You must apply for the email permission in your channel and get it approved | LINE docs |
Viewing signed-up members
When a shopper signs up, you can find that member in Services > ServiceLogin > Users. Here you view and manage the list of signed-up members.
If you turned on Require admin approval for new sign-ups earlier, newly signed-up members wait for approval on this screen. Once you activate a member, they can log in from that point on.
Member login when you have several sites
One person sometimes runs several different services. Imagine that, while running the clothing shop Cozy Closet, you also run a Corner Bakery site in a completely different line of business. The two sites have different visitors and different content. There is no reason for a shopper who signed up at the clothing shop to be a member of the bakery.
Member login lives one per Space. So for different sites like these, you create a separate Space for each and configure member login separately in each Space. The member roster is also split by Space, so clothing shop members and bakery members are managed as different members.
A Space's member login is used on the site you run with that Space. It is not a way to attach one member login to several sites and pass through them all at once. If you want screens that members can use together with a single login, gather those screens into one site.
What to do next
- Member Roles and Permissions: create the ServiceUserRole that defines what a signed-up member can see and use, and connect it to the Default Role you chose above.
- API Reference: to wire signed-up members' login into your own site's code, you need technical specifications such as the official client SDK and the request format. The specifications for handling, in your own program, the content that members see and use are also covered here.