Deploying a Website
Last updated: July 3, 2026
Imagine you have built an online clothing store. The pages are all laid out, and the products you registered in the content studio load just fine. But the site still lives only on your own computer. For customers to type in an address and visit it, you need a place to put the site on the internet. Web Hosting is what puts a finished website on the internet so that anyone can reach it by its address.
Think of it like renting a storefront. You bring in the shop you have decorated (your website), set it up in its spot, and decide on the address that will go on the sign out front. Customers then come to that address. Web Hosting hands you both that "spot" and that "address" in one place. This page covers what Web Hosting is, how to put a finished site online and make it public, and how to upload it again later once you have made changes.
What an uploadable site looks like
What you put on Web Hosting is a set of pre-built page files. When a customer arrives at the address, those finished pages appear exactly as built. There is no separate program sitting there to compute and build a page anew every time a customer arrives. So you have to finish every page and turn it into files before uploading. For the clothing store, it is like bringing in a fully arranged shop rather than rearranging the displays each time a customer walks in.
When you upload, you turn those page files into a single bundle file and upload that. Think of it like gathering several photos into one folder and zipping it: you bundle the files that make up the site into one and upload them together. This bundle has two rules.
- A bundle holds at most 100 files at a time. If the pages, images, fonts, and other files that make up your site add up to more than 100, you cannot upload it. If your file count looks like it will grow, keep one copy of an identical image and reuse it in several places, or pull heavy files like fonts from copies already published on the internet, to bring down the number of files in the bundle.
index.htmlmust sit at the very top when the bundle is unpacked.index.htmlis the first page file shown when a customer first arrives at the address. If this file is tucked inside a subfolder instead of at the top of the bundle, you cannot upload it. Place your site's first page file at the outermost level of the bundle.
For a site to load and show content such as the products you registered in the content studio, the site has to carry a key inside it that can read that content. How to issue this key (a Delivery Access Token) is covered in Tokens. Put this key into your site before you upload it.
Choosing an address (Subdomain)
Something you decide along with the upload is the address customers will use to come in. When you set the front part of the address yourself, one internet address containing that front part gets attached to the site. For example, if you name it myclothes after the clothing store, customers reach the site at an address containing that name.
The front part of the address has a few rules.
- You can use only lowercase letters, digits, and the hyphen (
-) that joins them. Spaces and other characters are not allowed. - The length is from 3 to 32 characters.
- You cannot take an address someone else is already using. There is only one of each address, so whoever claims it first owns it. That is why the upload screen has a step where you press Check Availability to check whether the address you want is free (see "Putting your site online and making it public" below). If it is not free, you have to choose a different address.
Putting your site online and making it public
The plan is to put the online clothing store on Web Hosting so customers can reach it at the myclothes address. Assume the page files to upload have already been prepared as a single bundle with index.html at the top.
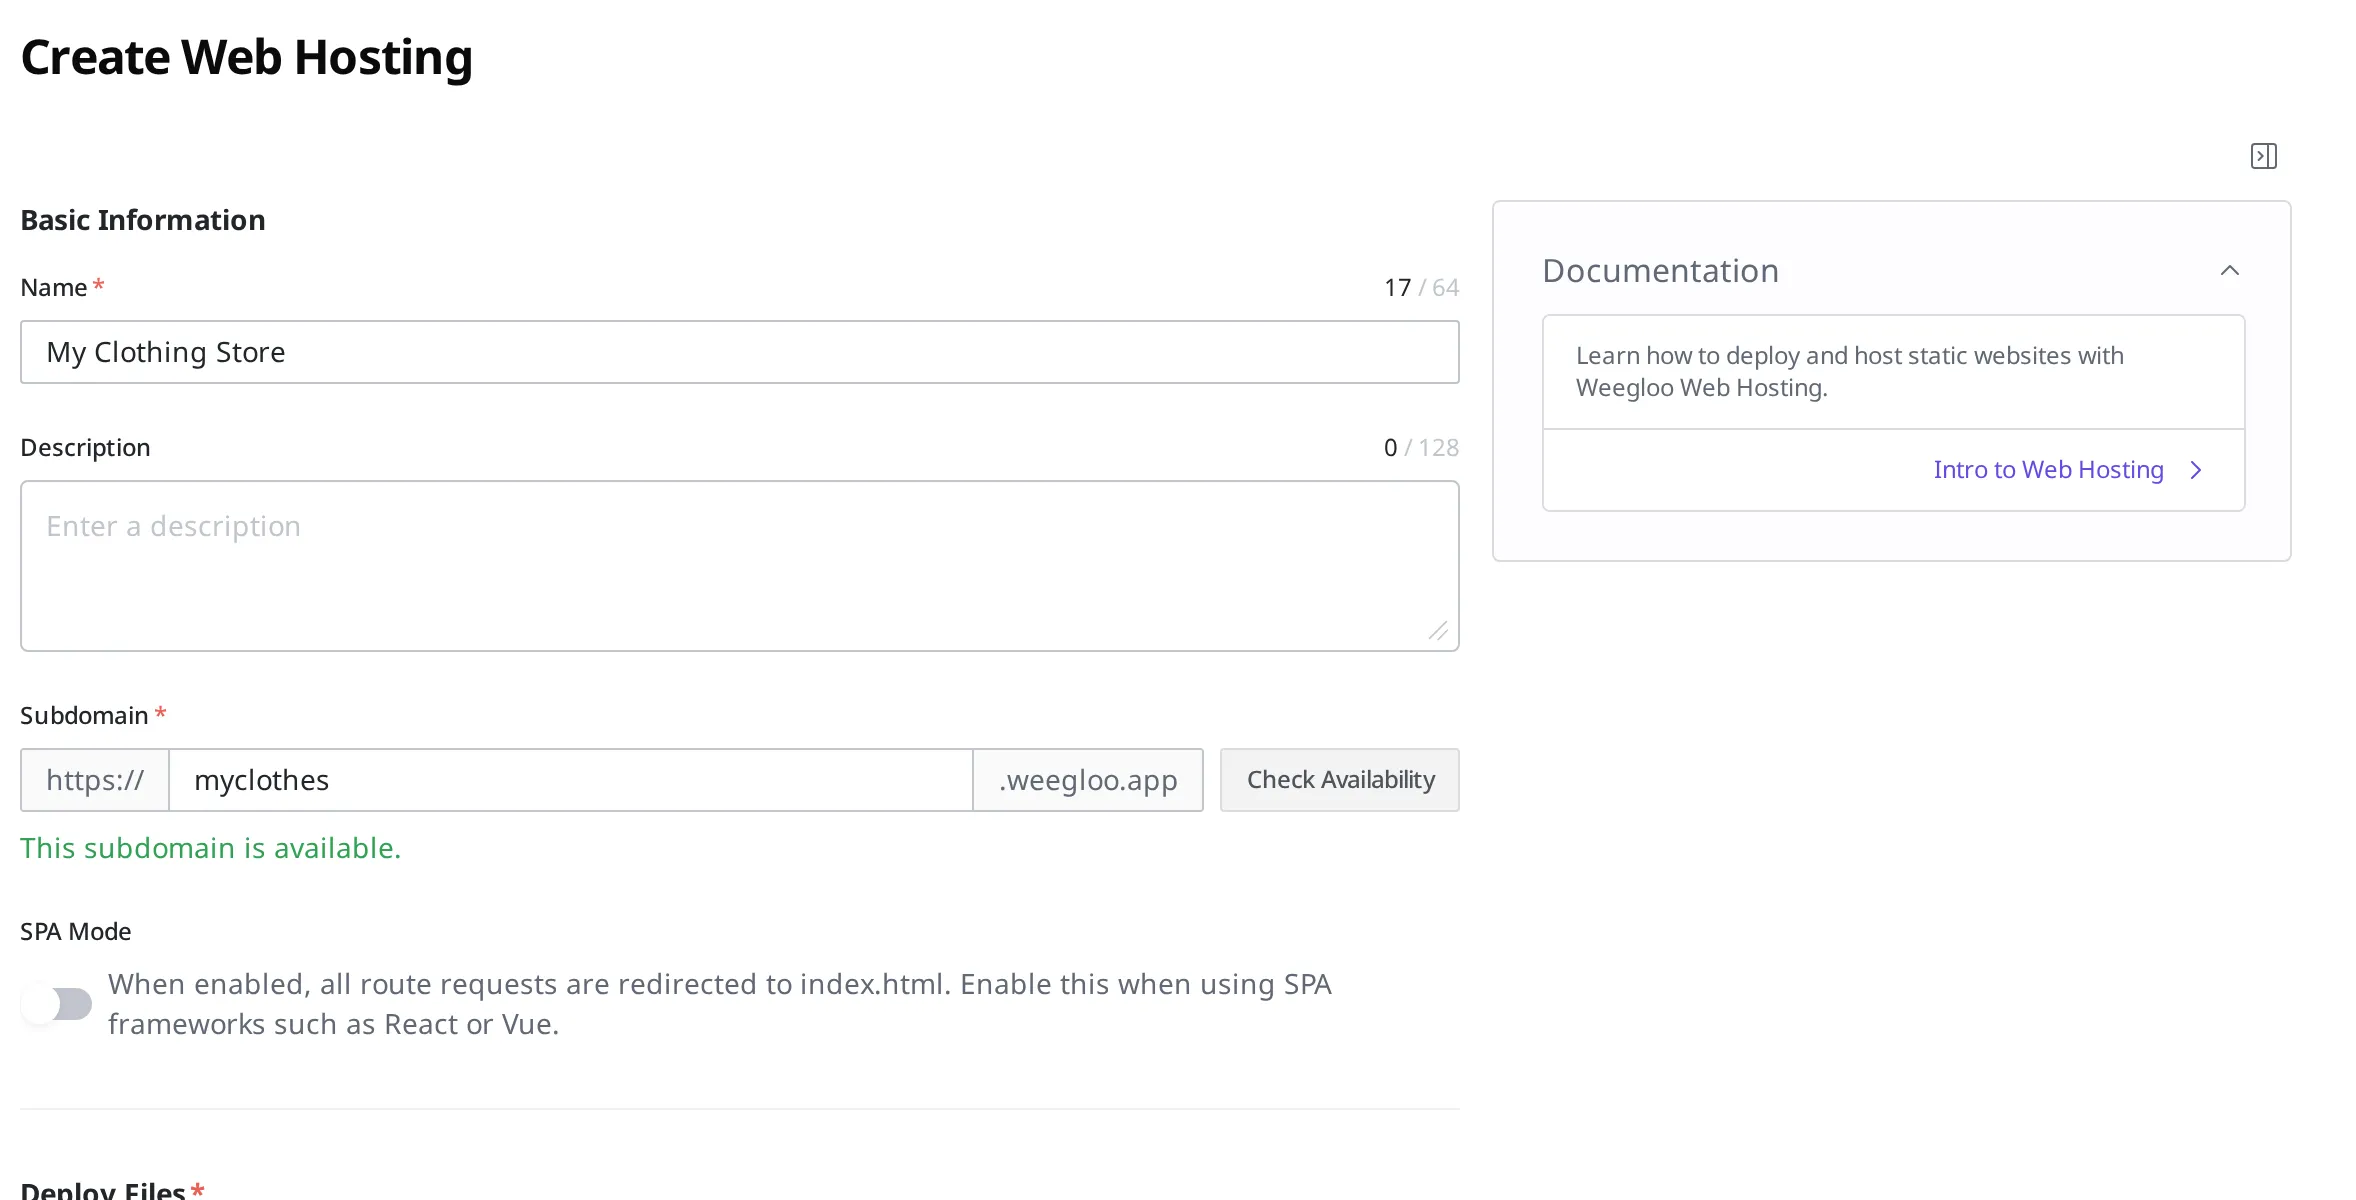
- Open the Web Hosting screen in the clothing store Space settings.
- Press the Create button at the top right.
- Enter
My Clothing Storein the name field. This name is so you can recognize later which site it is. - Enter
myclothesin the Subdomain field. - Press Check Availability to check whether that address is available. You are good to go when it shows This subdomain is available.. If it is already in use, choose a different address.
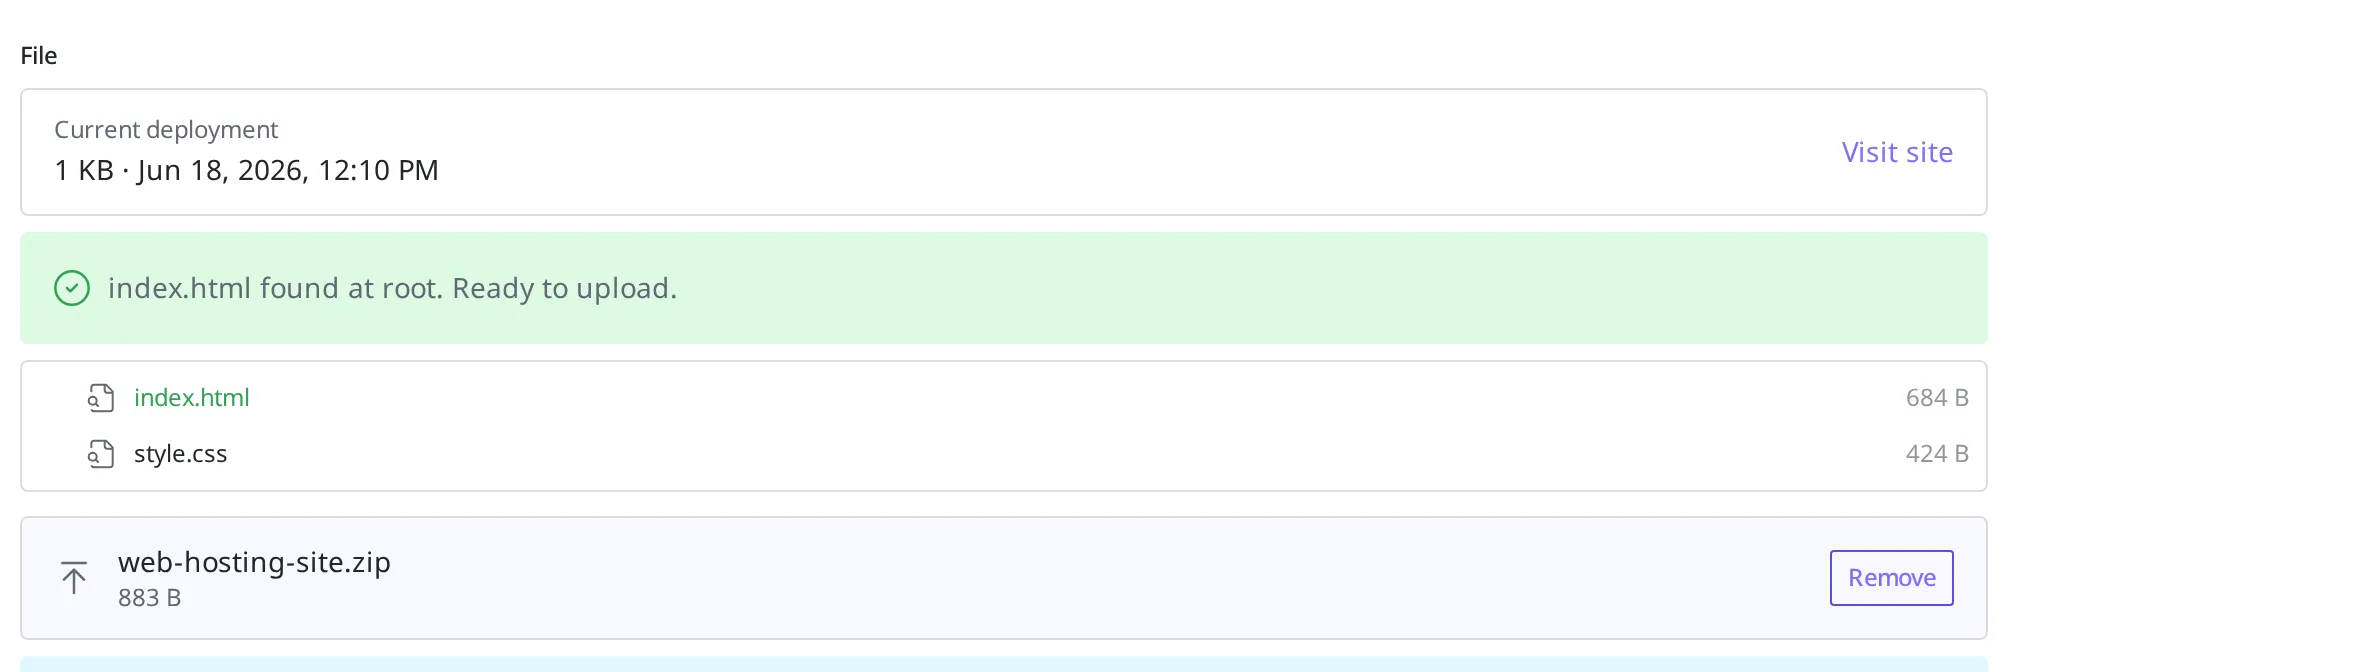
- Upload the page-file bundle you prepared earlier to Deploy Files. If
index.htmlis at the top of the bundle, it shows index.html found at root. Ready to upload.. - Press the Create button to deploy.
The uploaded bundle goes through the steps to set it in place and then goes public. Once it is ready, the address you can use to reach the site (a .weegloo.app address containing myclothes) appears on screen. Press that address to check that the site opens correctly. When the clothing store's products show up on screen, it worked.

Uploading again after changing the site
A site is not done once you upload it. For a clothing store, you will add new seasonal products or change the page design. When you change the site this way, you turn the changed page files into a single bundle again and upload it anew to the same Web Hosting. You keep the address as is and just swap out the contents. Once it switches to the newly uploaded content, customers come in at the same address and see the updated site.
To upload again, open that Web Hosting screen, upload the changed bundle to File, and press Save. The bundle rules are the same as the first time when you upload again. There must be 100 files or fewer, and index.html must be at the top.
Switching to your own domain
The address used so far, like myclothes.weegloo.app, is a free address that WEEGLOO hands out. If you have your own domain bought separately under the store name (for example myclothes.shop.com), you can switch things so customers come in at that address. You leave the site you already uploaded as is and only connect the incoming address to your own domain.
You do this on the detail screen of a Web Hosting that has finished deploying.
- Enter the domain you want to show customers (for example
myclothes.shop.com) in the Custom Domain field. - Once you enter it, the Connect Domain button becomes pressable. Press it to start connecting.
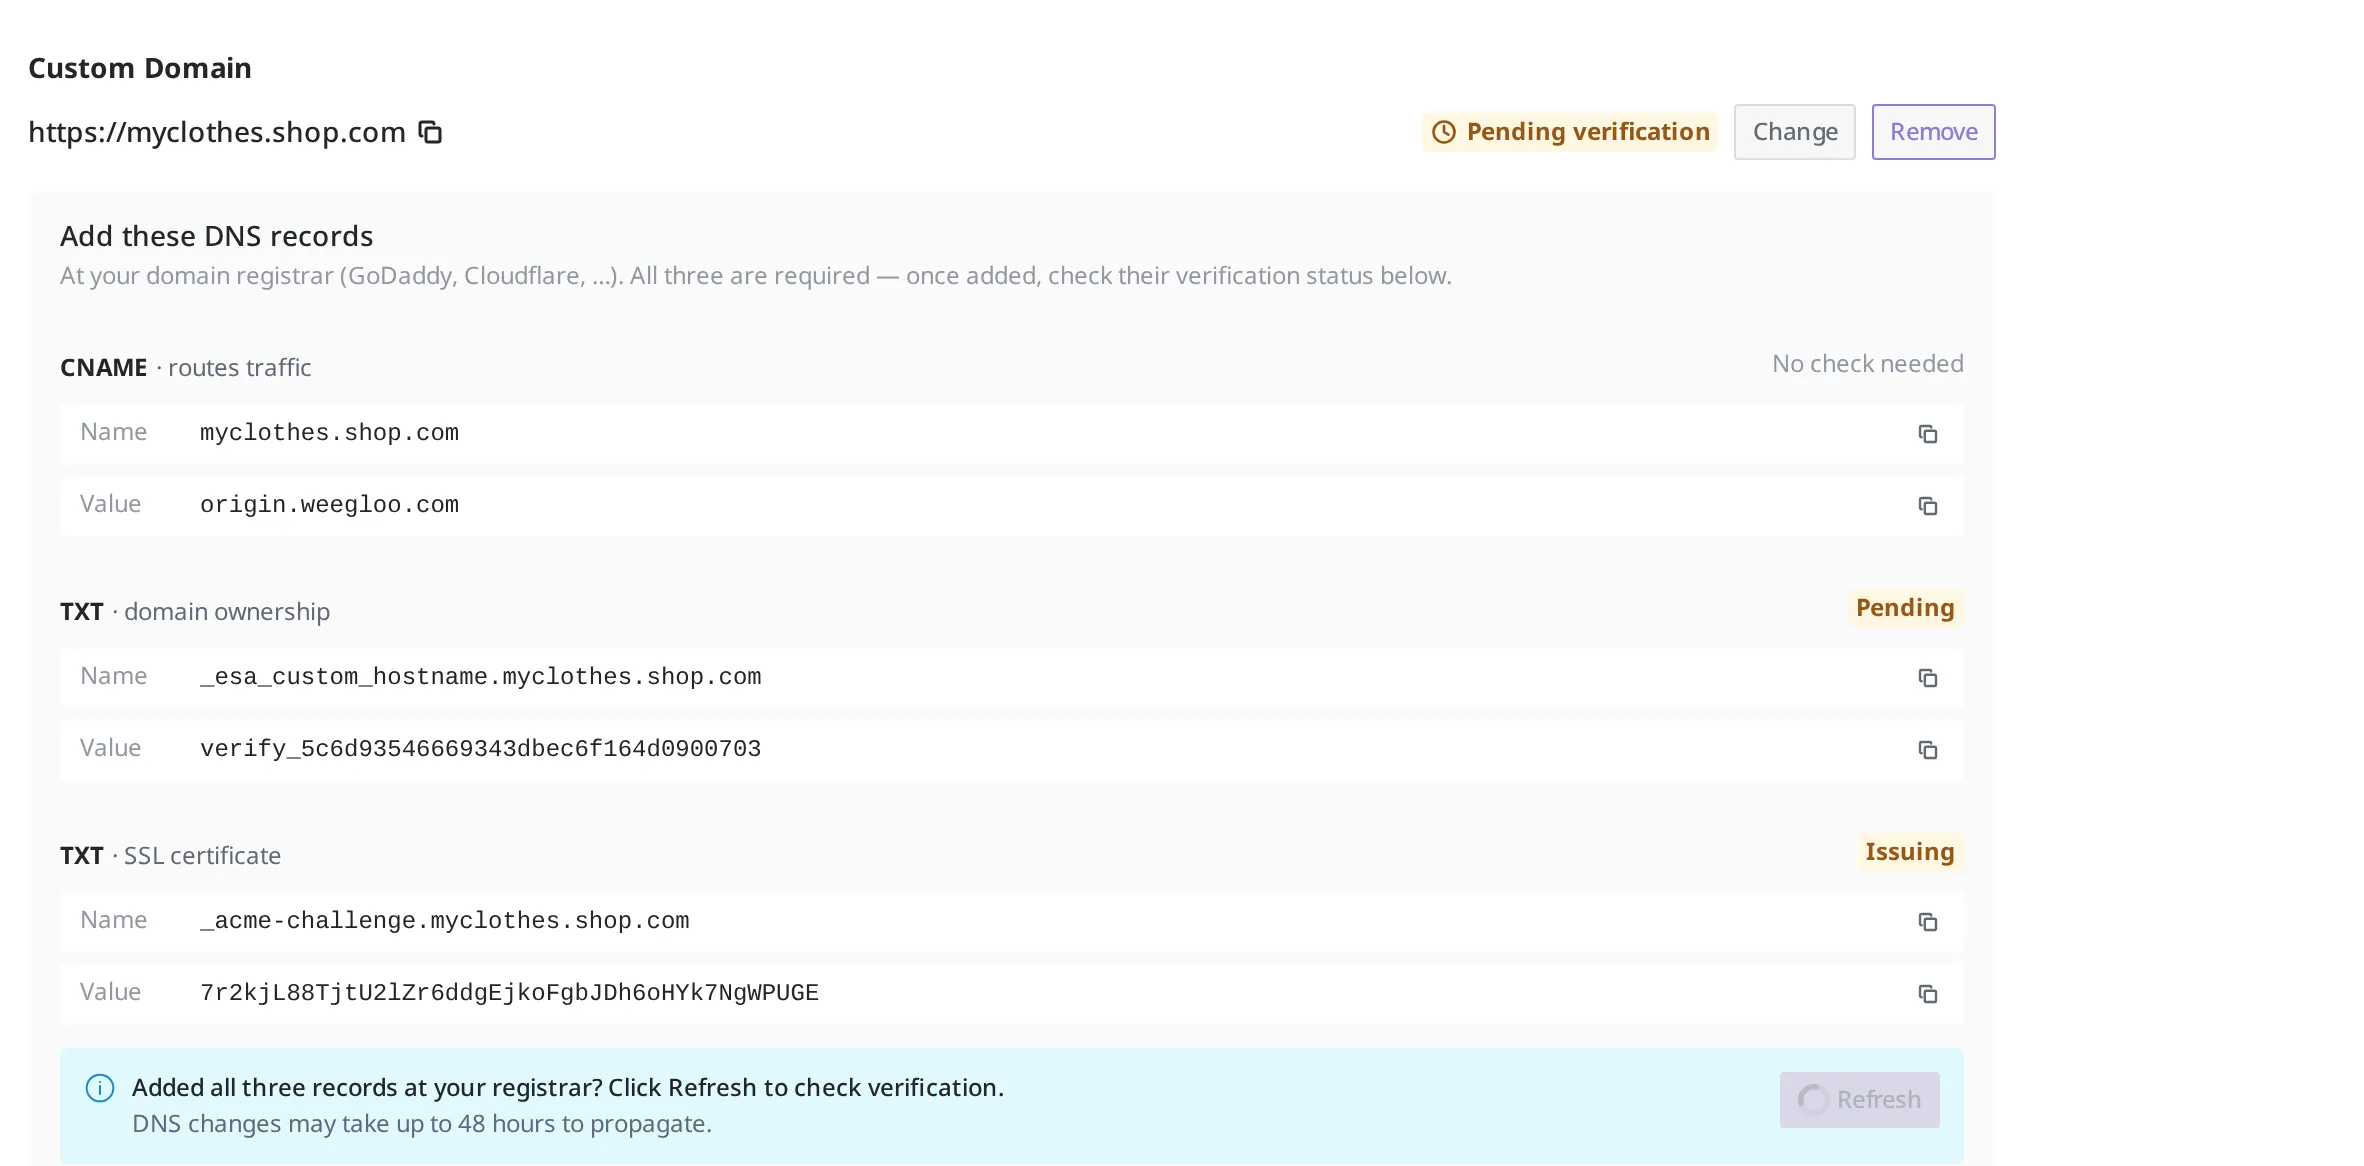
- Three DNS records to register with your domain provider appear on screen. Each record consists of a type, a name (
Name), and a value (Value).- Traffic routing (
CNAME): the path that sends customers from your domain to the actual site. - Domain ownership (
TXT): a value that confirms the domain is really yours. - SSL certificate (
TXT): a value used to obtain a secure connection (https, which puts a padlock in the address bar).
- Traffic routing (
- Copy these three lines exactly as shown on screen into the settings of the place where you bought the domain (a domain management provider, for example GoDaddy or Cloudflare) and register them. Enter the type, name, and value identically.
- Once you have finished registering, press Refresh to check the verification status. Changes can take time to spread across the internet (up to 48 hours), so if it is not confirmed right away, press it again a little later.
- When all three records are confirmed, your domain is connected to the site. Customers now come in at
myclothes.shop.comand see the same site.
To connect your own domain, you have to own that domain first. You buy a domain not from WEEGLOO but separately from a domain management provider. The free address (.weegloo.app) stays usable alongside it even after you connect a domain. Once connected, you can swap the domain with Change or break the connection with Remove.
What to do next
- Tokens: for a public site to read and show the products in your content studio, it needs a Delivery Access Token. This issues the key to put into your site.
- API Reference: covers technical specifications such as the request formats needed to work with Web Hosting directly from a program or to upload a file bundle.