

Tokens
Imagine you have built a clothing store. You want the products you registered in the content studio to be pulled in and shown on the storefront site that your customers see. But that site is a program, not a person. It cannot log in with an ID and password the way a person does. A token is the secret key you issue so that a site or program can access your content in place of a person.
Think of a token as a single key that opens a lock. Whoever holds this key can work with content within a set scope, without logging in. That is why a token must be handled exactly like a password. You should not show it to just anyone, and if it leaks, whoever holds it can use that same access.
WEEGLOO has three kinds of keys for different purposes: a powerful key that stands in for your whole account (Personal Access Token), a read-and-write key for content within a single Space (Space Access Token), and a read-only key for reading content out to a public site (Delivery Access Token). On this page you will look at what each of the three keys is and when to use it, then issue them yourself in the content studio.
The three keys serve different purposes
Here is a side-by-side look at how the three differ.
| Personal Access Token | Space Access Token | Delivery Access Token | |
|---|---|---|---|
| Where it applies | the whole account that issued it | within one specific Space | within one specific Space |
| Read and write | both read and write | both read and write | read only, on Published content |
| Where to keep it | only inside a server | anywhere, server or client, by narrowing its role | can be placed in a public site |
| Permission scope | the account's permissions as-is (cannot be narrowed) | only as much as the bound SpaceRole | only as much as the bound SpaceRole |
| What to use it for | management work spanning the whole account | a server or client that writes content to one Space (for example, leaving posts without logging in) | when a public site reads and shows published content |
The key point is this. A Personal Access Token is close to a master key that stands in for a whole person's account, a Space Access Token is a key that reads and writes content only within a single Space, and a Delivery Access Token is a read-only key that only reads published content. Pick the key that fits based on whether what you are doing spans the whole account, writes within a single Space, or only reads on a public site.
A key tied to an account: Personal Access Token
A Personal Access Token is a key that uses the permissions of the account that issued it directly. With this key, you can do, without logging in, everything that account can do in the content studio. That extends to management work such as registering products, editing them, and publishing them.
That is what makes this key powerful. If you hand it to a program that automatically uploads and edits content in place of a person, that program can work just like the account's owner. You need this key for management work that has to move across several Spaces or handle Space settings. Conversely, for work where you only need to read and write content within a single Space, it is safer to narrow the permissions with the Space Access Token described later, instead of this key that stands in for the whole account.
Because it is powerful, it needs to be handled with care. Do not put this key into a public client that is delivered to customers. If you put it somewhere public, anyone can pull the key out, and whoever gets hold of it can use the issuing account's permissions as-is. When you only need to pull in products and show them on a public site, use the Delivery Access Token below instead of this powerful key.
For a Personal Access Token, you only set a name when you issue it. You do not choose a permission scope separately, because it inherits the permissions the issuing account already has.
A key that reads and writes within one Space: Space Access Token
A Space Access Token is a key used only within one specific Space. Unlike a Delivery Access Token, which can only read, this key can read the content in that Space and also write it. A program can register new products or edit them in place of a person, without anyone logging in.
For example, imagine you want to let customers leave inquiry posts on your clothing store site without logging in. The client the customer uses has to write that post into the clothing store Space, but a read-only Delivery Access Token cannot write posts. And if you put a Personal Access Token, which stands in for the whole account, into the client, then if that key leaks, not just the clothing store but everything the account can reach is at risk. The key for this situation is the Space Access Token, which can write, but only within a single Space. Letting a customer's client write content like this is the representative use of this key, and you also use it when a server automatically registers and edits content.
A Space Access Token is valid only within a single Space. It can read and write the content of the clothing store Space, but it cannot look into another Space, change the Space's settings, or touch the organization and account. That is why, even for the same write work, it is safer than a Personal Access Token.
Where you keep this key depends on its use. You can keep it on a server, or in a client the customer uses. Safety comes not from hiding the key somewhere, but from narrowing the role you bind to match its use. So next, how you bind the role matters.
Bind a role to set what it can read and write
When you issue a Space Access Token too, you set how far this key can go with a SpaceRole (role) and bind it together. Unlike a Delivery Access Token's role, which sets "how far it can read," a Space Access Token's role sets "how far it can read and write."
You narrow the bound role to match where the key is placed. For a key that automatically registers and edits products on a server, bind a role that allows only Read, Create, and Edit on products (Content) and leaves out Delete and Publish. On the other hand, for a key placed in a customer's client that only takes inquiry posts, bind a narrower role that allows only creating (Create) a new "inquiry post." That way, even if this value leaks, neither can do anything beyond what each was allowed.
Do not bind the Administrator role, which can handle everything. The more a key can also write, and especially the more it sits somewhere customers can see, the safer it is to bind a role narrow enough that you could tolerate a leak.
How to create a role that allows writing is covered in Roles and Permissions. The "Product Editor" role created on that page is an example of a write role that allows registering and editing products.
A key that only reads within one Space: Delivery Access Token
A Delivery Access Token is a read-only key that works only within one specific Space. With this key you can only read content that is in the Published state within that Space. Content in the unpublished Draft state cannot be read with this key, and you cannot edit or delete anything either.
This is exactly the key the storefront site uses when it pulls in products and shows them to customers. The site only needs to display products, not register or delete them, so a narrow key that can only read is enough. Even if this key leaks, only published content can be read with it, and it cannot damage your content.
What it means to publish (Published) content, and why content must be published before it is made publicly available (delivered) externally, is covered in States and Publishing.
Bind a narrow role to limit what it can read
When you issue a Delivery Access Token, you set how far this key can read with a SpaceRole (role) and bind it together. A role is a permission bundle that defines "what can be done, and with which actions." When you bind a role to a key, that key can read only as much as the bound role allows.
For a storefront site you only need to read "products," so create a narrow role that allows only Read on products (Content) and bind it. That way, even if this key leaks, only product information can be read, and other content or member information does not leak with it.
Do not bind the Administrator role, which can handle everything. Administrator is the highest-privilege role that can handle everything in that Space. Binding such broad access to a public-site key that only needs to read raises the risk if the key leaks. It is safer to create a separate role narrowed to read only what is needed and bind that.
How to create roles and narrow permissions is covered in Roles and Permissions. Use that page to create, in advance, the role that allows only product Read, to bind to your public-site key.
Use Allowed referrers to set which sites can use the key
If the bound role sets what this key can read, Allowed referrers sets where this key can be used. It sits at the bottom of the creation screen, and you can change it after issuing as well.
The initial value is No restriction. In that state, content is delivered no matter which site asks for it. When you choose Allow only the referrers I list, a field for entering an address appears, and from then on only requests coming from the addresses you have listed here get through. If your clothing store's address is https://shop.example.com, you list that address. Then, even if the value of this key falls into someone else's hands, it does not work outside the clothing store site.
You can list several addresses. Press the Add button and one more field appears; press the delete icon to the right of a field and that line goes away.
To allow every address that sits under shop.example.com at once, put *. at the front and write it as https://*.shop.example.com. Written that way, it covers every address with something in front, such as event.shop.example.com. Even so, https://shop.example.com itself is not included. If you need to allow both, add https://shop.example.com as a separate line too.
This list works for the case where a customer opens the site in a browser and the site pulls in content. If a program running on a server uses this key instead of a site, there is no way to tell which site the request came from, so leave No restriction in place for that kind of key.
Handling the issued secret value
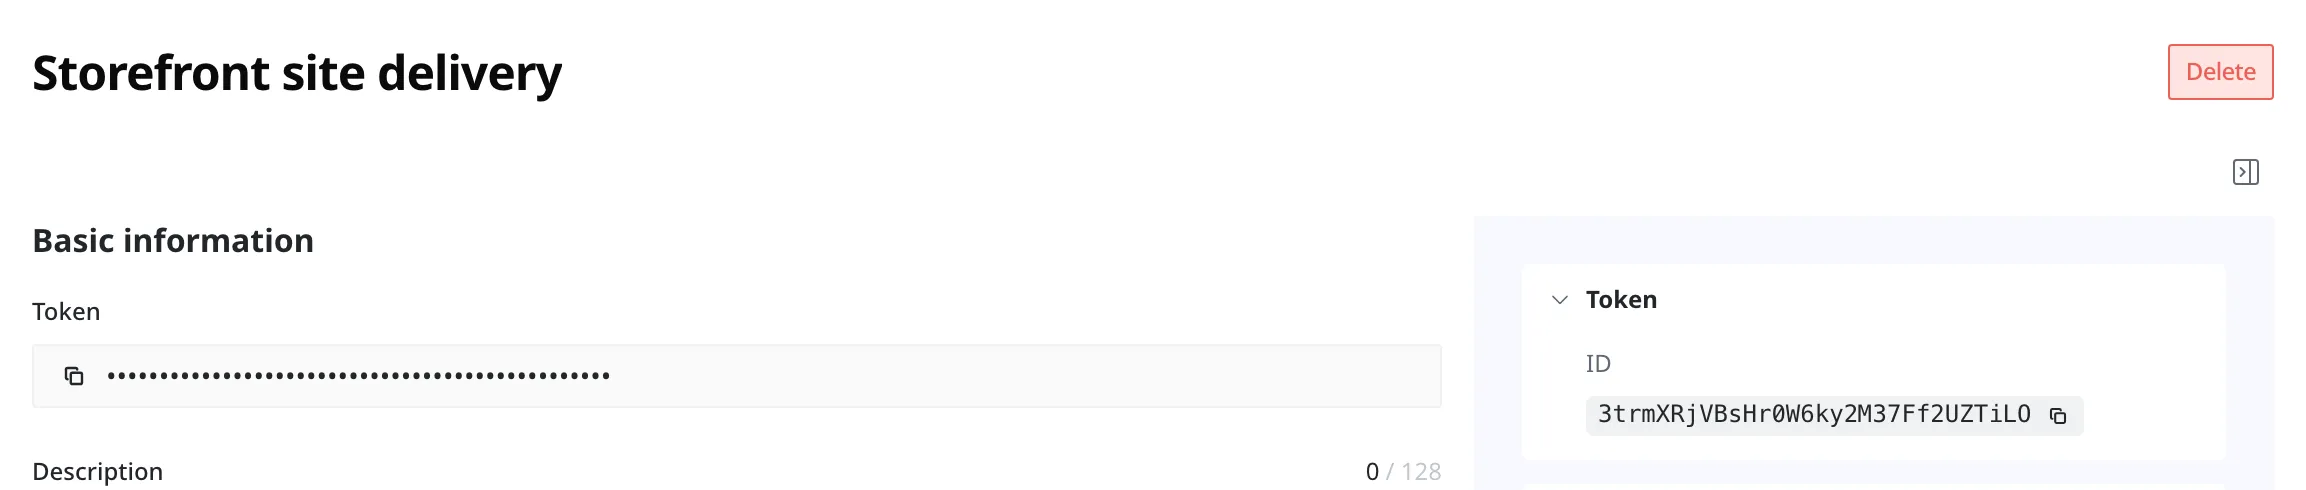
For all three keys, once issuing is finished, you move to that key's detail screen. The secret token value sits in the Token field under Basic information, and pressing the Copy button on its left copies the whole value. The value is longer than the field, so its end looks cut off on screen, but what gets copied is the whole value. This value is the key itself, and you use it when you put the key into a server or a site. Even if you did not copy it right after issuing, you can come back to this detail screen later and copy it. The ID under the Token item in the right-hand panel is an identifier that points to this key, not a secret value.
The keys, however, belong in different places.
- Handle a Personal Access Token like a password. Because it is a powerful key, keep it only inside a server, and do not put it into a public client that customers see or into code that others can view.
- For a Space Access Token, match where you keep it to the role you bind. For a key kept on a server, bind a write role scoped to just what is needed; for a key kept in a client delivered to customers, bind a role narrow enough to tolerate a leak (for example, creating only one kind of post). Do not bind Administrator or a broad write role to a key kept somewhere public.
- A Delivery Access Token, on the other hand, is meant to be placed into a public site that customers see. Anyone who opens the site can effectively see this value, but because you have bound a narrow role to it, even if someone takes the value they cannot do anything beyond the read scope that role allows. So putting it into the site itself is not a problem. And if you also list your storefront site's address under Allowed referrers, then even if the value falls into someone else's hands it cannot be used outside that site. Just do not spread it carelessly outside the site where you intend to use it.
If you lose a key, or it seems to be used in a way you did not intend, you can delete that key, issue a new one, and swap it in.
Issuing a Personal Access Token
Issue a Personal Access Token to hand to the program that automatically uploads new products every night.
- Open the Personal Access Token screen in your account settings.
- Press the Create button at the top right.
- Enter
Nightly New Arrivals Uploadin the name field. This name is so you can later tell what purpose the key was made for. - Press the Save button to issue it.
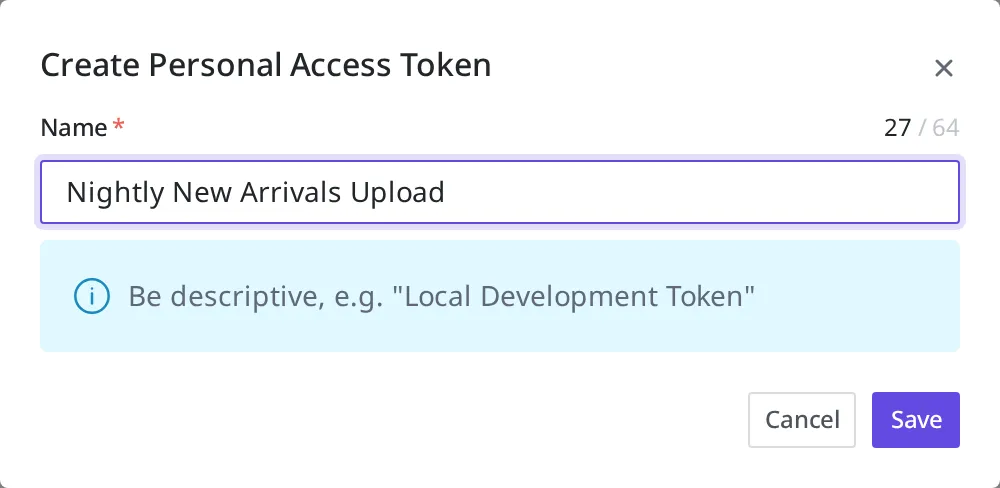
Once issuing is finished, you move to that key's detail screen. Copy the secret token value from this screen as described in Handling the issued secret value, and store it somewhere safe on the server where this program runs.
Issuing a Space Access Token
This time, issue a Space Access Token for a server that will automatically register products in the clothing store Space. This key is used in the clothing store Space, and you bind it together with a role that can register and edit products.
First, the role to bind to this key must already exist in the Space. Use Roles and Permissions to create, in advance, a role that can Read, Create, and Edit products (Content). Below, assume you have created that role under the name Product Editor.
The issue-and-manage screen is inside the same Space settings as the Delivery Access Token.
- Open the Space Access Token screen in the settings of the clothing store Space.
- Press the Create button at the top right of the list. The Space Access Token creation screen opens.
- Enter
New Arrivals Auto-register Serverin the Name field. - In SpaceRole, choose
Product Editor. Do not choose Administrator. - Leave Allowed referrers on No restriction. This key is used on a server, not on a site.
- Press the Create button at the top right of the screen to issue it.
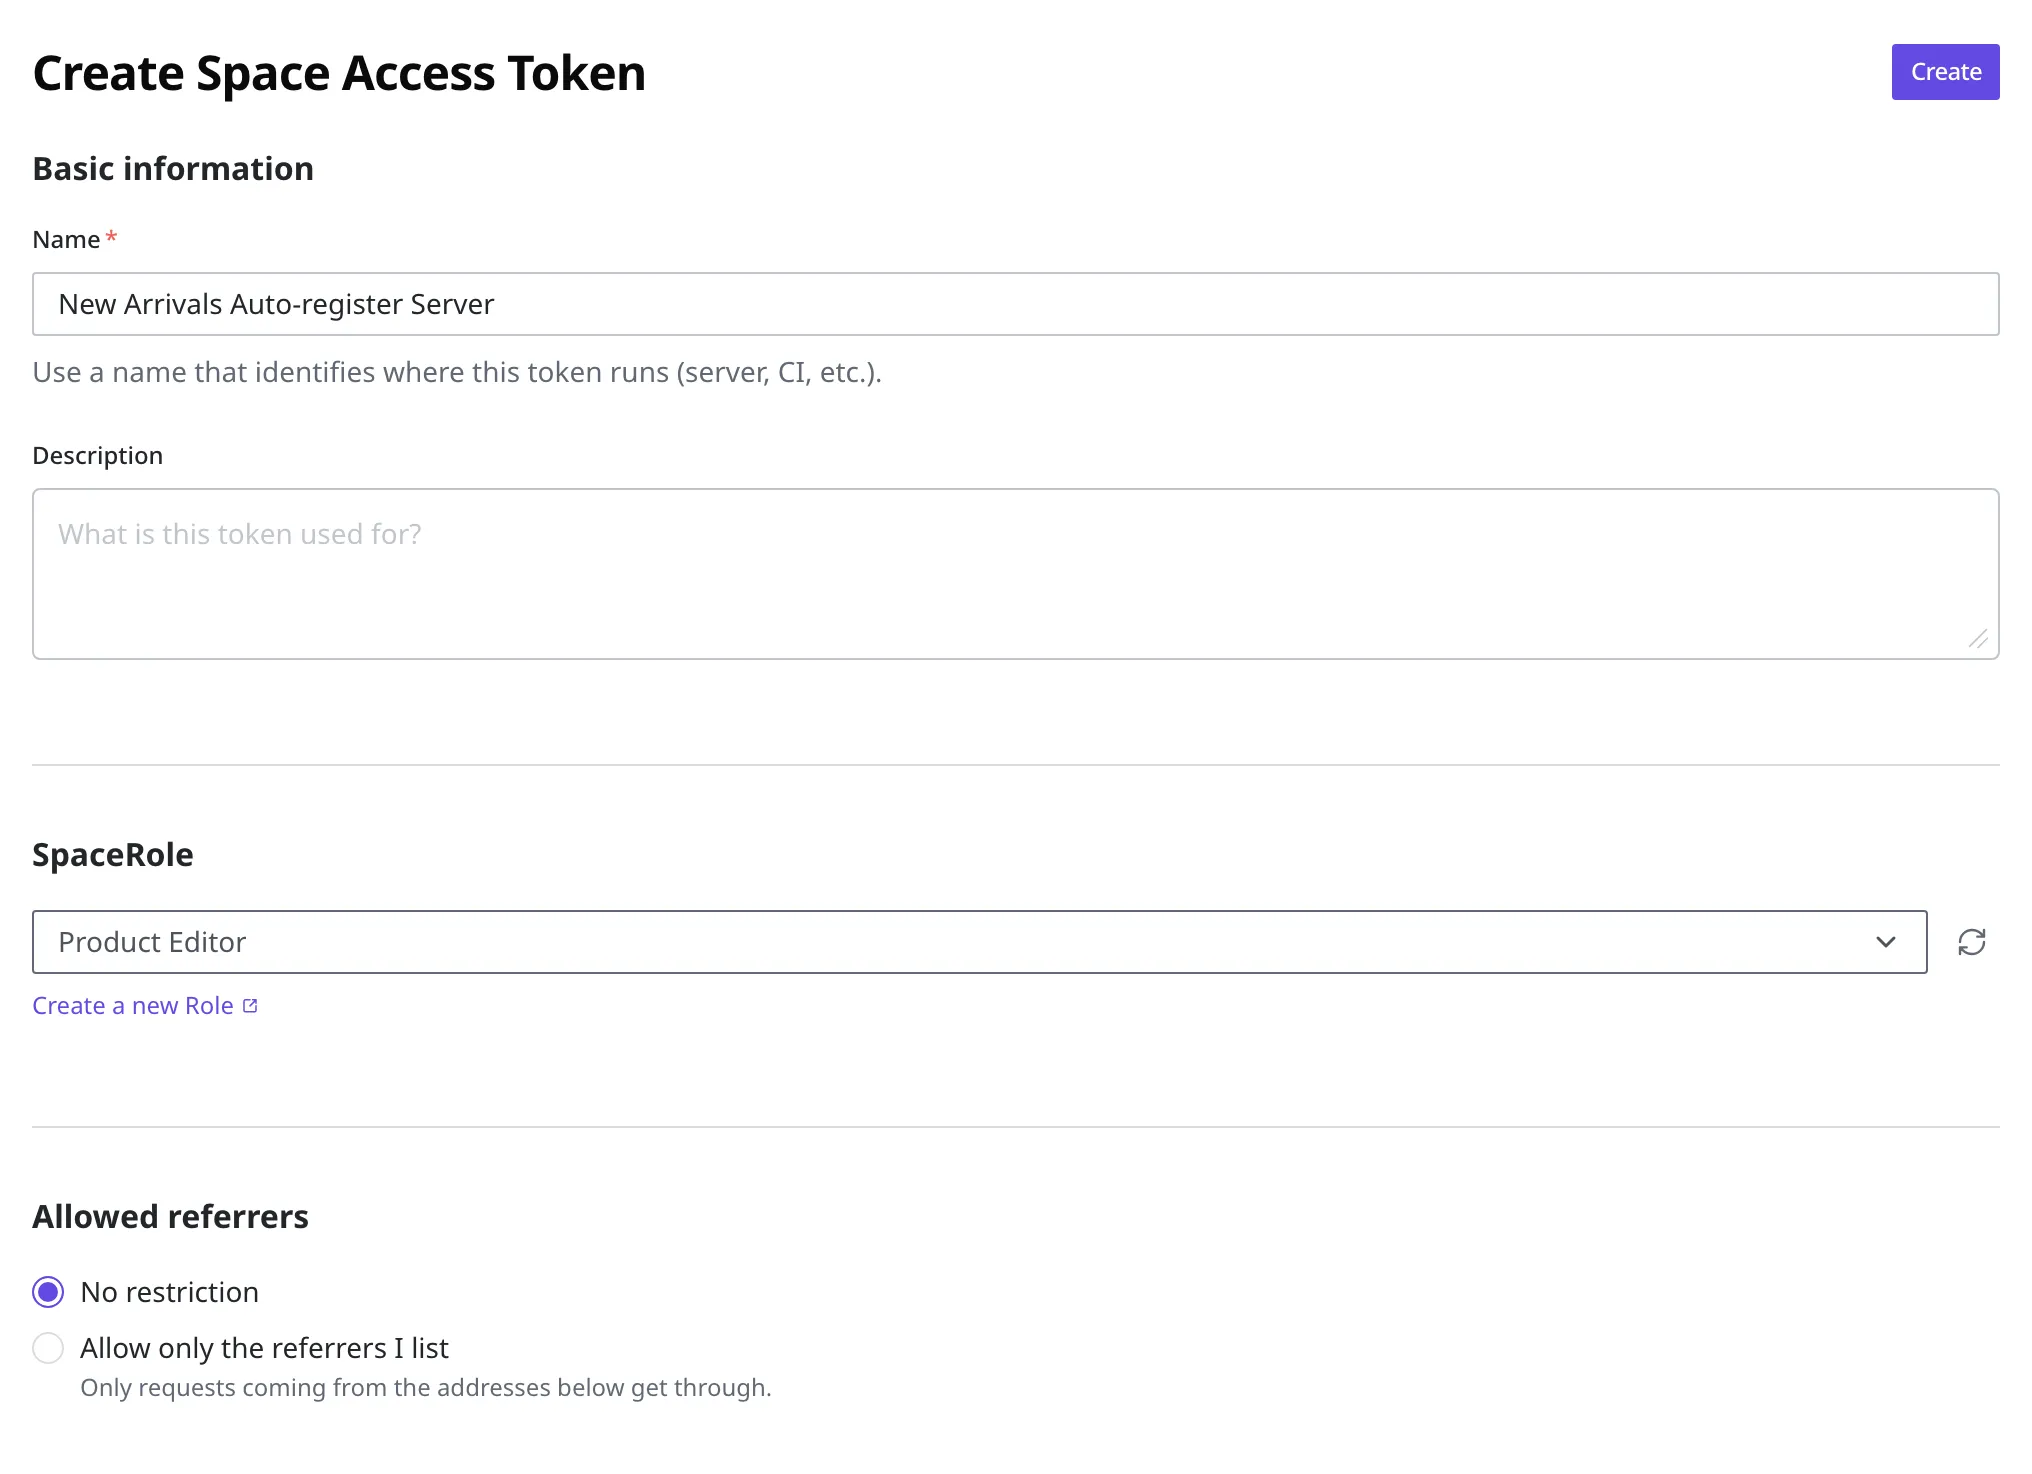
Once issuing is finished, you move to that key's detail screen. Copy the secret token value from this screen as described in Handling the issued secret value and store it somewhere safe. Here you bound a role that can register and edit products, so use this key on the server that needs that role. If you have to place it directly in a client the customer uses, issue a separate key bound to a narrower role you could tolerate leaking. For such a key that is delivered to customers, also list that site's address under Allowed referrers.
Issuing a Delivery Access Token
This time, issue a Delivery Access Token for the storefront site to use when it pulls in products and shows them. This key is used in the clothing store Space, and you bind it together with a narrow role that can read products.
First, the role to bind to this key must already exist in the Space. Use Roles and Permissions to create, in advance, a role that allows only Read on products (Content). Below, assume you have created that role under the name Product Read-only.
-
Open the Delivery Access Token screen in the settings of the clothing store Space.
-
Press the Create button at the top right of the list. The Delivery Access Token creation screen opens.
-
Enter
Storefront site deliveryin the Name field. -
In the Description field, you can note what this key is used for. (This is optional.)
-
In SpaceRole, choose
Product Read-only. Do not choose Administrator.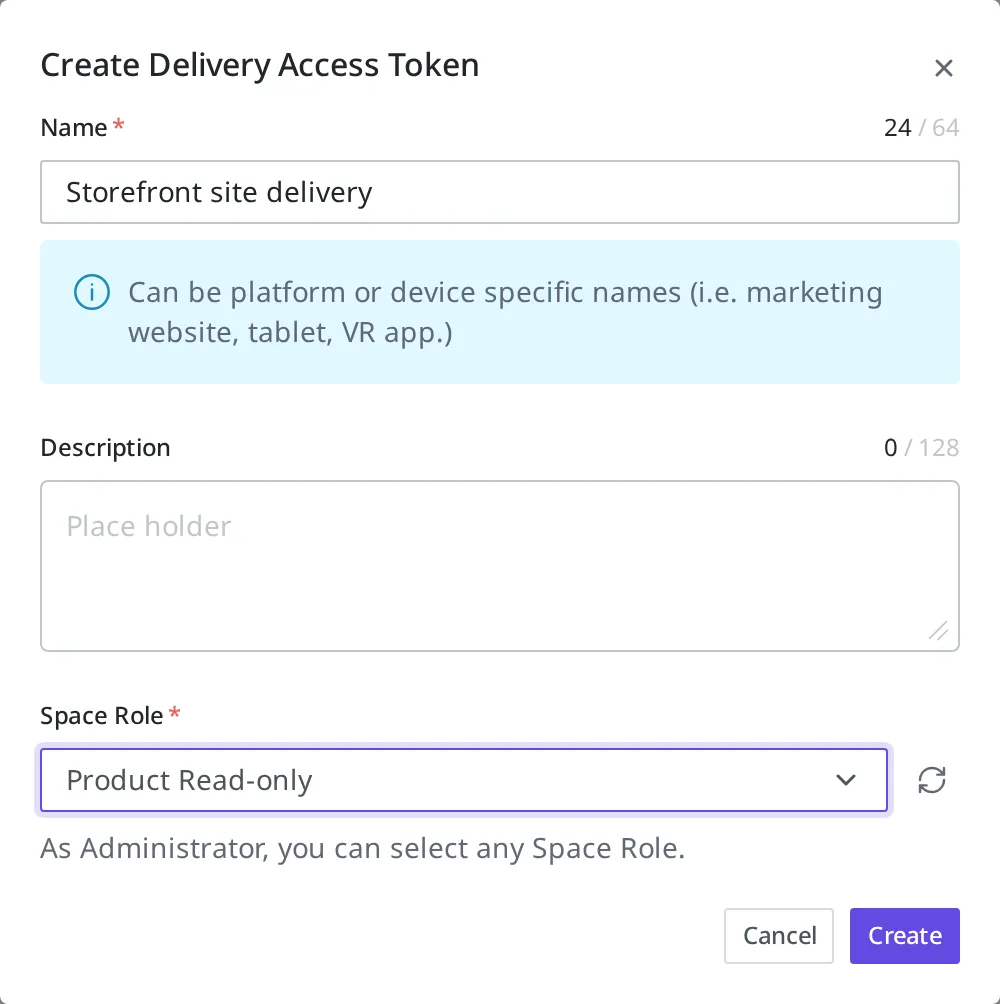
-
Under Allowed referrers at the bottom of the screen, choose Allow only the referrers I list. This setting ties the key to your storefront site only.
-
Enter
https://shop.example.comin the field that appears. -
Press the Add button.
-
Enter
https://*.shop.example.comin the new field.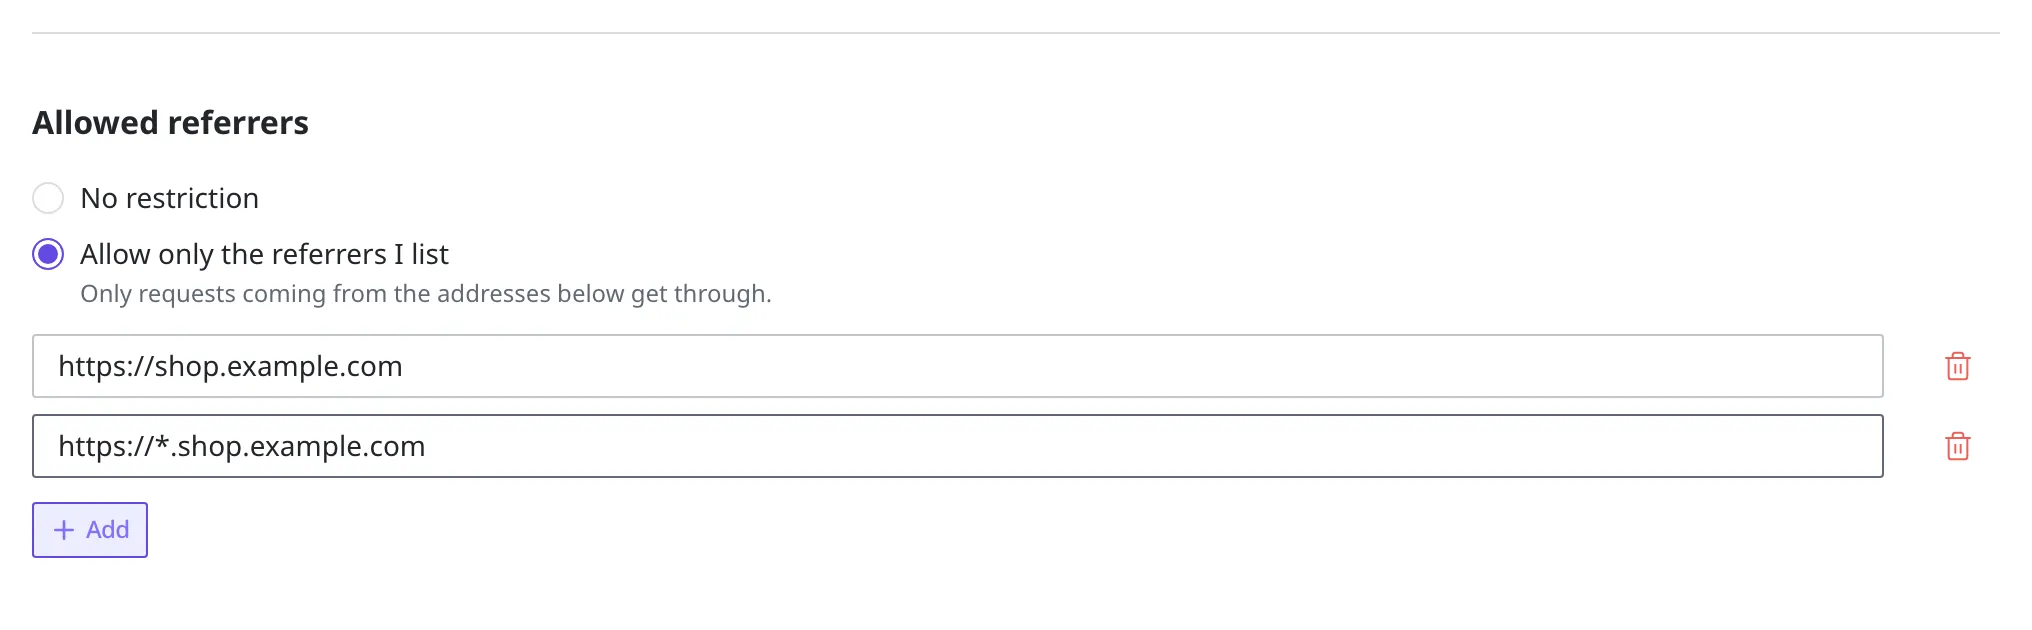
-
Press the Create button at the top right of the screen to issue it.
Once issuing is finished, you move to that key's detail screen. Copy the secret token value from this screen as described in Handling the issued secret value and put it into your storefront site.
Delete keys you no longer use
It is safer to delete a key you have stopped using rather than leaving it in place. Find the key you no longer use in the token list and delete it. Once you delete a key, it can no longer be used for access. The same goes when a key seems to have leaked. Delete the suspect key, issue a new one, and swap it in.
What to do next
- Roles and Permissions: Create the read-only role to bind to a Delivery Access Token and the read-and-write role to bind to a Space Access Token.
- States and Publishing: A Delivery Access Token reads only content in the Published state. Learn what publishing is.
- Space Access Token: Covers the technical specifications, such as the request format, that you need when issuing a Space Access Token from a program or reading and writing content with this key.
- Delivery Access Token: Covers the technical specifications, such as the exact notation rules for the addresses you list under Allowed referrers and the request format you need when handling this key from a program.
- API Reference: Covers the technical specifications, such as the request format, that you need when issuing other tokens or handling content directly from a program.